In the summer of 2019 LINBIT® and NuoDB collaborated on some testing to see how well the two performed together in Google Cloud Platform (GCP). The original blog can still be read here if you’re curious what was written. Spoiler: NuoDB and LINSTOR® performed very well together, with LINSTOR’s synchronous replication between zones adding negligible overhead to the performance of NuoDB’s Storage Manager (<5% reduction to the transactions per second).
Way back in 2019 you had to deploy a LINSTOR cluster “by hand” and then integrate it into Kubernetes using the LINSTOR CSI driver for Kubernetes. That meant it wasn’t very practical to run LINSTOR in managed Kubernetes environments, like Google Kubernetes Engine (GKE) or Amazon’s Elastic Kubernetes Service (EKS), since you’d end up having to manage the LINSTOR cluster separately from your Kubernetes environment. You can still do it that way if you’d like or have a good reason to, but deploying LINSTOR has gotten much easier thanks to LINBIT’s Helm-deployed LINSTOR Operator. The LINSTOR Operator also makes using LINSTOR for persistent storage in managed Kubernetes environments possible.
Deploying NuoDB back in 2019 was done using an installation script that deployed NuoDB’s operator into Kubernetes. When checking the NuoDB documentation and reading that now NuoDB also uses Helm for their operator’s deployment I decided to write this updated blog that includes both the deployment and testing of NuoDB and LINSTOR in Amazon’s EKS.
Preparing EKS for LINSTOR
While most of the LINSTOR cluster’s initialization and configuration is handled by the LINSTOR Operator and a handful of YAML, there is one thing we must do before we start writing manifests to prepare our EKS instances for LINSTOR. We need to configure how we want our worker nodes provisioned using an EC2 launch template. The launch template allows you to add additional EBS volumes to your EKS worker instances, set your instance type, as well providing additional bootstrapping commands that will run before the nodes are added to the EKS cluster.
Creating the EC2 Launch Template
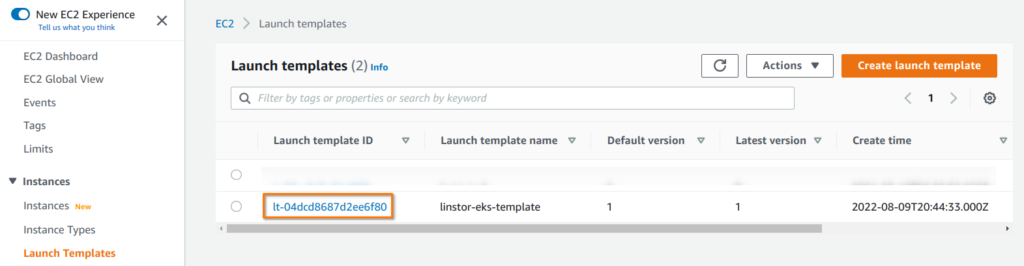
From the EC2 Dashboard, you should see “Launch Templates” listed under the “Instances” section.

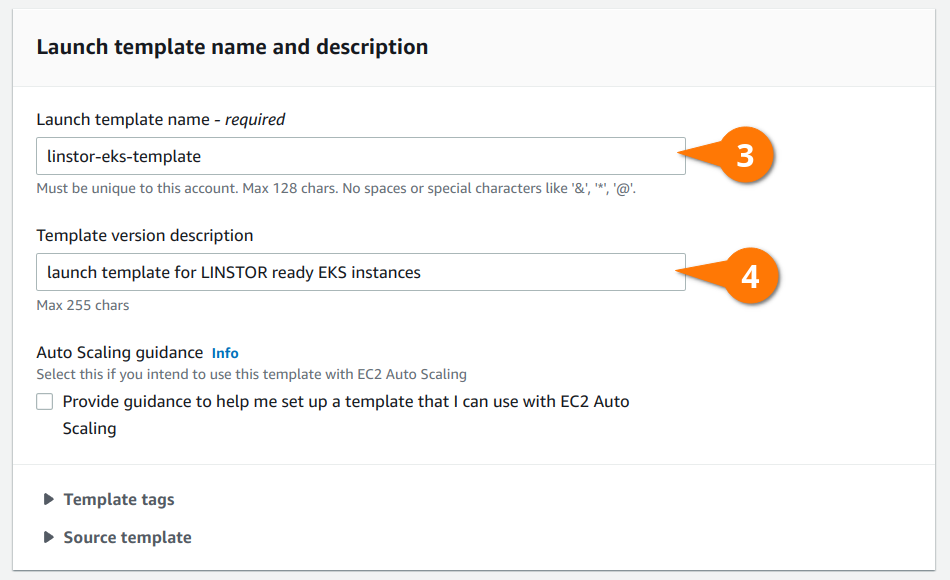
From the launch templates console, create a new launch template.

Give your template a meaningful name and description so you know what it is later.
You can leave the “Application and OS Images (Amazon Machine Image)” section blank, which will result in instances being created using the Amazon Linux 2.0 AMI.
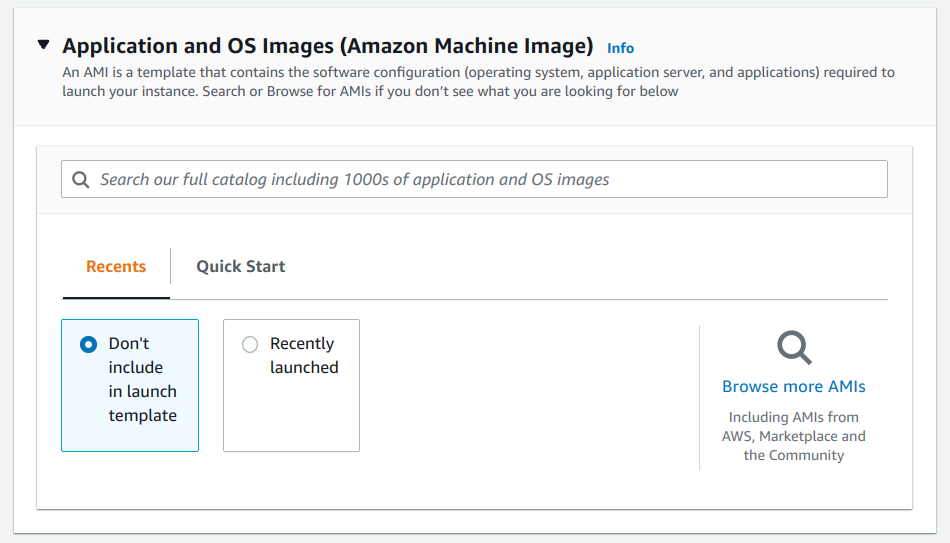
NOTE: If you select an Amazon Machine Image (AMI) that LINBIT packages kernel modules for such as Ubuntu, RHEL, or SLES, the LINSTOR Operator will be able to install the DRBD® kernel module without the need to install
kernel-develduring the bootstrapping process. However, you would need to set the appropriate Helm values depending on your AMI, as outlined in the Deploying with the LINSTOR Operator section of the LINSTOR User’s Guide.
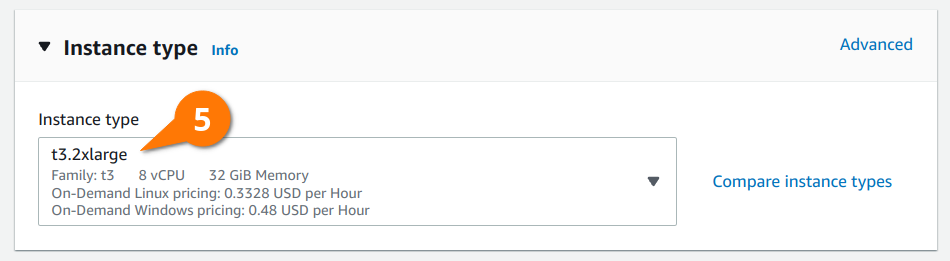
To run NuoDB with three transaction engines (TE) in a three node cluster, we need to use some larger instances to meet NuoDB’s CPU and memory requirements. You’ll need at least six vCPU for each instance. The t3.2xlarge includes eight vCPUs, which is more than enough to run NuoDB’s storage manager (SM) and transaction engine along side any of LINSTOR’s pods.
The volumes section of the launch template is where most of the configuration happens. LINSTOR is able to use a separate block device for DRBD’s metadata than the one used for provisioning persistent volumes. Doing so will result in better performance of your persistent volumes, but isn’t completely necessary if you’re not concerned with squeezing out every last drop of performance. We will use separate block devices in this blog because I want to compare LINSTOR’s performance while replicating across multiple AWS Availability Zones (AZs) to the non-replicated Elastic Block Storage (EBS) that is included with EKS later.
In the volume configuration below you’ll see two volumes: a larger 100 GiB volume that LINSTOR will provision persistent volumes from, and a smaller 4 GiB volume that LINSTOR will use for DRBD’s metadata. These devices will end up getting attached to the EC2 instances as /dev/nvme2n1 and /dev/nvme1n1, respectively.
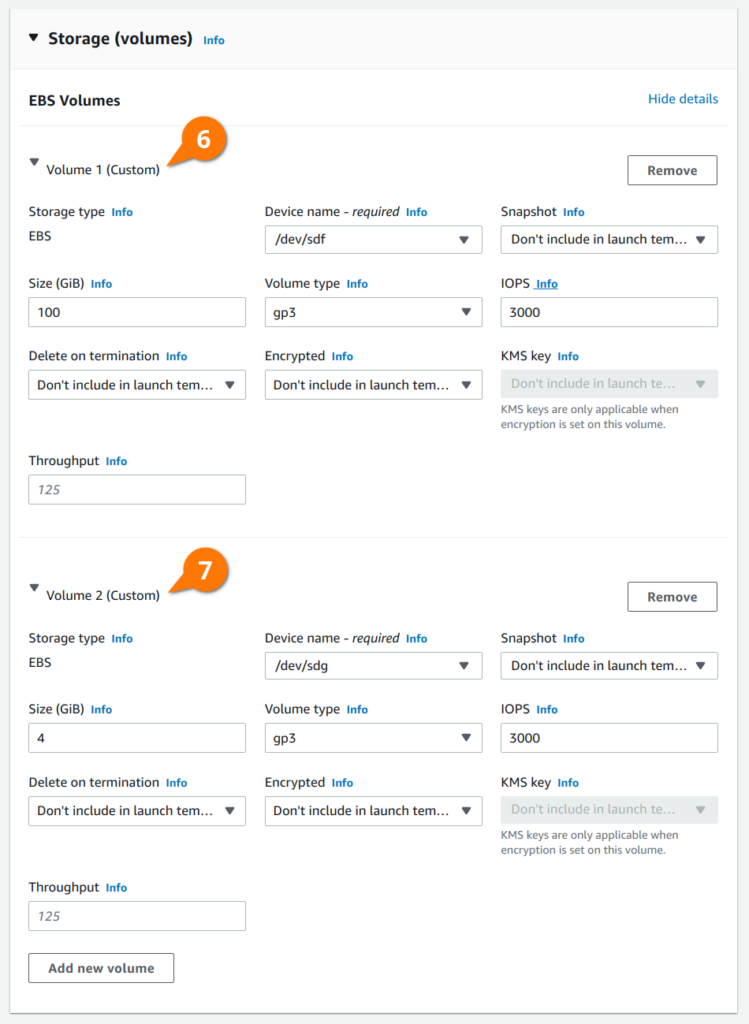
NOTE: Set the size of the larger volume according to your deployment’s storage requirements. The smaller volume should be sized relative to the size of your larger volume; the ratio of 32 MiB (metadata) per 1 TiB (data), per peer. 4 GiB is the smallest volume allowed by EBS, which will work for data volumes up to 64 TiB in size with three replicas of each volume.
Finally, under the “Advanced details” section, add the following user data script that will be merged into the EKS bootstrapping process. This will install the appropriate kernel-devel package on the EKS instance allowing the LINSTOR Operator to compile DRBD. Using the Compile method for the DRBD kernel module injection is a more robust option than relying on the prepackaged module RPM and DEB packages included in the LINSTOR Operator’s kernel module injector container images.

Here is the plain text of the user data pictured above for copy and pasting into your own launch template:
Content-Type: multipart/mixed; boundary="==BOUNDARY=="
MIME-Version: 1.0

--==BOUNDARY==
Content-Type: text/x-shellscript; charset="us-ascii"
#!/bin/bash
echo "Running custom user data script"
sudo yum install kernel-devel-`uname -r` -y

--==BOUNDARY==--\
You can now click the “Create launch template” button to create the template. Once created, you will be able to see the “Launch template ID” listed under your EC2 launch templates. You will need this ID later.
Configuring and Creating the EKS Cluster
We’ll use eksctl to create our EKS cluster. If you’re not familiar with eksctl or want to explore other options, you can refer to the Amazon EKS user guide where you’ll find instructions for getting started with eksctl. Once you have your AWS tools configured to manage your AWS account you can proceed to creating your EKS cluster’s configuration.
Create a file named eksctl-cluster.yaml and populate it with the details for your cluster. Specifically, you will have to adjust the launchTemplate.id to match the launch template you created previously, and the metadata.region to your desired AWS region.
$ cat << EOF > eksctl-cluster.yaml
apiVersion: eksctl.io/v1alpha5
kind: ClusterConfig
metadata:
  name: linbit-eks
  region: us-west-2
  version: "1.22"
managedNodeGroups:
- name: lb-mng-0
  launchTemplate:
    id: lt-0123456789abcdefg
    version: "1"
  desiredCapacity: 3
EOF
Use eksctl to create the EKS cluster from your configuration.
$ eksctl create cluster -f eksctl-cluster.yaml
Once the command above completes you will find the Kubernetes configuration for this cluster added to your kubeconfig file, which is the file that you have set in the KUBECONFIG environment variable or ~/.kube/config by default. If everything succeeded you should be able to see your EKS nodes listed in the output from the following command.
$ kubectl get nodes -o wide
Deploying LINSTOR into EKS
We’ve prepared EKS for LINSTOR and created our EKS cluster. We can now deploy LINSTOR. Both LINSTOR and NuoDB are deployed using Helm. If you don’t already have Helm installed, you can use the following one line command, or consult the Helm installation documentation, to install Helm.
$ curl https://raw.githubusercontent.com/helm/helm/main/scripts/get-helm-3 | bash
Create a namespace for LINSTOR in your EKS cluster.
$ kubectl create namespace linstor
Create a Kubernetes secret using the credentials for your LINBIT portal (customer or trial). If you don’t have this, you can reach out to LINBIT to start a trial by filling out the Contact Us form. Alternatively, you can use LINSTOR’s upstream — community supported but LINBIT developed — project named Piraeus Datastore.
$ kubectl create secret docker-registry drbdiocred -n linstor \
    --docker-server=drbd.io --docker-username=<lb-username> \
    --docker-email=<lb-email> --docker-password=<lb-password>
Add the LINSTOR repository to Helm.
$ helm repo add linstor https://charts.linstor.io
$ helm repo update
Configure LINSTOR’s options in a values file that will be passed to Helm during installation.
$ cat << EOF > linstor-op-vals.yaml
operator:
  controller:
    dbConnectionURL: k8s
  satelliteSet:
    storagePools:
      lvmThinPools:
      - name: ext-meta-pool
        thinVolume: metapool
        volumeGroup: ""
        devicePaths:
        - /dev/nvme1n1
      - name: lvm-thin
        thinVolume: thinpool
        volumeGroup: ""
        devicePaths:
        - /dev/nvme2n1
    kernelModuleInjectionMode: Compile
etcd:
  enabled: false
stork:
  enabled: false
csi:
  enableTopology: true
haController:
  replicas: 3
EOF
Finally, use Helm to install LINSTOR, and watch the LINSTOR stack become ready.
$ helm install -n linstor -f ./linstor-op-vals.yaml linstor-op linstor/linstor
$ watch kubectl get pods -n linstor -o wide
Create storageClass definitions for LINSTOR using the examples below:
$ cat << EOF > linstor-sc.yaml
apiVersion: storage.k8s.io/v1
kind: StorageClass
metadata:
  name: "linstor-csi-lvm-thin-r1"
provisioner: linstor.csi.linbit.com
parameters:
  allowRemoteVolumeAccess: "false"
  autoPlace: "1"
  storagePool: "lvm-thin"
  DrbdOptions/Disk/disk-flushes: "no"
  DrbdOptions/Disk/md-flushes: "no"
  DrbdOptions/Net/max-buffers: "10000"
  property.linstor.csi.linbit.com/StorPoolNameDrbdMeta: "ext-meta-pool"
reclaimPolicy: Retain
allowVolumeExpansion: true
volumeBindingMode: WaitForFirstConsumer
---
apiVersion: storage.k8s.io/v1
kind: StorageClass
metadata:
  name: "linstor-csi-lvm-thin-r2"
provisioner: linstor.csi.linbit.com
parameters:
  allowRemoteVolumeAccess: "false"
  autoPlace: "2"
  storagePool: "lvm-thin"
  DrbdOptions/Disk/disk-flushes: "no"
  DrbdOptions/Disk/md-flushes: "no"
  DrbdOptions/Net/max-buffers: "10000"
  property.linstor.csi.linbit.com/StorPoolNameDrbdMeta: "ext-meta-pool"
reclaimPolicy: Retain
allowVolumeExpansion: true
volumeBindingMode: WaitForFirstConsumer
---
apiVersion: storage.k8s.io/v1
kind: StorageClass
metadata:
  name: "linstor-csi-lvm-thin-r3"
provisioner: linstor.csi.linbit.com
parameters:
  allowRemoteVolumeAccess: "false"
  autoPlace: "3"
  storagePool: "lvm-thin"
  DrbdOptions/Disk/disk-flushes: "no"
  DrbdOptions/Disk/md-flushes: "no"
  DrbdOptions/Net/max-buffers: "10000"
  property.linstor.csi.linbit.com/StorPoolNameDrbdMeta: "ext-meta-pool"
reclaimPolicy: Retain
allowVolumeExpansion: true
volumeBindingMode: WaitForFirstConsumer
EOF

$ kubectl apply -f ./linstor-sc.yaml
Deploying NuoDB into EKS using LINSTOR Persistent Storage
Now that LINSTOR is ready, we can deploy NuoDB into EKS configured to use LINSTOR for persistent storage.
Create a namespace for NuoDB in the EKS cluster.
$ kubectl create namespace nuodb
Add the NuoDB repository to Helm.
$ helm repo add nuodb https://storage.googleapis.com/nuodb-charts
$ helm search repo nuodb/
NAME                            CHART VERSION   APP VERSION     DESCRIPTION
nuodb/admin                     3.4.0           4.2.1           Administration tier for NuoDB.
nuodb/database                  3.4.0           4.2.1           NuoDB distributed SQL database.
nuodb/restore                   3.4.0           4.2.1           On-demand restore a NuoDB SQL database.
nuodb/storage-class             3.4.0           4.2.1           Storage classes for NuoDB.
nuodb/transparent-hugepage      3.4.0           4.2.1           Disable disables transparent_hugepage on Linux ...
As you can see, NuoDB consists of a few different projects. We’ll need to deploy a subset of them individually to have a functional NuoDB database. For more information, consult the NuoDB Helm chart’s GitHub repository’s README.
First, disable Linux Transparent Huge Pages (THP) on all cluster nodes using the nuodb/transparent-hugepage Helm charts.
$ helm -n nuodb install thp nuodb/transparent-hugepage
Next, deploy the NuoDB Admin deployment into the EKS cluster.
$ helm -n nuodb install admin nuodb/admin \
    --set nuocollector.enabled=true \
    --set admin.persistence.storageClass=linstor-csi-lvm-thin-r2
Finally, deploy the NuoDB database’s Storage Manager (SM) and Transaction Engine (TE) components into the cluster.
$ helm -n nuodb install database nuodb/database \
    --set database.persistence.storageClass=linstor-csi-lvm-thin-r2 \
    --set database.persistence.size=40Gi \
    --set database.sm.noHotCopy.journalPath.storageClass=linstor-csi-lvm-thin-r2 \
    --set database.sm.hotCopy.replicas=0 --set database.sm.noHotCopy.replicas=1 \
    --set database.sm.hotCopy.enableBackups=false --set nuocollector.enabled=true
NOTE: There are many settings for NuoDB’s components. These are the settings I came up with to satisfy my testing needs but you should consult the NuoDB documentation to plan a production deployment.
Once your pods are ready, verify things are working as expected by logging into the demo database.
$ kubectl -n nuodb exec admin-nuodb-cluster0-0 -- nuocmd show domain
$ kubectl -n nuodb exec -it admin-nuodb-cluster0-0 -- bash

$ nuosql demo --user dba --password secret
SQL> use demo;
SQL> show tables;

    No tables found in schema DEMO
Testing NuoDB Performance with Yahoo! Cloud Serving Benchmark (YCSB)
The Yahoo! Cloud Serving Benchmark (YCSB) is an open source benchmarking program often used to test the performance of various NoSQL databases. NuoDB packages YCSB prepared to test against NuoDB in their incubator Helm repositories. If you want to test your deployment using YCSB you can follow the steps outlined in this section, however, I’ve gathered and included results from my own testing if you’re simply reading along.
To test your own deployment you’ll need to add the nuodb-incubator charts to your Helm installation.
$ helm repo add nuodb-incubator https://nuodb-charts-incubator.storage.googleapis.com/
$ helm search repo nuodb-incubator/
NAME                            CHART VERSION   APP VERSION     DESCRIPTION
nuodb-incubator/backup          2.3.1           4.0.0           Scheduled and on-demand backup for NuoDB.
nuodb-incubator/demo-ycsb       3.4.0           4.2.1           Load YCSB for NuoDB
Deploy the nuodb-incubator/demo-ycsb chart into Kubernetes.
$ helm -n nuodb install ycsb nuodb-incubator/demo-ycsb
Create a Kubernetes secret with the credentials to the demo database. The example below configures the defaults, which will work if you’re following this blog verbatim.
$ kubectl -n nuodb create secret generic demo.nuodb.com \
    --from-literal=database-name=demo \
    --from-literal=database-username=dba \
    --from-literal=database-password=secret
Finally, you can scale the ycsb-load to generate a workload on your database.
$ kubectl -n nuodb scale replicationcontroller ycsb-load --replicas=1
You should see a ycsb-load pod running in the nuodb namespace shortly after scaling the ycsb-load replicationcontroller. You can exec into the pod and watch the workload’s logs fly by.
$ ycsb_pod=$(kubectl get pods -n nuodb -l app=ycsb-load,database=demo -o custom-columns=":metadata.name" --no-headers)
$ kubectl exec -it -n nuodb $ycsb_pod -- sh
/ # ls *.log
ycsb_b.log  ycsb_c.log
/ # tail -f ycsb_b.log
...snip...
The workload will run indefinitely by default. While this is great to see if sustained I/O patterns perform differently than bursting I/O patterns, it’s a little hard to see what’s going on. NuoDB’s Insights is a real-time monitoring tool packaged by NuoDB that can help in this area, but to keep an already long blog shorter, I won’t be deploying Insights.
Instead, you can update the ycsb-load deployment to only run a single iteration of the test workload, and gather the results “manually” from within the pod.
$ kubectl -n nuodb scale rc ycsb-load --replicas=0
$ helm upgrade -n nuodb ycsb nuodb-incubator/demo-ycsb \
    --reuse-values --set ycsb.noOfIterations=1
$ kubectl -n nuodb scale rc ycsb-load --replicas=1
After a short while, your test will complete, and you can view the results by printing the ycsb_b.log inside of the new ycsb-load pod.
$ ycsb_pod=$(kubectl get pods -n nuodb -l app=ycsb-load,database=demo -o custom-columns=":metadata.name" --no-headers)
$ kubectl exec -n nuodb $ycsb_pod -- cat ycsb_b.log
---------------------------------------------------------
---------------------------------------------------------
----- run number 1 at  Thu Aug 18 19:54:08 UTC 2022
---------------------------------------------------------
----- run number 1 at  Thu Aug 18 19:54:08 UTC 2022
---------------------------------------------------------
/usr/lib/jvm/java-1.8-openjdk/bin/java  -classpath /driver/conf:/driver ...snip...
...snip...
2022-08-18 19:54:14:704 6 sec: 10000 operations; 1591.09 current ops/sec; [READ: Count=9486,
Max=10503, Min=260, Avg=487.89, 90=639, 99=987, 99.9=2407, 99.99=5087] [CLEANUP: Count=1, Max=1445,
Min=1445, Avg=1445, 90=1445, 99=1445, 99.9
=1445, 99.99=1445] [UPDATE: Count=514, Max=9423, Min=1223, Avg=2742.32, 90=3707, 99=4923, 99.9=8023,
99.99=9423]
[OVERALL], RunTime(ms), 6285.0
[OVERALL], Throughput(ops/sec), 1591.0898965791566
[TOTAL_GCS_PS_Scavenge], Count, 2.0
[TOTAL_GC_TIME_PS_Scavenge], Time(ms), 7.0
[TOTAL_GC_TIME_%_PS_Scavenge], Time(%), 0.11137629276054097
[TOTAL_GCS_PS_MarkSweep], Count, 0.0
[TOTAL_GC_TIME_PS_MarkSweep], Time(ms), 0.0
[TOTAL_GC_TIME_%_PS_MarkSweep], Time(%), 0.0
[TOTAL_GCs], Count, 2.0
[TOTAL_GC_TIME], Time(ms), 7.0
[TOTAL_GC_TIME_%], Time(%), 0.11137629276054097
[READ], Operations, 9486.0
[READ], AverageLatency(us), 487.88983765549233
[READ], MinLatency(us), 260.0
[READ], MaxLatency(us), 10503.0
[READ], 95thPercentileLatency(us), 722.0
[READ], 99thPercentileLatency(us), 987.0
[READ], Return=OK, 9486
[CLEANUP], Operations, 1.0
[CLEANUP], AverageLatency(us), 1445.0
[CLEANUP], MinLatency(us), 1445.0
[CLEANUP], MaxLatency(us), 1445.0
[CLEANUP], 95thPercentileLatency(us), 1445.0
[CLEANUP], 99thPercentileLatency(us), 1445.0
[UPDATE], Operations, 514.0
[UPDATE], AverageLatency(us), 2742.3229571984434
[UPDATE], MinLatency(us), 1223.0
[UPDATE], MaxLatency(us), 9423.0
[UPDATE], 95thPercentileLatency(us), 3971.0
[UPDATE], 99thPercentileLatency(us), 4923.0
[UPDATE], Return=OK, 514
...snip...
NOTE: NuoDB Insights is a visual monitoring tool that is highly recommended for production deployments. If you’ve followed this post verbatim, you’ve set the
nuocollector.enabledoption on theadminanddatabasedeployments totrue, which is required for Insights. I will leave deploying NuoDB Insights as an exercise for the reader.
From here you can adjust or change configurations and retest to see which options perform best for you.
My Test Results
I wanted to see how LINSTOR’s “DRBD powered” replication affected the performance when compared against similar, but unreplicated, EBS volumes. I also wanted to see how the number of NuoDB transaction engines (TE) affected the performance of my tests. I ran tests as outlined in the section above while changing NuoDB’s TE replica count and the storage classes used for persistence.
These are the different storage classes and configurations I tested with:
- EKS’s Default GP2 storage class with one NuoDB TE (1TE)
- EKS’s Default GP2 storage class with three NuoDB TE (3TE)
- Basic or standard two-replica (2R) LINSTOR storage class with one NuoDB TE (1TE)
- Basic or standard two-replica (2R) LINSTOR storage class with three NuoDB TE (3TE)
- Tuned two-replica (2R) LINSTOR storage class with one NuoDB TE (1TE)
- Tuned two-replica (2R) LINSTOR storage class with three NuoDB TE (3TE)
The distinction between what I’m considering a “basic” LINSTOR configuration as opposed to a “tuned” LINSTOR configuration is explained in depth in a past blog post of mine.
To summarize, a “basic” configuration uses a single block device for DRBD and its metadata, while a tuned device uses separate devices. A “basic” configuration sets no DRBD options in its storage classes, while a “tuned” configuration does. Finally, a “basic” configuration allows for diskless attachment to physical storage (think iSCSI if you’re unfamiliar with diskless DRBD), while a “tuned” configuration forces pods to be scheduled on nodes where there is a physical replica of the persistent volume.
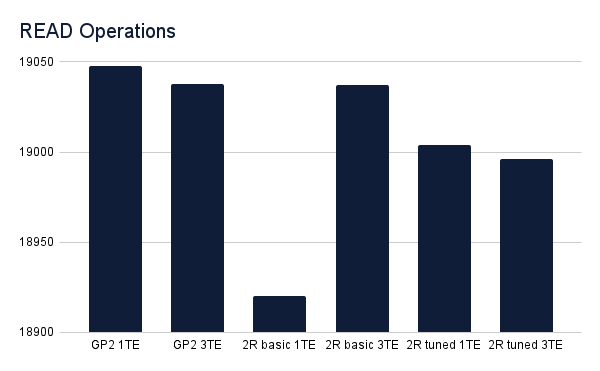
The charts below show the aggregate results from the two threads run by the ycsb-load deployment. Be sure to notice the scale on the y-axis. Charts that show how many operations were performed during the run time of a single iteration of the yscb workload varied by less than 150 operations across the six different testing scenarios. While variations in latency were more noticeable, these variations had minimal impact on the overall throughput of operations.
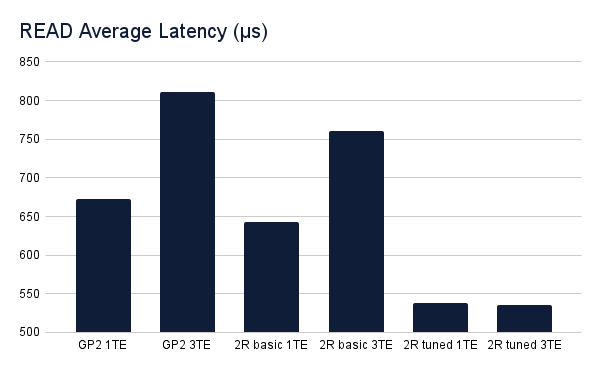
The latency of read operations increased in a seemingly uniform way when scaling up NuoDB’s TE in both the GP2 and basic LINSTOR tests, although the latency when reading from the tuned LINSTOR storage class seemed unaffected, while also performing best. Perhaps this is due to DRBD’s read-balancing, which is enabled by default for DRBD devices.
Read operations varied by very little across all test scenarios.
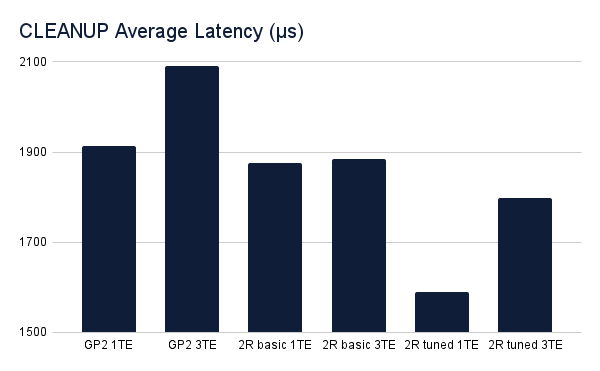
The latency of the cleanup operation was also slightly higher when increasing the number of NuoDB TE, but only by very small margins. Again, the tuned LINSTOR deployments performed best.
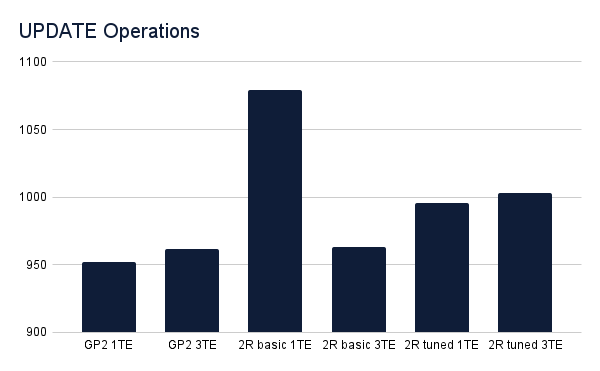
Update operations benefited from the increased number of TE but not by much. Outside of the spike in the basic LINSTOR test with a single TE, operations across all scenarios performed similarly.
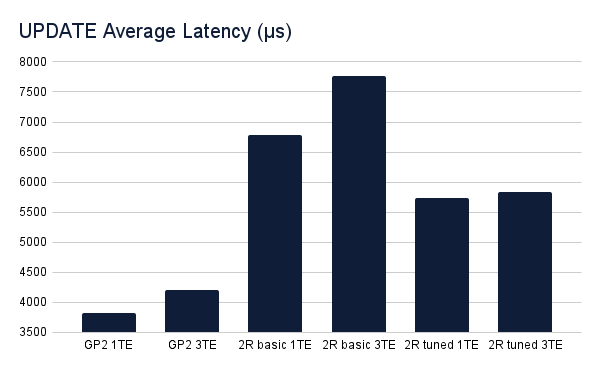
The latency of update operations shows the most contrast between scenarios, which makes sense. With LINSTOR backed storage classes you’re synchronously replicating updates to another node in a different AWS Availability Zone (AZ), which obviously will add some latency. However, as we can see from the results, when LINSTOR is tuned the additional latency is limited to 1500-2000µs (or 1.5-2ms).
Conclusion
The performance differences between replicated and unreplicated persistent storage seem negligible from my perspective. Replicating NuoDB’s persistent storage between multiple AWS AZs is one way you can protect your services from rare, but not unheard of, AZ outages in the cloud. LINSTOR also supports snapshot shipping to S3 compatible storage or remote LINSTOR clusters, further protecting your data from outages. LINSTOR and DRBD can run anywhere you have a Linux kernel and some block devices, so on-premises clusters can be identical to those you run in the cloud. The benefits far outweigh the extremely small impact to performance.