Along with the ability to encrypt replication traffic, DRBD® version 9.2.6 gives you the ability to load balance replication traffic across multiple TCP sockets1. You can see a demo of the load balancing feature from LINBIT® founder and CEO Philipp Reisner during one of our community meetings.
DRBD version 9 has supported replicating data over multiple paths in an active-backup-like manner since its inception. With multiple paths configured, users can ensure that any single point of failure (SPOF) in a network path is mitigated by adding a second separate path for DRBD to use should the other fail. So it was only a matter of time before DRBD’s developers added the ability to load balance across multiple paths.
Load balancing DRBD’s replication traffic allows DRBD to use multiple network paths in unison for replicating writes. This allows users of a single network path to add more throughput if they find themselves approaching the limits of a single path. This might also be interesting for cloud users where bandwidth between virtual machine instances is more confined or flow controlled.
How To Enable DRBD TCP Load Balancing
Enabling TCP load balancing in DRBD is simple. If you’re a LINBIT customer, an apt or dnf update to DRBD version 9.2.6 and DRBD user space utilities (drbd-utils) version 9.26.0 or newer is all that is needed to get the supported versions installed. If you’re not a LINBIT customer, you can download and compile prepared source tar files from LINBIT’s website.
With supported versions of DRBD and DRBD utilities installed, you need only configure multiple paths and enable load-balance-paths in the network settings of the DRBD configuration.
The following is an example configuration with only the meaningful settings shown:
resource "drbd-lb-0"
{
[...]
    net
    {
        load-balance-paths      yes;
        [...]
    }

    on "linbit-0"
    {
        volume 0
        {
        [...]
        }
        node-id    0;
    }

    on "linbit-1"
    {
        volume 0
        {
        [...]
        }
        node-id    1;
    }

    on "linbit-2"
    {
        volume 0
        {
        [...]
        }
        node-id    2;
    }

    connection
    {
        path
        {
            host "linbit-0" address ipv4 192.168.220.60:7900;
            host "linbit-1" address ipv4 192.168.220.61:7900;
        }
        path
        {
            host "linbit-0" address ipv4 192.168.221.60:7900;
            host "linbit-1" address ipv4 192.168.221.61:7900;
        }
    }

    connection
    {
        path
        {
            host "linbit-0" address ipv4 192.168.220.60:7900;
            host "linbit-2" address ipv4 192.168.220.62:7900;
        }
        path
        {
            host "linbit-0" address ipv4 192.168.221.60:7900;
            host "linbit-2" address ipv4 192.168.221.62:7900;
        }
    }
        connection
    {
        path
        {
            host "linbit-1" address ipv4 192.168.220.61:7900;
            host "linbit-2" address ipv4 192.168.220.62:7900;
        }
        path
        {
            host "linbit-1" address ipv4 192.168.221.61:7900;
            host "linbit-2" address ipv4 192.168.221.62:7900;
        }
    }
}
With such configurations in place, you’re only a drbdadm up drbd-lb-0 away from balancing DRBD’s replication traffic across multiple paths.
❗ IMPORTANT: It is currently not possible to use
drbdadm adjust <resource>to toggle load balancing on an active DRBD device. If you’re adding load balancing to an existing DRBD device, the device will need to be brought down and then up usingdrbdadm down <resource>anddrbdadm up <resource>.
Testing and Verifying TCP Load Balancing
Load balancing can be verified by inspecting network interface utilization while steadily writing to a TCP load balanced DRBD device. There are quite a few utilities you could use to do this, but iptraf-ng, tcpdump, or even something as simple as ss are very common.
While inspecting the output from the command of your choosing, simply unplug one of the network paths. You should see that DRBD becomes disconnected, and traffic across both the load balanced paths is reduced to DRBD’s periodic rechecking of the links. Once DRBD identifies which network paths are healthy, it will reestablish load balanced replication over the working paths. After reconnecting, a small resynchronization of any data that changed while the peers were disconnected will occur in the background to ensure the devices are UpToDate. If an unhealthy path becomes healthy, DRBD will detect this automatically, and reconnect the peer connections to include the newly repaired path.
💡 TIP: If you’re only interested in resilience, leaving
load-balance-pathsdisabled will result in DRBD only using one path at a time instead of load balancing replicated writes across all configured paths.
Verifying Load Balancing Using IPTraf-ng
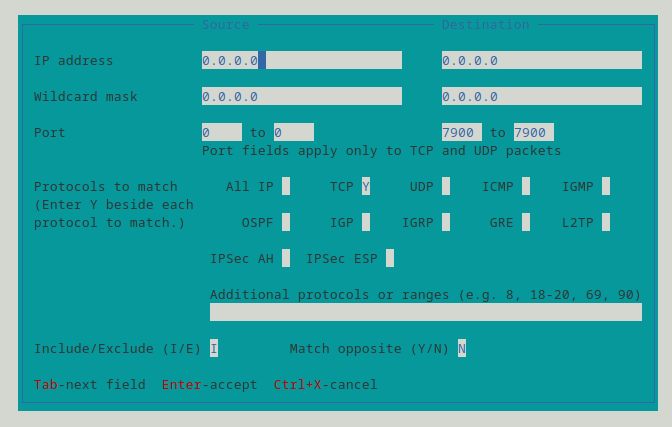
You can start verifying DRBD load balancing by using the most visual of the three networking traffic inspection tools that my brain conjured up: the iptraf-ng utility. After opening iptraf-ng on the DRBD primary node, create an IP filter that filters for TCP traffic destined for port 7900 (the port used in the example configuration above).

With such a filter applied, run an IP traffic monitor on all interfaces and verify that packets are accumulating on both of the configured paths at a comparable rate.

Verifying Load Balancing Using tcpdump
A go to for many system administrators, tcpdump, can also be used to verify TCP load balancing for DRBD. On any of the DRBD secondary nodes, filter for TCP packets destined for port 7900 on any interface. You should see the stream of replicated writes coming from the DRBD primary node.
# tcpdump -n -c 10 -i any tcp port 7900
tcpdump: data link type LINUX_SLL2
tcpdump: verbose output suppressed, use -v[v]... for full protocol decode
listening on any, link-type LINUX_SLL2 (Linux cooked v2), snapshot length 262144 bytes
23:38:40.592588 eth2  Out IP 192.168.220.61.7900 > 192.168.220.60.45677: Flags [P.], seq 4088704108:4088704140, ack 604110629, win 501, options [nop,nop,TS val 1829930048 ecr 3540804965], length 32
23:38:40.592751 eth2  In  IP 192.168.220.60.45677 > 192.168.220.61.7900: Flags [.], ack 32, win 3106, options [nop,nop,TS val 3540804969 ecr 1829930044], length 0
23:38:40.596986 eth2  In  IP 192.168.220.60.7900 > 192.168.220.61.38539: Flags [.], seq 2108668342:2108668390, ack 648750293, win 501, options [nop,nop,TS val 3540804973 ecr 1829930043], length 48
23:38:40.597031 eth1  In  IP 192.168.221.60.7900 > 192.168.221.61.36487: Flags [P.], seq 3295614837:3295617733, ack 2514536037, win 509, options [nop,nop,TS val 1980714571 ecr 4293346714], length 2896
23:38:40.597031 eth1  In  IP 192.168.221.60.7900 > 192.168.221.61.36487: Flags [P.], seq 2896:3080, ack 1, win 509, options [nop,nop,TS val 1980714571 ecr 4293346714], length 184
23:38:40.597043 eth1  Out IP 192.168.221.61.36487 > 192.168.221.60.7900: Flags [.], ack 2896, win 24560, options [nop,nop,TS val 4293346725 ecr 1980714571], length 0
23:38:40.597080 eth2  Out IP 192.168.220.61.38539 > 192.168.220.60.7900: Flags [.], ack 48, win 24576, options [nop,nop,TS val 1829930052 ecr 3540804973], length 0
23:38:40.597092 eth1  Out IP 192.168.221.61.36487 > 192.168.221.60.7900: Flags [.], ack 3080, win 24576, options [nop,nop,TS val 4293346725 ecr 1980714571], length 0
23:38:40.602247 eth2  In  IP 192.168.220.60.45677 > 192.168.220.61.7900: Flags [P.], seq 1:41, ack 32, win 3106, options [nop,nop,TS val 3540804978 ecr 1829930044], length 40
23:38:40.602258 eth2  Out IP 192.168.220.61.7900 > 192.168.220.60.45677: Flags [.], ack 41, win 501, options [nop,nop,TS val 1829930058 ecr 3540804978], length 0
10 packets captured
17 packets received by filter
0 packets dropped by kernel
TIP: The -n flag tells tcpdump to not convert IP addresses to names, the -c flag specifies how many packets tcpdump should capture before exiting, the -i flag specifies the interface to listen on, and tcp port 7900 is the tcpdump filter expression.
Again, you should see a nearly equal amount of traffic on TCP port 7900 traveling over both paths.
Verifying Load Balancing Using ss
Lastly, but the first utility I personally use for inspecting open network sockets on a system, the ss utility can be used to verify that there are established TCP sessions on all of the configured paths’ sockets.
# ss -tna dst :7900
State   Recv-Q   Send-Q       Local Address:Port          Peer Address:Port   Process
ESTAB   0        0           192.168.221.61:36487       192.168.221.60:7900
ESTAB   0        0           192.168.220.61:39223       192.168.220.62:7900
ESTAB   0        0           192.168.220.61:38539       192.168.220.60:7900
ESTAB   0        0           192.168.221.61:35837       192.168.221.62:7900
TIP: The -t flag inspects only TCP sessions, the -n flag instructs ss not to resolve service names, the -a flag displays both listening and established connections, and dst :7900 is the filter expression.
While you cannot see active traffic using ss – unless you happen to catch some data in a send or receive buffer – you will be able to see established (ESTAB) TCP sessions, which is enough to verify you’re using both paths configured for DRBD.
Conclusion
DRBD 9.2.6. is an exciting release for the new features that it brings, such as Encryption using kTLS and load balancing. Adding two major features, all in one release, is quite an update for DRBD. Hopefully this article has shown you how you can get started using the load balancing feature to increase DRBD data replication performance for your highly available storage needs. Be sure to test this out for yourself and let us know what you think!
1. At the time of writing this blog, it is not possible to use both kTLS encrpytion and TCP load balancing in the same DRBD configuration.


