A Visual Approach to LINBIT SDS
Here at LINBIT®, we live at the shell prompt, but on occasion, getting a graphical view of things can provide benefits. This is why we developed the LINBIT GUI, a graphical user interface (GUI), for the LINBIT SDS stack (LINSTOR®, DRBD®, and related software). Open source code for the GUI is available at the project’s GitHub page or you can get the GUI as an RPM or DEB package in LINBIT’s customer or public package repositories.
Reasons for Using the LINBIT GUI
The LINBIT GUI allows you to view complex LINSTOR environments quickly and also lets administrators who are unfamiliar with the command line promptly observe the status of deployments without the need to resort to the CLI. By using the GUI, you can deploy new storage resources or edit existing resources. You can easily take control over your NFS, iSCSI, NVMe-oF targets, and much more.
Installing the LINBIT GUI
For existing LINSTOR customers or public package repository users, installing the LINBIT GUI is as simple as using your distribution’s package manager to get up and running in just a few moments. From your LINSTOR controller node, enter the appropriate command below to install the latest version of the LINBIT GUI.
For RPM-based Linux distributions (LINBIT customers only):
# dnf -y install linstor-gui
For DEB-based systems (LINBIT customers and public package repository users):
# apt update && apt -y install linstor-gui
📝 NOTE: Your nodes should already be configured to provide access to LINBIT software package repositories. However, as a LINBIT customer, if you need to configure repository access on your controller node, you can use the LINBIT manage node script to do this and enable the
drbd-9LINBIT package repository.
The installation should only take a few seconds. Once the package has been installed, the GUI is ready to go. No additional actions are required.
If you are installing a new instance of LINSTOR, the GUI is automatically installed as part of the linbit-sds-controller meta-package.
Using the LINBIT GUI
Using the LINBIT GUI is as simple as opening up your favorite web browser and then connecting to the LINSTOR controller node where you performed the installation. First, open your web browser and navigate to: http://<CONTROLLER_IP>:3370.
📝 NOTE:: If you have secured your LINSTOR controller with SSL/TLS, you will need to access the GUI via HTTPS using port 3371.
When you first access the GUI, the dashboard screen will greet you. The dashboard page provides an overview of your cluster.

Selecting a Different Language
If you prefer working in a language other than English, the GUI supports eight languages: English, German, Chinese, Japanese, Turkish, Spanish, French, and Russian. Just select your desired language from the drop-down menu in the upper right corner.
Navigating the LINBIT GUI Dashboard
From the dashboard, you can select any option from the left menu to navigate to the appropriate page, for example, to manage your cluster inventory (LINSTOR nodes, controller, or storage pools) or your storage configuration (LINSTOR resource groups, resources, volumes, or other LINSTOR objects).
Managing LINSTOR Nodes
The LINBIT GUI supports managing LINSTOR controller and satellite nodes. By expanding the Inventory menu item, you can then click “Nodes” to see a list of your LINSTOR cluster nodes showing the controller and the satellites in this view.
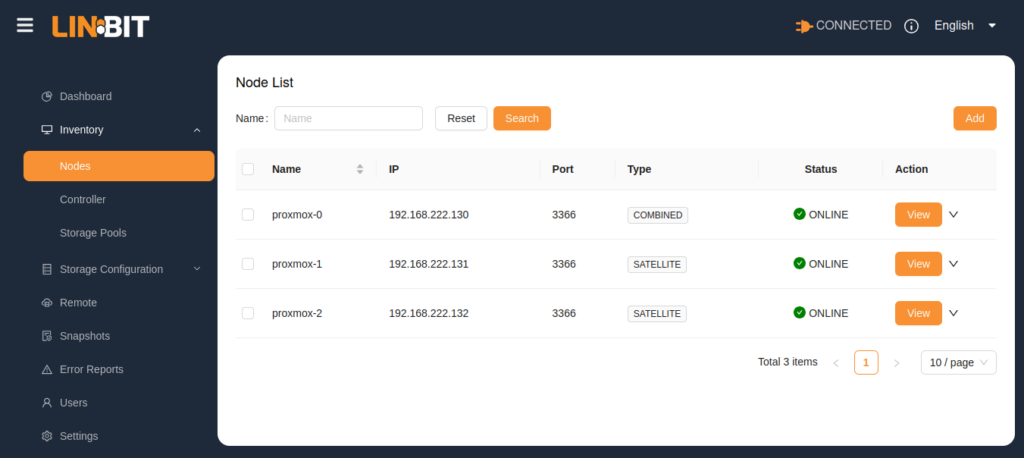
From this page, you can either view a node’s details by clicking the “View” button to the right of the node, or else click the down-arrow icon to the right of the “View” button to access a menu of actions that you can perform on that node.
For example, you can view and set properties for a node by clicking the “Properties” action menu item. You can use LINSTOR node properties to do such things as constraining automatic LINSTOR resource placement.
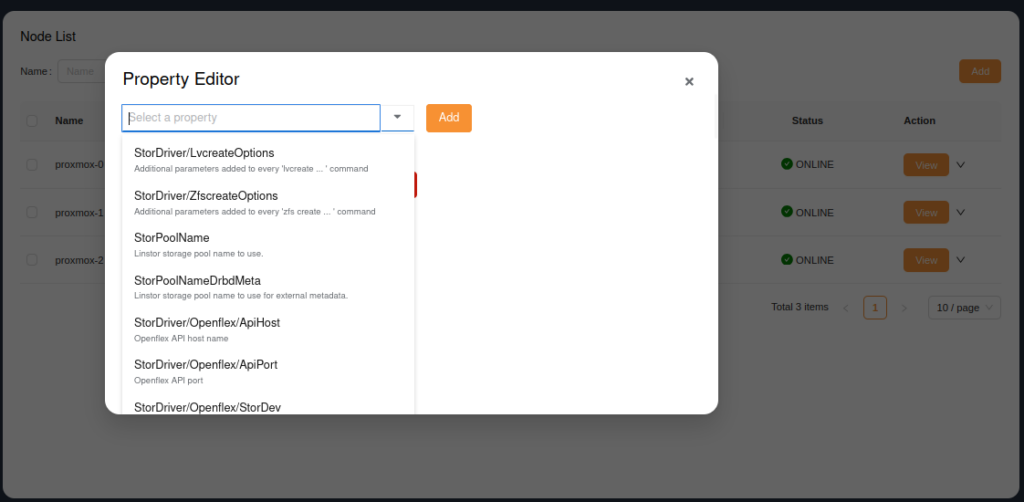
⚠️ WARNING: Some pages allow you to view and set properties for the nodes or other LINSTOR objects, such as resources or resource groups. This can be very convenient, especially if you are unfamiliar with all available properties. However, use caution before changing properties unless you are familiar with the resulting changes! If you are unsure, check resources like the LINSTOR User Guide or the [LINBIT Community Forums] (https://forums.linbit.com/).
The “Node List” page also allows you to add or remove nodes from the cluster easily. If this is a new LINSTOR installation, you would start by adding nodes to define your LINSTOR cluster.
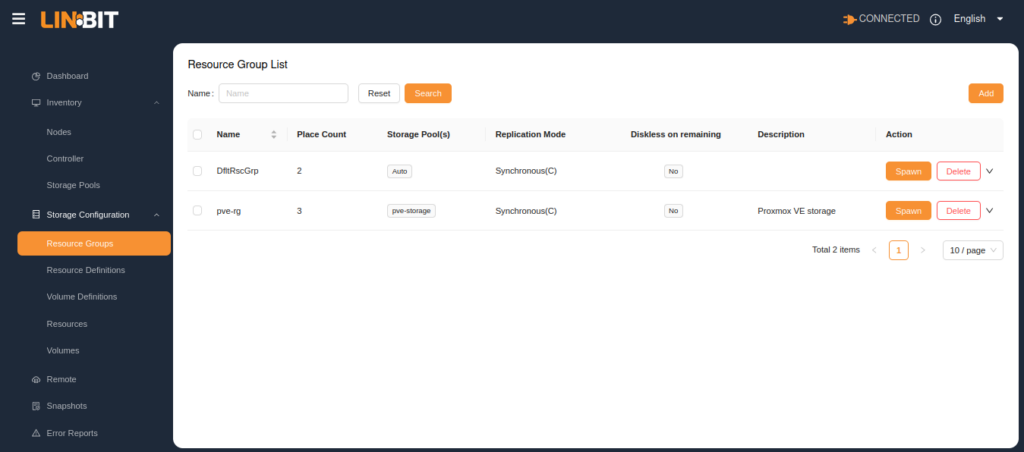
Managing Your Software-Defined Storage
After configuring your LINSTOR cluster nodes and storage pools, you can use the LINBIT GUI to create software-defined storage for your applications and services to consume. You do this through actions that are available under the “Storage Configuration” menu items. Here, you can create, delete, edit, and otherwise manage LINSTOR storage objects: resource groups, resource definitions, volume definitions, resources, and volumes.
Other Management Actions
Besides managing your LINSTOR cluster nodes and LINSTOR objects, you can also use the LINBIT GUI to create and manage snapshots of your storage, view and delete LINSTOR error reports, and even customize the dashboard reporting by pointing to your own Grafana dashboard.
Benefits of the LINBIT GUI
Providing your administrators with an additional tool to manage the cluster is a great benefit, especially in environments with administrators that might not be familiar with Linux or working from the command line. Productivity does not have to wait for an administrator to climb a CLI learning curve, as drop-down menu navigation and dashboard status representations are intuitive.
This tool is available to LINBIT customers for the low, low price of free! It’s a great tool to make available to your staff.
Getting Started With The LINBIT GUI
If you are interested in trying the LINBIT GUI, LINBIT Solutions Architect, Ryan Ronnander, made a video about using the LINBIT SDS GUI to create a LINSTOR cluster and provision storage resources.
Changelog
2023-08-18:
- Originally published post.
2024-09-12:
- LINBIT GUI is now open source software.
- Updated based on LINBIT GUI v1.7.7.
- Added mentions of installing by source code or public package repositories.


