
Kubernetes is best known as a container orchestrator. However, more and more businesses and organizations are using Kubernetes to also deploy and manage virtual machines (VMs). There are many reasons why this is a growing trend.
One reason people are running and managing VMs in Kubernetes is to decompose legacy workloads running in VMs and convert them to more modern, containerized workloads. This way, a team can have virtualized workloads running alongside containerized workloads, as the team might be working to fully replace the virtualized workloads with containerized equivalents.
Another reason is to provide the means to test Kubernetes workloads on different operating systems and platforms, for example, as part of a CI/CD pipeline, before delivering a final product or service.
These are just two examples. Whatever your reasons are, the open source Cloud Native Computing Foundation (CNCF) incubating project, KubeVirt, is one way that you can bring virtualized workloads to Kubernetes. For resiliency, disaster recovery, data sharing, and other reasons, you might want to use persistent storage to back your VM disks running in Kubernetes. To this end, you can also use the open source software-defined storage (SDS) management tool, LINSTOR®, and its Kubernetes integration to help you provision and deploy persistent storage for KubeVirt VMs automatically on-demand. Besides easing the management and deployment burden on your team, using LINSTOR-managed storage to back your KubeVirt VMs brings advantages such as VM live migrations, and disaster recovery capability.
This article will take you through the steps of configuring LINSTOR to manage persistent storage for KubeVirt VM disks and demonstrate a VM live migration.
Prerequisites and LINSTOR preparation
To follow the instructions in this article, you will need a LINSTOR and Kubernetes environment up and running. The Kubernetes cluster I deployed to write this article used containerd as a container runtime, and Kube-OVN with Overlay networking for Kubernetes networking.
This article will also demonstrate live migrating a KubeVirt VM. KubeVirt documentation on the topic of live migration describes some limitations and requirements that you might need to refer to if you have issues live migrating VMs in your environment.
Deploying LINSTOR in Kubernetes
The LINBIT®-published how-to guide, Kubernetes Persistent Storage Using LINBIT SDS Quick Start provides instructions for deploying LINSTOR in Kubernetes if you do not have an environment ready.
Creating a LINSTOR storage pool
Your LINSTOR and Kubernetes cluster will also need a LINSTOR storage pool configured on all the cluster nodes that you want to provide backing storage for KubeVirt VM disks.
To write this article, I created a storage pool named lvm-thin, backed by an LVM volume group, named drbdpool, and a thin-provisioned logical volume (thin pool) within the volume group, named thinpool. You can learn more about creating LINSTOR storage pools in the LINSTOR User Guide. The output of a kubectl linstor storage-pool list command run on a cluster node in my environment was:
╭──────────────────────────────────────────────────────────────────────────────────────────────────────────────────────────────────────────────────╮
┊ StoragePool          ┊ Node   ┊ Driver   ┊ PoolName          ┊ FreeCapacity ┊ TotalCapacity ┊ CanSnapshots ┊ State ┊ SharedName                  ┊
╞══════════════════════════════════════════════════════════════════════════════════════════════════════════════════════════════════════════════════╡
[...]
┊ lvm-thin             ┊ kube-0 ┊ LVM_THIN ┊ drbdpool/thinpool ┊     8.00 GiB ┊      8.00 GiB ┊ True         ┊ Ok    ┊ kube-0;lvm-thin             ┊
┊ lvm-thin             ┊ kube-1 ┊ LVM_THIN ┊ drbdpool/thinpool ┊     8.00 GiB ┊      8.00 GiB ┊ True         ┊ Ok    ┊ kube-1;lvm-thin             ┊
┊ lvm-thin             ┊ kube-2 ┊ LVM_THIN ┊ drbdpool/thinpool ┊     8.00 GiB ┊      8.00 GiB ┊ True         ┊ Ok    ┊ kube-2;lvm-thin             ┊
╰──────────────────────────────────────────────────────────────────────────────────────────────────────────────────────────────────────────────────╯
📝 NOTE: The
kubectl linstorcommand relies on thekubectl-linstorutility, which makes it easier to enter LINSTOR commands when LINSTOR is running in Kubernetes. To install this utility in your cluster, refer to instructions in the LINSTOR User Guide.
Creating a LINSTOR storage class in Kubernetes
To create a LINSTOR storage class in Kubernetes that will use a LINSTOR storage pool to back your KubeVirt DataVolumes for VM disks, enter the following command:
cat << EOF > linstor-basic-kubevirt-storage-class.yaml
apiVersion: storage.k8s.io/v1
kind: StorageClass
metadata:
  # The name used to identify this StorageClass in Kubernetes.
  name: linstor-basic-kubevirt-storage-class
  # The name used to match this StorageClass with a provisioner.
  # linstor.csi.linbit.com is the name that the LINSTOR CSI plugin uses to identify itself
provisioner: linstor.csi.linbit.com
volumeBindingMode: WaitForFirstConsumer
allowVolumeExpansion: true
parameters:
  autoPlace: "3"
  storagePool: "lvm-thin"
  resourceGroup: "kubevirt-sc-rg"
EOF
kubectl apply -f linstor-basic-kubevirt-storage-class.yaml
Change the name of the LINSTOR storage pool, lvm-thin in this example, to match a LINSTOR storage pool in your deployment. You can change the autoPlace placement count number to meet your high availability requirements, constrained by the number of LINSTOR satellite nodes in your cluster. The resource group name is arbitrary, unless you want to use an existing resource group. If the specified resource group does not exist, LINSTOR will create it when needed, for example, when creating and starting a KubeVirt VM that uses LINSTOR storage.
Output from the command will show that the storage class was created.
Installing KubeVirt
KubeVirt documentation has instructions for deploying KubeVirt on various Kubernetes flavors, such as miniKube and Kind. However, to write this article, I followed the generic “cloud providers” quickstart guide.
❗ IMPORTANT: I was in a VM-based environment where my Kubernetes and LINSTOR cluster nodes were VMs themselves. For this reason, I also heeded the instructions related to nested virtualization that are linked in the KubeVirt cloud providers quickstart guide.
Enter the following commands on a Kubernetes node to deploy the KubeVirt operator:
export VERSION=$(curl -s https://storage.googleapis.com/kubevirt-prow/release/kubevirt/kubevirt/stable.txt)
echo $VERSION
kubectl create -f "https://github.com/kubevirt/kubevirt/releases/download/${VERSION}/kubevirt-operator.yaml"
Next, deploy the KubeVirt custom resource definitions by entering the following command:
kubectl create -f \
  "https://github.com/kubevirt/kubevirt/releases/download/${VERSION}/kubevirt-cr.yaml"
Finally, install virtctl, a binary that makes it easy to start, stop, and connect to KubeVirt VMs.
VERSION=$(kubectl get kubevirt.kubevirt.io/kubevirt -n kubevirt -o=jsonpath="{.status.observedKubeVirtVersion}")
ARCH=$(uname -s | tr A-Z a-z)-$(uname -m | sed 's/x86_64/amd64/') || windows-amd64.exe
echo ${ARCH}
curl -L -o virtctl https://github.com/kubevirt/kubevirt/releases/download/${VERSION}/virtctl-${VERSION}-${ARCH}
chmod +x virtctl
install virtctl /usr/local/bin
Verifying KubeVirt installation
Enter the following command to verify that you deployed KubeVirt successfully:
kubectl get kubevirt.kubevirt.io/kubevirt -n kubevirtOutput from the command should be similar to this:
NAME       AGE    PHASE
kubevirt   2m9s   Deployed
According to KubeVirt documentation, “KubeVirt will deploy 7 pods, 3 services, 1 DaemonSet, 3 deployment apps, and 3 replica sets.” In the 3-node Kubernetes cluster that I deployed KubeVirt into, my experience was nine pods, four services, one daemon set, three deployment apps, and three replica sets. Verify KubeVirt components are deployed by entering the following command:
kubectl get all -n kubevirtInstalling the Containerized Data Importer
This article uses the Containerized Data Importer (CDI) persistent storage management add-on for Kubernetes, for building KubeVirt VM disk images.
To install the latest version of the CDI add-on in Kubernetes (this article uses CDI version 1.62.0), enter the following commands:
export TAG=$(curl -s -w %{redirect_url} https://github.com/kubevirt/containerized-data-importer/releases/latest)
export VERSION=$(echo ${TAG##*/})
kubectl create -f https://github.com/kubevirt/containerized-data-importer/releases/download/$VERSION/cdi-operator.yaml
kubectl create -f https://github.com/kubevirt/containerized-data-importer/releases/download/$VERSION/cdi-cr.yaml
Verifying the CDI installation
Enter the following command to verify that you deployed the CDI successfully:
kubectl get cdis.cdi.kubevirt.io -n cdiOutput from the command should be similar to this:
NAME   AGE   PHASE
cdi    20s   Deployed
Allowing non-root containers to use devices
This article uses a VM with a ReadWriteMany (RWX) access mode for the persistent volume claim (PVC) that backs the VM’s disk. This is necessary for VM live migration. This also means that you need to opt-in to the Kubernetes container runtime behavior that allows non-root containers to use host devices, such as storage devices, GPUs, hardware accelerators, and others. Refer to the Kubernetes blog post, “Non-root Containers And Devices”, for more background information on the topic.
If you are using containerd, add the following configuration to your containerd configuration file, /etc/containerd/config.toml, on all your Kubernetes nodes:
[plugins]
  [plugins."io.containerd.grpc.v1.cri"]
    device_ownership_from_security_context = true
If you are using CRI-O as your container runtime, add the following configuration to the CRI-O configuration file, /etc/crio/crio.conf, on all your Kubernetes nodes:
[crio.runtime]
device_ownership_from_security_context = true
Restarting the container runtime service
After making changes to the container runtime configuration file on all your Kubernetes nodes, restart the container runtime service on all your Kubernetes nodes. For example, if your container runtime is containerd, enter the following command:
systemctl restart containerd.serviceIf your container runtime is CRI-O, enter the following command:
systemctl restart crio.serviceUsing Kube-OVN with KubeVirt
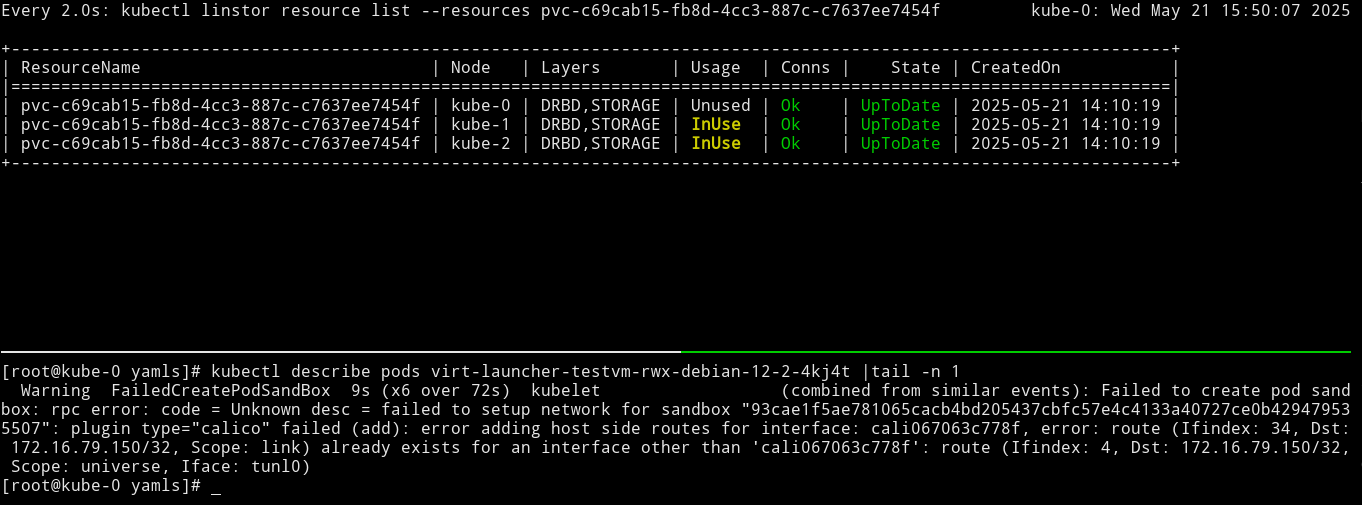
Before moving on to creating a KubeVirt VM, some words about the choice of Kube-OVN for a Container Network Interface (CNI) plugin. When I first started exploring using KubeVirt with LINSTOR, I used Calico for a CNI plugin in my Kubernetes environment. The LINBIT US team generally uses Calico for Kubernetes networking in its testing environments. However, I hit some issues when testing and verifying the KubeVirt VM live migration use case.
While researching the topic of live migrating VMs in Kubernetes, I learned about the Kube-OVN project. In a moment of difficulty with Calico, I found the following statements from the Kube-OVN website:
[…] KubeVirt faces the following challenges during live migration:
- KubeVirt does not support live migration of virtual machines using bridge network mode by default.
- KubeVirt only handles memory and disk migration without specific optimizations for network migration.
- If the virtual machine’s IP changes during migration, it cannot achieve a seamless live migration.
- If the network is interrupted during migration, it cannot achieve a seamless live migration.
Kube-OVN specifically addresses the above issues during the virtual machine migration process, allowing users to perform network-transparent live migrations. Our tests show that network interruption time can be controlled within 0.5 seconds, and TCP connections remain uninterrupted.
These words resonated with me because the issues that I encountered when I was trying to live migrate KubeVirt VMs while using Calico related to VM IP address changes during migration. VM migrations worked when using Calico, and I could monitor the LINSTOR backing storage resource for the VM disk migrating to a new node, however, the VM’s IP address would change.
A colleague and I explored a few options within Calico, such as the floatingIPs and the ipAddrsNoIpam CNI plugin features and annotations. They either did not work as expected or only partially worked, during our experiments. For example, setting a static IP address for a VM by using the Calico CNI plugin feature, ipAddrsNoIpam, worked for a single live migration, but did not work when trying to migrate the VM “back” to the original node.
I went down a few rabbit holes trying to work around this and other issues. During a moment of desperation, the Kube-OVN project turned up in a search result, which was how I learned about it.
Installing Kube-OVN was easy, although I did need to completely blow away my Kubernetes with Calico cluster and create a new Kubernetes cluster first. Amazingly, live migrating a KubeVirt VM to another node, and then back again, worked as advertised with Kube-OVN, and I did not need to do any additional configuring.
With those words of background, it is time to configure and create a KubeVirt VM.
Configuring and creating a KubeVirt VM
After making Kubernetes, KubeVirt, LINSTOR, and Kubernetes networking preparations, next you can create a KubeVirt VM.
The KubeVirt VM will need a CDI DataVolume (DV) to store the VM disk image. You can either specify the DV and its specs in the VM configuration, and it will be created when the VM is first instantiated, or else you can create the DV in advance and reference it by name in the VM configuration.
For reasons of understanding, perhaps not for convenience, this article shows creating a DV before creating a VM.
Creating a KubeVirt CDI DataVolume for the VM disk image
To create a KubeVirt DataVolume to store the disk image for the VM that you will create later, enter the following commands:
cat << EOF > dv-debian-12.yaml
apiVersion: cdi.kubevirt.io/v1beta1
kind: DataVolume
metadata:
  name: "dv-debian-12"
spec:
  storage:
    resources:
      requests:
        storage: 4Gi
    accessModes:
      - ReadWriteMany
    volumeMode: Block
    storageClassName: linstor-basic-kubevirt-storage-class
  source:
    http:
      url: "https://cdimage.debian.org/images/cloud/bookworm/latest/debian-12-nocloud-amd64.qcow2"
EOF
kubectl apply -f dv-debian-12.yaml
❗ IMPORTANT: The
ReadWriteManystorage access mode is a requirement for live migrating the VM. You also might want to change the allocated storage size to suit your needs. The4GiBsize shown in this configuration is enough for a demonstration Debian VM, but might not be enough for an actual use case.
After applying the configuration file to your Kubernetes deployment, output from the command will show that the DV was created.
Verifying the CDI DataVolume
To verify that you created the DV successfully, enter the following command:
kubectl get datavolumes.cdi.kubevirt.io dv-debian-12Output from the command will be similar to this:
NAME           PHASE               PROGRESS   RESTARTS   AGE
dv-debian-12   PendingPopulation   N/A                   5m25s
The DV will report that it is in a PendingPopulation phase. This is because the storage class that you created earlier that backs the DV, linstor-basic-kubevirt-storage-class, has a volumeBindingMode of WaitForFirstConsumer. The DV will not be populated until you create and instantiate a VM that references the DV. After instantiating a VM later, if you enter another kubectl get command, the phase will eventually show Succeeded with 100% progress.
Creating a KubeVirt VM
After creating a KubeVirt CDI DV, you can create a VM that references the DV. Enter the following commands to create a VM by using an official Debian 12 (Bookworm) nocloud QCOW2 image:
cat << EOF > testvm-rwx-debian-12.yaml
apiVersion: kubevirt.io/v1
kind: VirtualMachine
metadata:
  name: testvm-rwx-debian-12
spec:
  runStrategy: Manual
  template:
    metadata:
      annotations:
        kubevirt.io/allow-pod-bridge-network-live-migration: v1
    spec:
      domain:
        devices:
          disks:
            - name: disk0
              disk:
                bus: virtio
        resources:
          requests:
            memory: 2Gi
      volumes:
      - dataVolume:
          name: dv-debian-12
        name: disk0
EOF
kubectl apply -f testvm-rwx-debian-12.yaml
The annotation kubevirt.io/allow-pod-bridge-network-live-migration: v1 is a requirement if you want to be able to live migrate the VM. Depending on your needs, and the VM image, you might change some of the other values in this configuration. For example, setting the KubeVirt VM RunStrategy to Manual means that KubeVirt will not automatically start or stop the VM, an administrator must do that manually. It is possible to set other run strategies if you need to.
After you apply the KubeVirt VM configuration to your Kubernetes deployment, output from the command will show that your VM was created. You can verify this by entering a kubectl get vms command.
Output from the command will show that your VM exists but is in a stopped state.
NAME                   AGE   STATUS    READY
testvm-rwx-debian-12   12s   Stopped   False
This is because the manual runStrategy requires an administrator to start the VM.
Starting a KubeVirt VM
Before starting the VM you just created, it might be interesting to check in on some LINSTOR objects.
Enter the following command to list LINSTOR resource groups and resources in your cluster:
kubectl linstor resource-group list && kubectl linstor resource listOutput from the command in a new cluster without any existing resource groups or resources will show the following:
╭──────────────────────────────────────────────────────╮
┊ ResourceGroup ┊ SelectFilter  ┊ VlmNrs ┊ Description ┊
╞══════════════════════════════════════════════════════╡
┊ DfltRscGrp    ┊ PlaceCount: 2 ┊        ┊             ┊
╰──────────────────────────────────────────────────────╯
╭──────────────────────────────────────────────────────────────────╮
┊ ResourceName ┊ Node ┊ Layers ┊ Usage ┊ Conns ┊ State ┊ CreatedOn ┊
╞══════════════════════════════════════════════════════════════════╡
╰──────────────────────────────────────────────────────────────────╯
For some excitement, before starting the VM that you created, you might use tmux, screen, or another terminal multiplexer to simultaneously watch -c LINSTOR resource group and resource list commands in separate panes.
Next, start the KubeVirt VM that you created earlier.
virtctl start testvm-rwx-debian-12Output from the command will show that the VM has been scheduled to start.
You can enter a kubectl get vmis --watch command to monitor the VM starting. After a while, output from the command will show the VM in a running state.
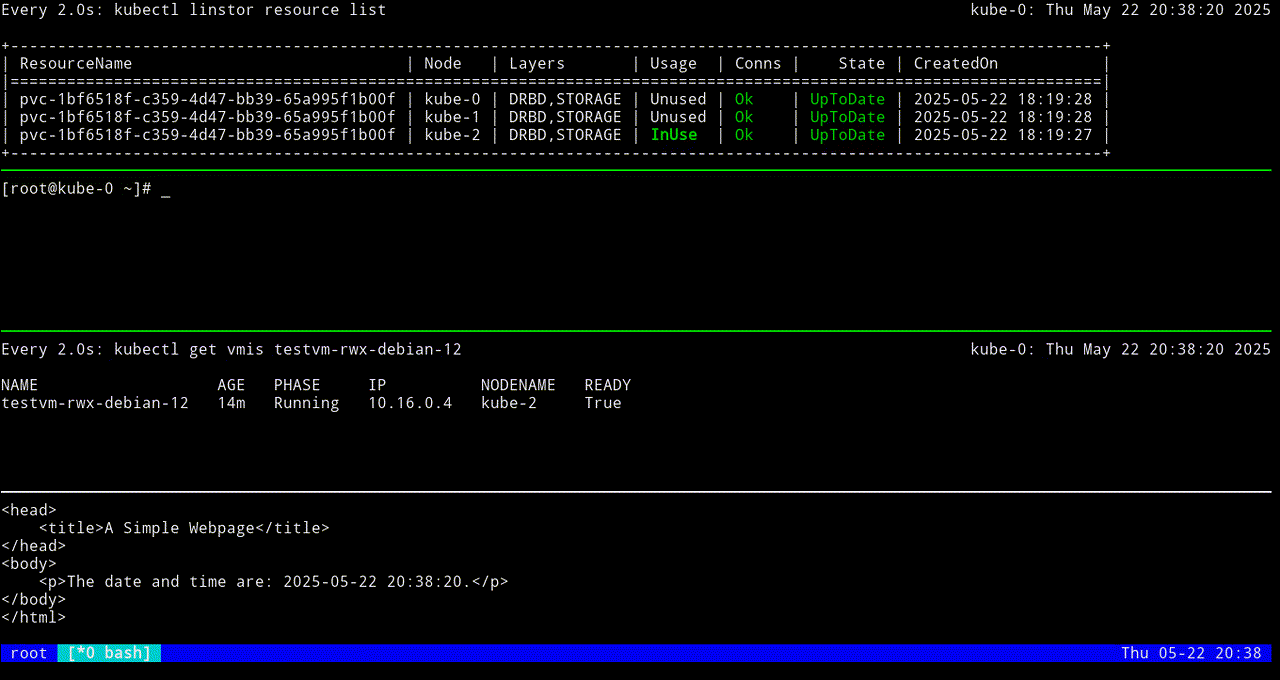
NAME                   AGE   PHASE     IP          NODENAME   READY
testvm-rwx-debian-12   11m   Running   10.16.0.4   kube-2     True
Logging in to the KubeVirt VM
After your VM reaches an up and running state, you can use a virtctl console command to log in to it.
virtctl console testvm-rwx-debian-12Output from the command should show that you have successfully connected to the VM.
Successfully connected to testvm-rwx-debian-12 console. The escape sequence is ^]If the terminal does not show a login prompt, try pressing the Enter key.
testvm-rwx-debian-12 login:Log in with username root, without a password. Log out by entering exit, then use the escape key sequence Ctrl+] to end the VM console session.
Verifying LINSTOR resource groups and resources
If you were not using watch commands to monitor the output of kubectl linstor resource-group list and kubectl linstor resource list commands when you started the KubeVirt VM earlier, enter them now.
kubectl linstor resource-group list && kubectl linstor resource listOutput will be similar to the following:
╭─────────────────────────────────────────────────────────────────────────╮
┊ ResourceGroup  ┊ SelectFilter                    ┊ VlmNrs ┊ Description ┊
╞═════════════════════════════════════════════════════════════════════════╡
[...]
╞┄┄┄┄┄┄┄┄┄┄┄┄┄┄┄┄┄┄┄┄┄┄┄┄┄┄┄┄┄┄┄┄┄┄┄┄┄┄┄┄┄┄┄┄┄┄┄┄┄┄┄┄┄┄┄┄┄┄┄┄┄┄┄┄┄┄┄┄┄┄┄┄┄╡
┊ kubevirt-sc-rg ┊ PlaceCount: 3                   ┊ 0      ┊             ┊
┊                ┊ StoragePool(s): lvm-thin        ┊        ┊             ┊
┊                ┊ LayerStack: ['DRBD', 'STORAGE'] ┊        ┊             ┊
╰─────────────────────────────────────────────────────────────────────────╯
╭────────────────────────────────────────────────────────────────────────────────╮
┊ ResourceName ┊ Node   ┊ Layers       ┊ Usage  ┊ Conns ┊      State ┊ CreatedOn ┊
╞════════════════════════════════════════════════════════════════════════════════╡
┊ pvc-[...]    ┊ kube-0 ┊ DRBD,STORAGE ┊ Unused ┊ Ok    ┊   UpToDate ┊ [...]     ┊
┊ pvc-[...]    ┊ kube-1 ┊ DRBD,STORAGE ┊ Unused ┊ Ok    ┊   UpToDate ┊ [...]     ┊
┊ pvc-[...]    ┊ kube-2 ┊ DRBD,STORAGE ┊ InUse  ┊ Ok    ┊   UpToDate ┊ [...]     ┊
╰────────────────────────────────────────────────────────────────────────────────╯
Live migrating a KubeVirt VM
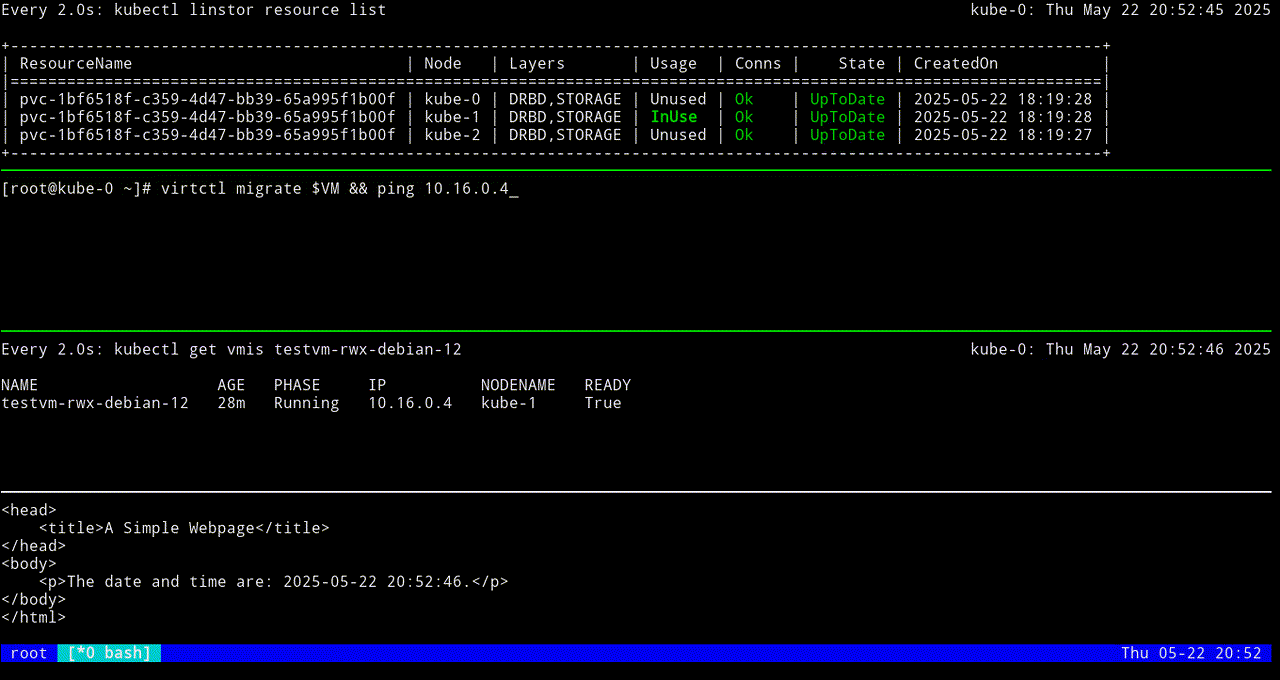
With a KubeVirt VM up and running, it is time to highlight a feature of using LINSTOR-backed storage for KubeVirt VM disks: VM live migrations. If you are comfortable using tmux, screen, or another terminal multiplexer, this is a great use case for one. In one terminal multiplexer pane, you can enter a watch -c kubectl linstor resource list command, to monitor in real time the LINSTOR resource that backs the KubeVirt VM disk, and in another pane you can enter commands that will migrate the VM from one node to another.
If you do not want to use a terminal multiplexer, that is fine. You can enter a kubectl linstor resource list command before and after you live migrate the VM, to confirm that the LINSTOR resource that backs your KubeVirt VM disk has moved to another node.
To live migrate the VM, named testvm-rwx-debian-12 in this example, enter the following command:
virtctl migrate testvm-rwx-debian-12Output from the command should show that the VM will be migrated.
VM testvm-rwx-debian-12 was scheduled to migrateIf you are monitoring the output of a kubectl linstor resource list command in real time, output will show the LINSTOR resource InUse on one node, then also InUse on another node, and finally, after the migration is complete, InUse on the new node and Unused on the original node.
The first screen grab shows an initial KubeVirt migration, while the VM uses a looping python3 -m http.server 80 command to “host” a simple web page that itself relies on a looping while command to update the page every second with the date and time.
The next screen grab shows migrating the KubeVirt VM back to the original node.
Conclusion and next steps
Hopefully this article helps to get you started in the exciting world of running and managing virtual machines in Kubernetes. Whether your reason for doing this is to migrate legacy workloads to modern, containerized microservices, to help with CI/CD testing workflows in Kubernetes, to improve use of hardware resources for mixed workloads under a single control plane, or something else, by using KubeVirt it is possible.
By using LINSTOR to back persistent storage for your VM disks and data storage, you gain benefits such as being able to live migrate VMs which can help your VM workloads stay up and running, for example, during system maintenance events. LINSTOR also brings disaster recovery capability to your Kubernetes persistent storage. You can create snapshots of LINSTOR-managed thin-provisioned storage volumes and ship them to another LINSTOR cluster or S3-compatible storage for backups. There are still more benefits LINSTOR brings to Kubernetes such as storage resource monitoring by using Prometheus metrics and Grafana dashboards, automatic storage resource provisioning and deployment, and more.
If you are a SUSE Rancher or Harvester user, LINBIT is a SUSE certified partner. You can browse LINBIT software offerings in the SUSE partner certification and solutions catalog.
If you have questions about using LINSTOR in Kubernetes, or with using LINSTOR with KubeVirt for your use case, reach out to the LINBIT team or join the LINBIT Community Forum.