This article is a companion article to “How to Setup LINSTOR on Proxmox VE”. Instructions in this article will guide you through installing and integrating LINSTOR® with Proxmox VE. However, rather than using the LINSTOR client utility, within a CLI, to set up LINSTOR, you will use the open source LINBIT GUI.
Some of the benefits of integrating LINSTOR with Proxmox are:
- Virtual disk replicas on two or more nodes
- Live migrations of virtual machines (VMs) and containers
- High availability (HA) for VMs and containers
- Flexibility to configure the replica count in your cluster
- Thin-provisioned volume snapshots and snapshot shipping for disaster recovery
- Ability to use LINSTOR storage pools and resource groups to configure tiered-storage
The previously mentioned article goes into more detail and explanation about the steps to integrate LINSTOR with Proxmox. This article is really meant to get you up-and-running as quickly as possible, with just the bare amount of explanation or background information. If you find yourself wanting more information about the setup steps or the integration, refer to the earlier mentioned article or the Proxmox chapter of the LINSTOR User Guide.
Assumptions
The assumptions about your deployment environment are similar to the assumptions in the earlier mentioned “How to Setup LINSTOR on Proxmox VE” article. These are:
- You have a working Proxmox Virtual Environment (PVE) 8.x cluster with three nodes,
proxmox-0,proxmox-1, andproxmox-2. This tutorial uses PVE version 8.4.0 with kernel6.8.12-10-pve. - Each node has an additional unused physical disk drive,
/dev/vdb. - You will install LINSTOR alongside Proxmox in a hyperconverged cluster, that is, your Proxmox nodes will also be LINSTOR nodes.
- All commands that you might need to run within a CLI, for example, installing packages or working with a logical volume manager, are run under the root user account or prefixed with
sudofrom a privileged user account.
Installing LINSTOR alongside Proxmox
You can get LINSTOR packages for Proxmox in a few different ways:
- For LINBIT® customers, all required packages are available from the
drbd-9LINBIT repository for Proxmox. - The LINBIT public Proxmox package repository is the LINBIT equivalent offering to the Proxmox No-Subscription Repository.
- As an alternative to installing from packages, you can compile LINSTOR and related components from their open source project repositories.
If you are not a current LINBIT customer but want to evaluate LINBIT software, you can contact the LINBIT team for an evaluation account.
For convenience, the instructions in this article show configuring the LINBIT public Proxmox package repository.
Adding the LINBIT public Proxmox package repository
You can add the LINBIT public Proxmox package repository by entering the following commands on all your nodes:
wget https://packages.linbit.com/public/linbit-keyring.deb
dpkg -i linbit-keyring.deb
PVERS=8 && echo "deb [signed-by=/etc/apt/trusted.gpg.d/linbit-keyring.gpg] \
  http://packages.linbit.com/public/ proxmox-$PVERS drbd-9" \
  > /etc/apt/sources.list.d/linbit.list
apt update
❗ IMPORTANT: Set the
PVERSvariable to your Proxmox VE major version number. In this example, thePVERSvariable is set to8because Proxmox VE 8.4.0 is installed. If you need to determine what version of Proxmox VE you are running, enter apveversion --verbose|grep proxmox-vecommand.
⚠️ WARNING: Although the LINBIT public package repository can be a great option for a homelab, testing, or other non-production use, LINBIT does not offer any guarantees, support, or SLAs for the packages in LINBIT public repositories. For production or enterprise deployments, using the official LINBIT customer repositories is recommended.
Installing low-level components
First, install some of the necessary low-level components that you will need before you install LINSTOR and the LINSTOR Proxmox plugin.
On all nodes in your cluster, enter the following command:
apt install -y proxmox-default-headers drbd-dkms drbd-utilsInstalling LINSTOR components
Next, install LINSTOR components by entering the following command on all nodes:
apt install -y linstor-controller linstor-satellite linstor-client📝 NOTE: The instructions in this article only require the LINSTOR controller service to be installed and running on one node,
proxmox-0. However, by installing thelinstor-controllerpackage on all nodes, you can later make the LINSTOR controller service highly available in your cluster, as a next step.
Start the LINSTOR satellite service on all nodes.
systemctl enable linstor-satellite --nowStart the LINSTOR controller service on one node only, proxmox-0.
systemctl enable linstor-controller --nowDisable the LINSTOR controller service on all other nodes:
systemctl disable linstor-controller --nowInstalling the LINBIT GUI
You can install the LINBIT GUI from a DEB package available on both the LINBIT customer and public Proxmox repositories. To install the LINBIT GUI, enter the following command on all nodes:
apt install -y linstor-guiSetting up LINSTOR by using the GUI
You can reach the GUI by opening the following URL in a web browser on the same network as your LINSTOR controller node: http://<LINSTOR_controller_node_hostname_or_IP_address>:3370.
In this article, proxmox-0 is the LINSTOR controller node hostname and its IP address is 192.168.222.130.
Adding nodes by using the GUI
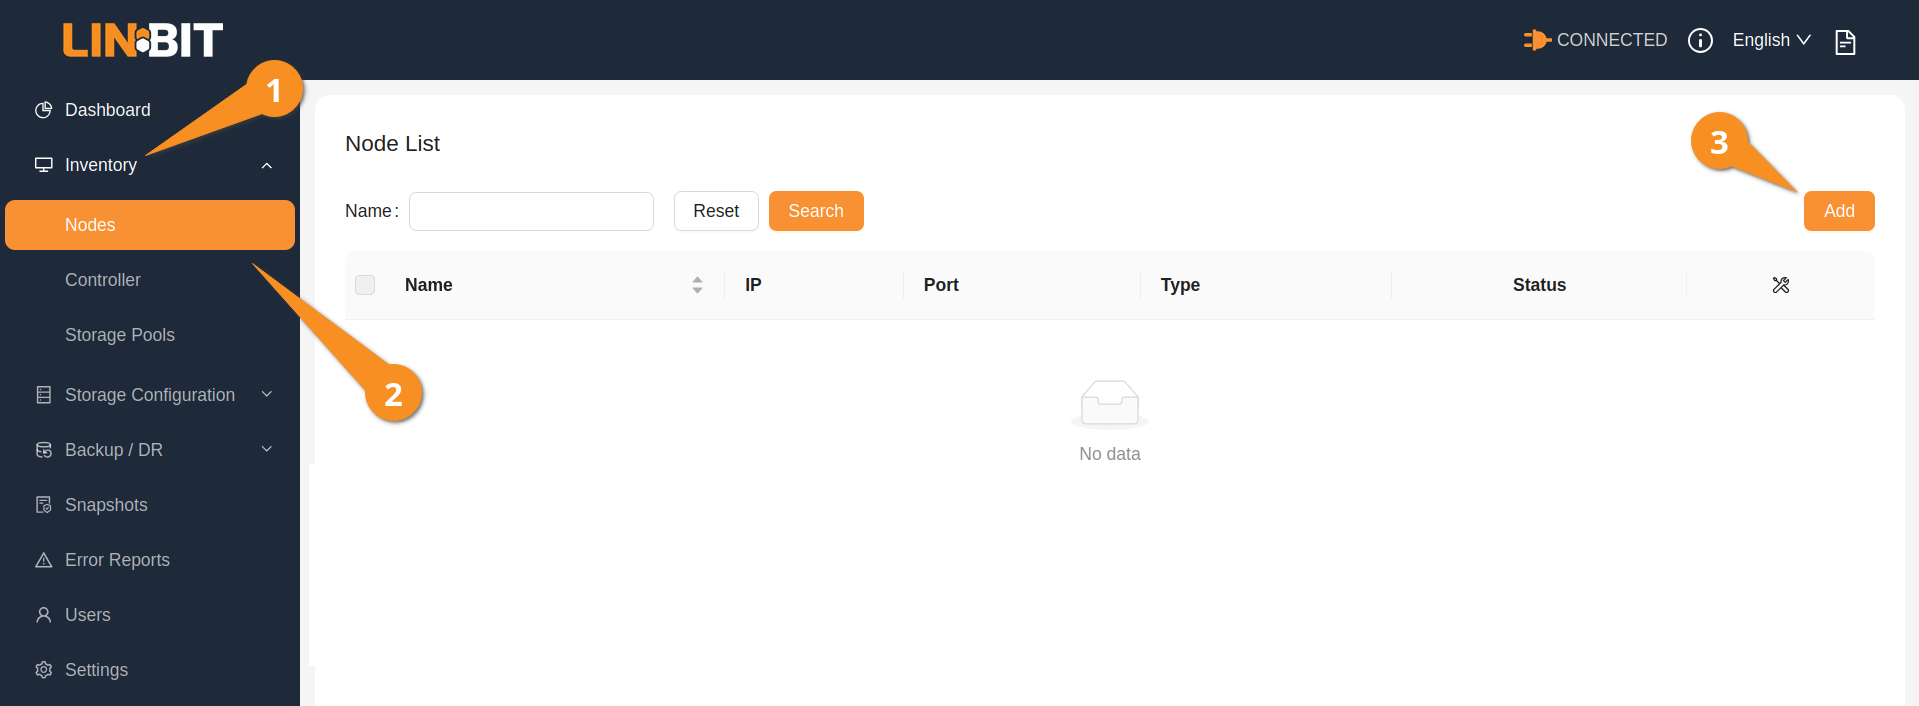
Before you can configure LINSTOR storage, you need to set up your LINSTOR cluster by defining the cluster nodes. Go to the “Node List” screen by expanding the “Inventory” menu item on the left side of the screen, then clicking on “Nodes”.
At first, your LINSTOR deployment will have no defined nodes. On the “Node List” screen, click the “Add” button to add a node to your cluster. This will take you to the “Create Node” screen.
On the “Create Node” screen, you enter information about the node you want to add. For example, proxmox-0 for the name and 192.168.222.130 for its IP address. For the “Type” field, choose “Satellite”, “Controller”, or “Combined”, depending on the node’s role. In this article’s example deployment, proxmox-0 runs LINSTOR satellite and controller services, so it has a “Combined” role in the cluster.

After creating a LINSTOR combined node, create the other two nodes as LINSTOR satellite nodes.

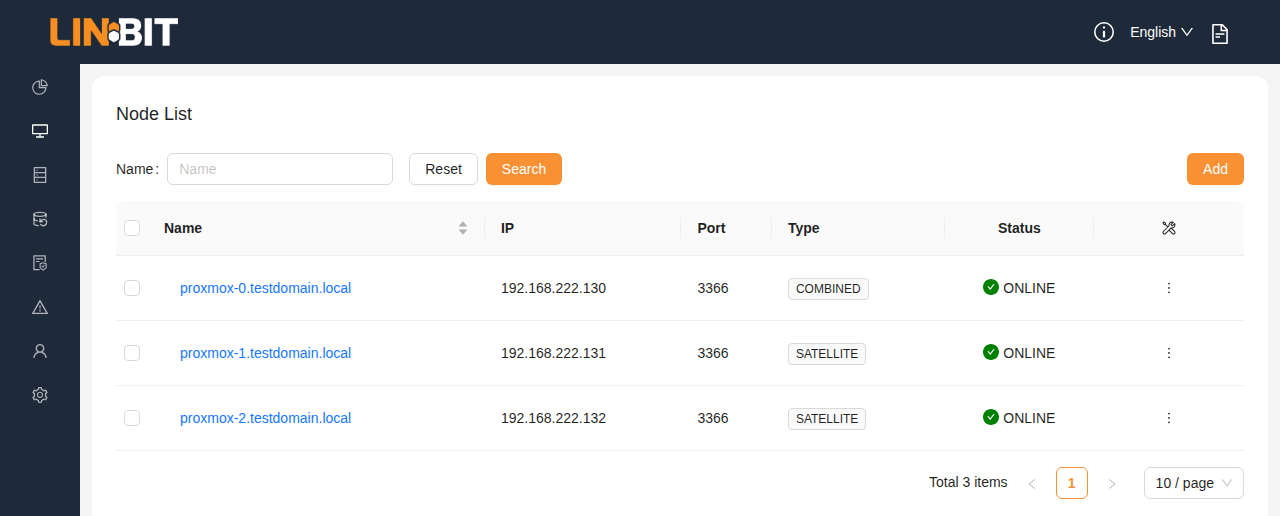
When you finish defining nodes in your cluster, the “Node List” screen will show summary information for them.
Adding storage pools
After defining the nodes in your LINSTOR cluster, you can configure LINSTOR-managed storage. The GUI allows you to create storage pools with some extra convenience. Unlike the LINSTOR CLI client, for example, you can create the same storage pool on multiple nodes using a single input form, rather than executing multiple CLI commands.
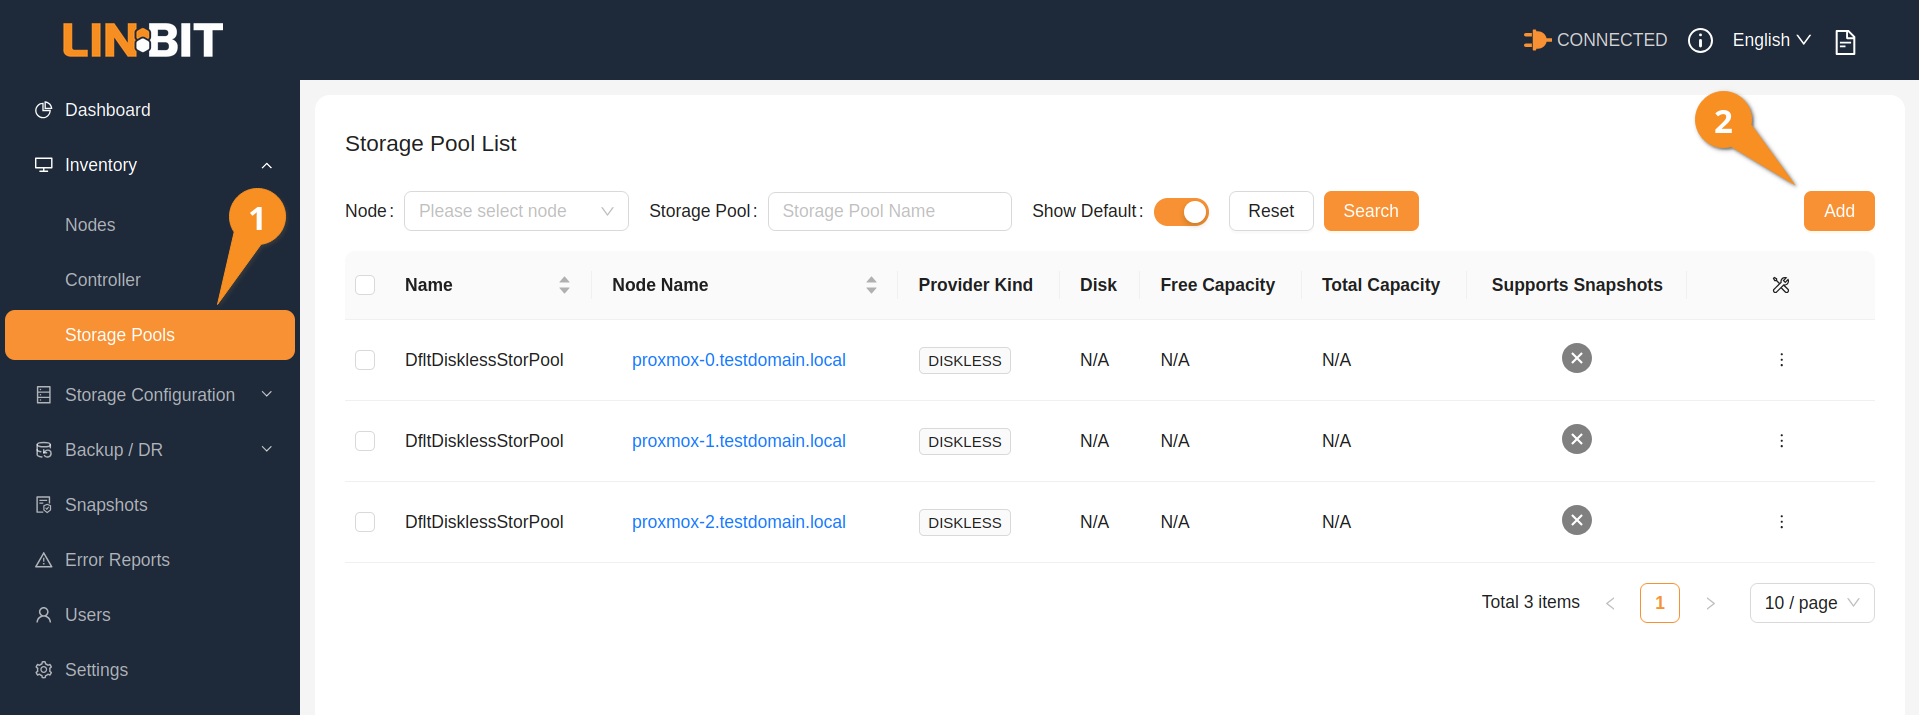
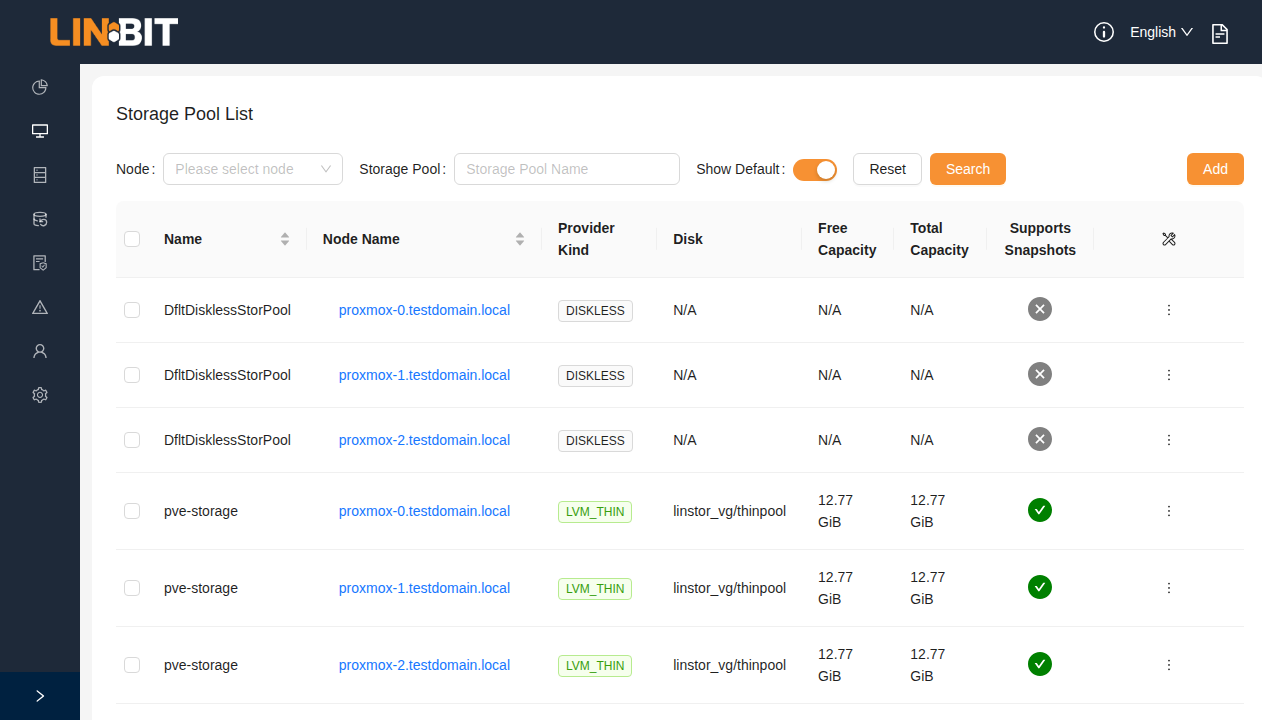
Navigate to the “Storage Pool List” screen by clicking the “Storage Pools” item from within the “Inventory” menu item on the left side of the GUI. In a new LINSTOR deployment, the screen will list only the default “diskless” storage pool on all your LINSTOR satellite nodes.
Next, click the “Add” button on the “Storage Pool List” screen. This will bring you to a screen where you can define and create a new storage pool.
On the “Add Storage Pool” screen, you might complete the fields as follows, for example:
- Storage Pool Name:
pve-storage - Multiple Nodes: toggle on
- Node:
proxmox-0proxmox-1proxmox-2 - Type:
LVM_THIN - Device path:
/dev/vdb
However, for the Proxmox use case in this guide, you need some free space head room with your storage pool. For this reason, you need to create an LVM volume group on all your storage cluster nodes by using the CLI, and then create a thin-provisioned logical volume that only uses 80% of your physical disk to leave some headroom. To do that, enter the following command on all the storage nodes in your cluster:
vgcreate linstor_vg /dev/vdb && \
  lvcreate -l 80%FREE -T linstor_vg/thinpool
Output from the command will show that the volume group and the logical volume were created.
  Physical volume "/dev/vdb" successfully created.
  Volume group "linstor_vg" successfully created
  Thin pool volume with chunk size 64.00 KiB can address at most <15.88 TiB of data
  Logical volume "thinpool" created.
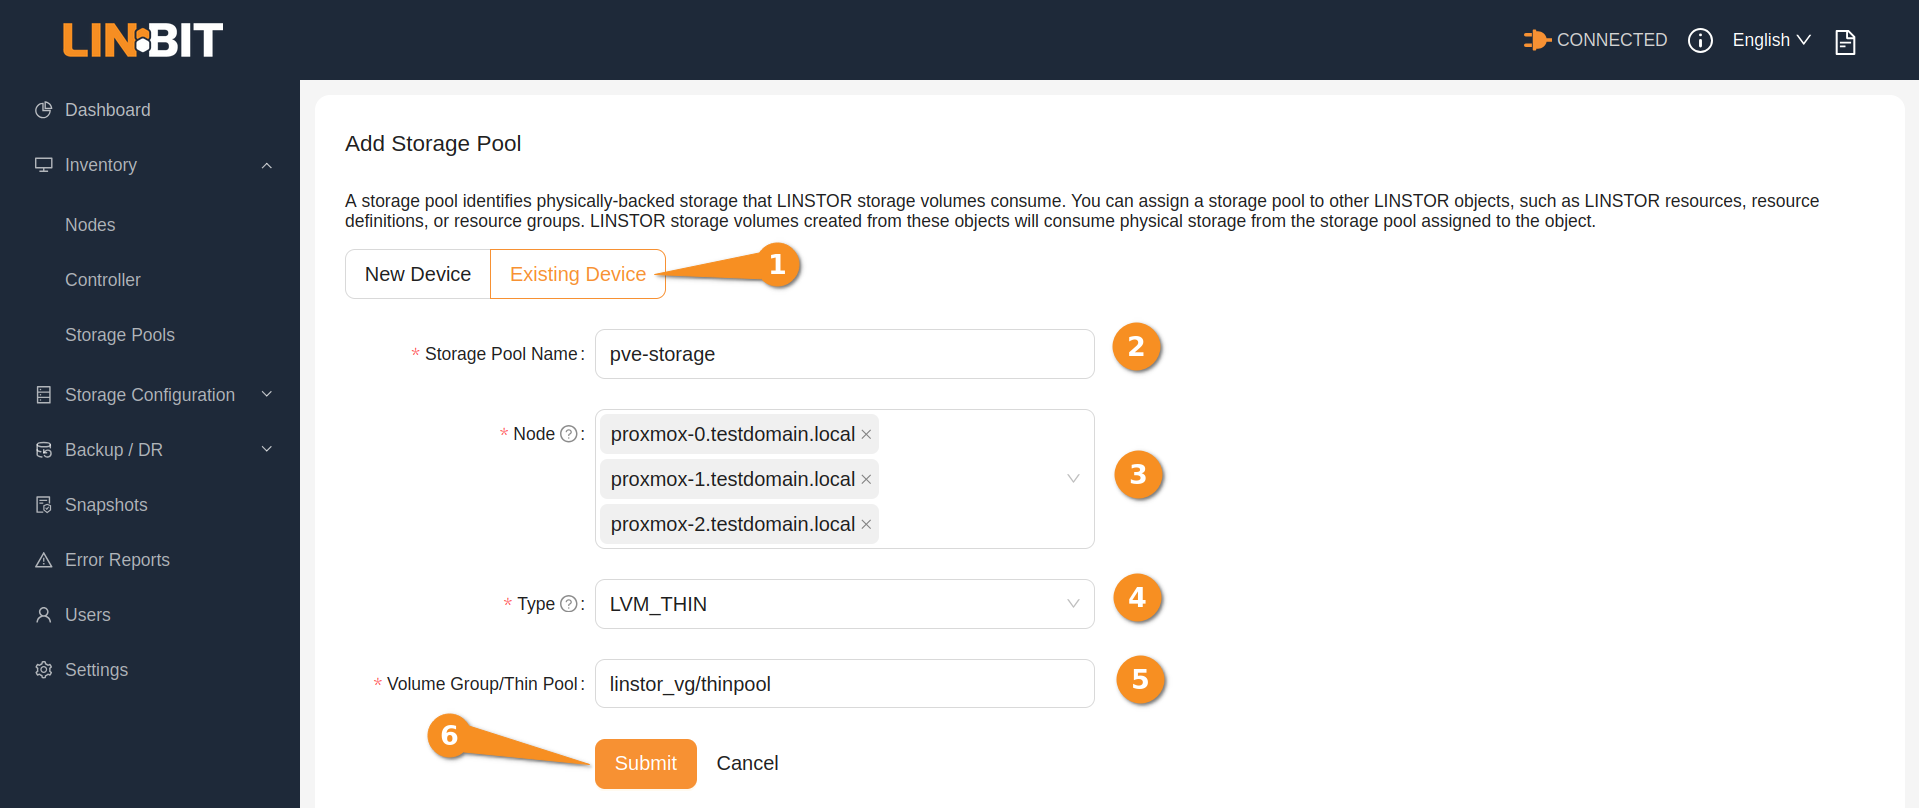
After creating an LVM volume group and thin pool logical volume on all your storage nodes, you can add a LINSTOR storage pool backed by this logical volume on all your nodes. If you are not on it already, return to the “Add Storage Pool” screen by expanding the “Inventory” menu item and clicking on “Storage Pools”. Click the “Add” button in the upper right corner. On the “Add Storage Pool” screen, click the “Existing Device” tab and complete the fields, for example:
- Storage pool name:
pve-storage - Node:
proxmox-0,proxmox-1,proxmox-2 - Type:
LVM_THIN - Volume group:
linstor_vg/thinpool
Click the “Submit” button after entering values into the fields.
After defining and creating the pve-storage storage pool on your LINSTOR satellite nodes, the “Storage Pool List” screen will show the new storage pool on these nodes.
Creating a LINSTOR resource group
After creating the same storage pool, pve-storage, on all your satellite nodes, you need to create a LINSTOR resource group. In this case, you will create a resource group that is backed by the storage pool that you just created. Later you will link this resource group to Proxmox when you configure the LINSTOR Proxmox integration plugin. This way, when you specify that Proxmox uses LINSTOR storage, for example, when you create a new VM, LINSTOR will create a new resource from the resource group, and deploy replicas of the resource in your cluster, all automatically and behind-the-scenes. Proxmox will then use this storage resource to store the VM disk image.
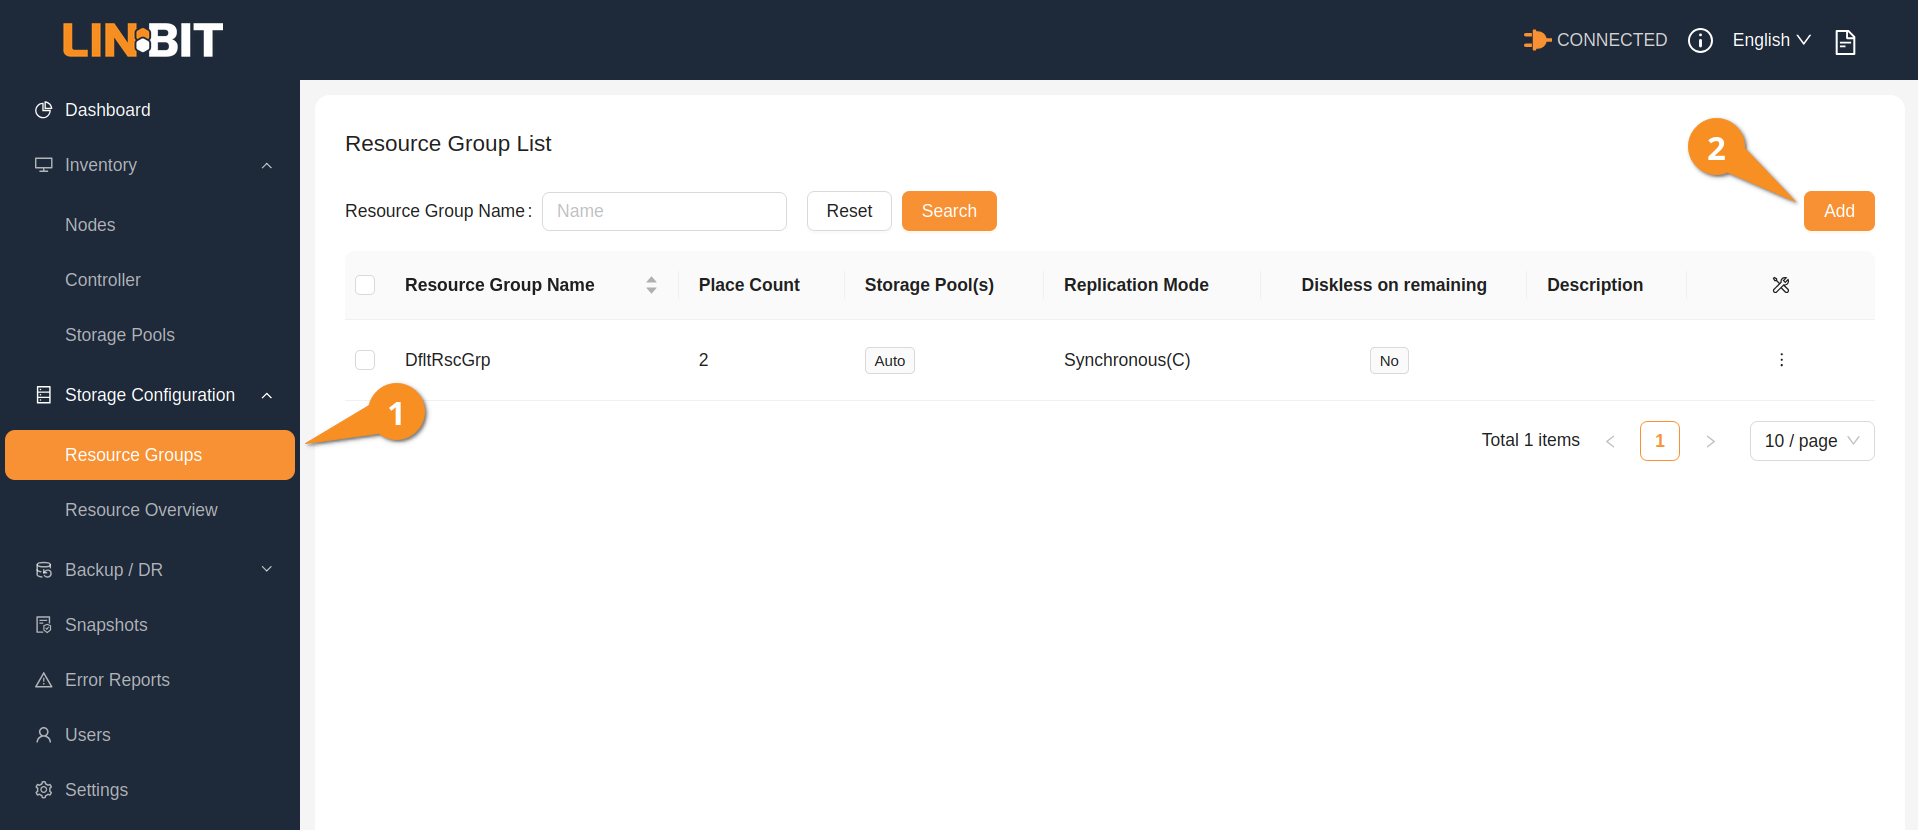
To create a LINSTOR resource group, expand the “Storage Configuration” menu item and click “Resource Groups”. From the “Resource Group List” screen, click the “Add” button.
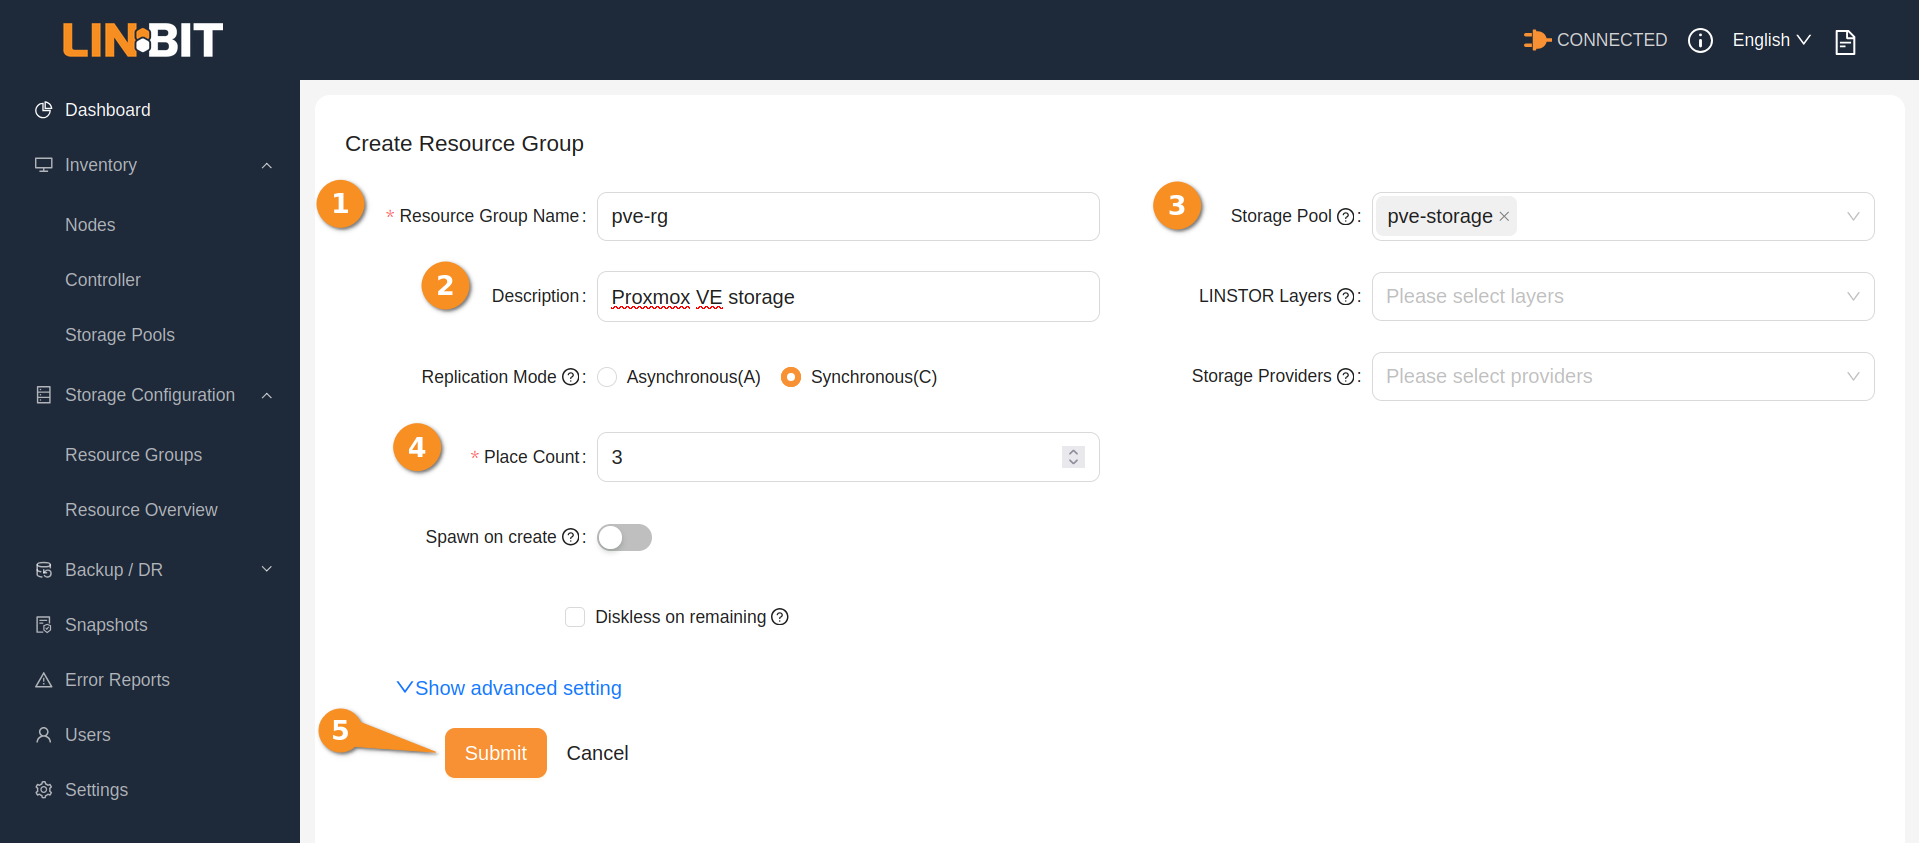
On the “Create Resource Group” screen, enter the following values in these fields:
- Name:
pve-rg - Description: Proxmox VE storage
- Storage Pool:
pve-storage - Place Count: 3
After entering the values, click the “Submit” button.
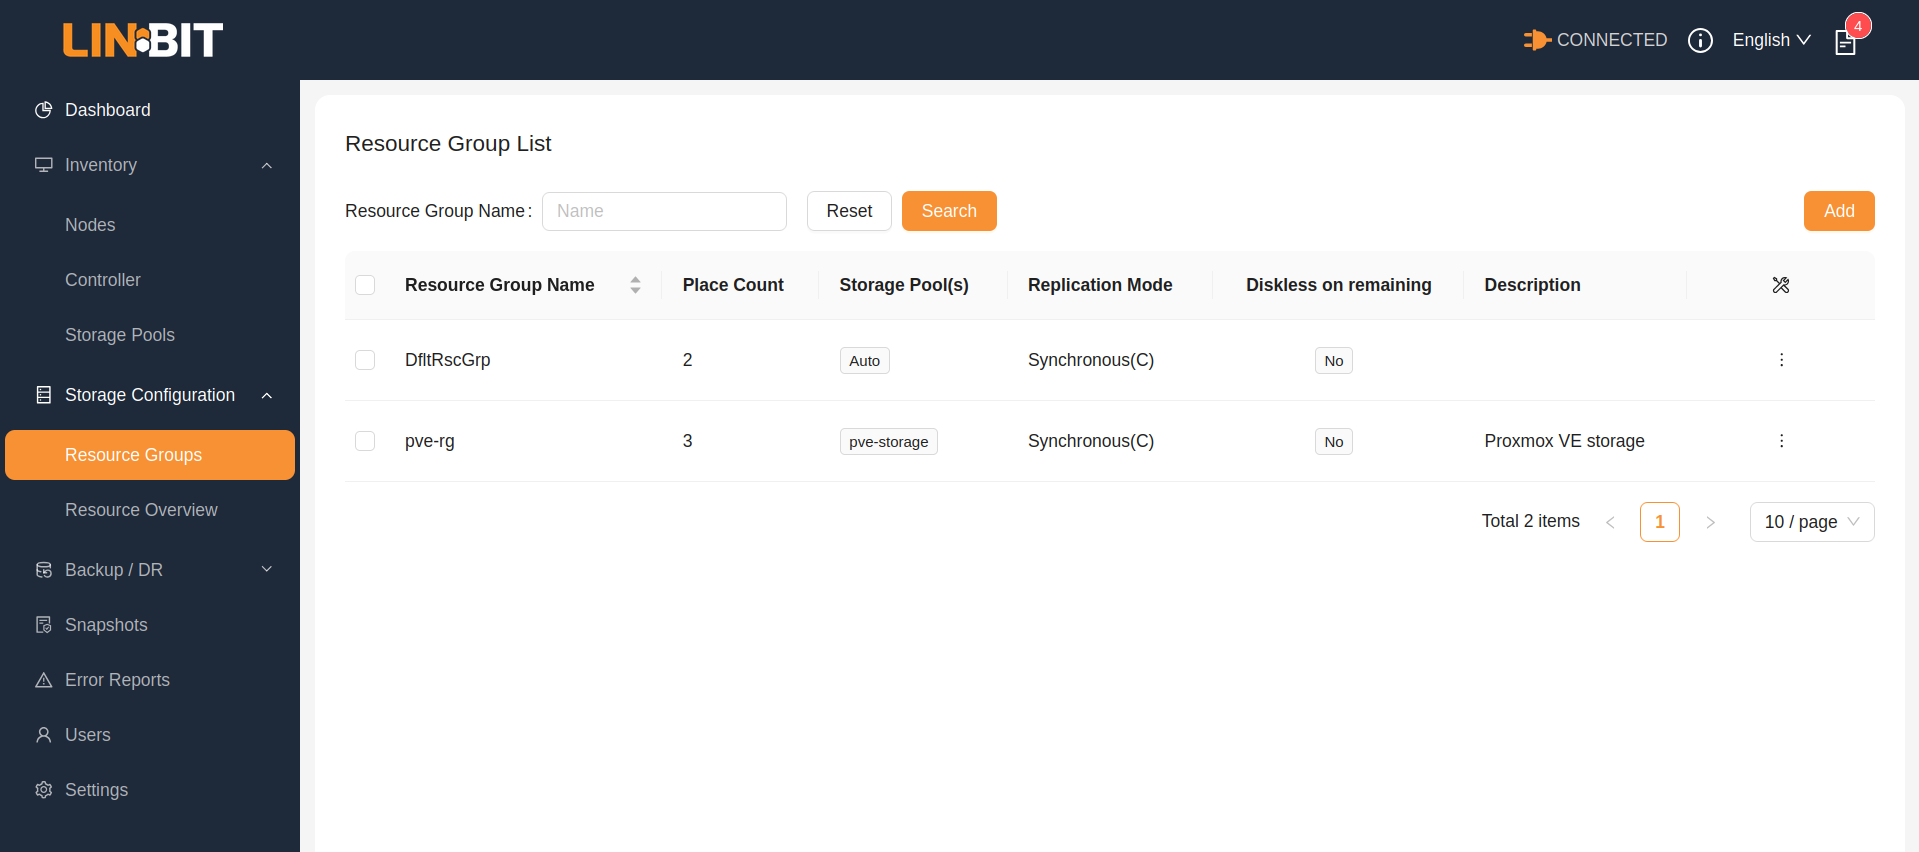
LINSTOR will create the resource group and the associated LINSTOR volume group. After creating the resource group, the GUI will return to the “Resource Group List” page. The resource group list will show the new pve-rg resource group. You are now ready to install and configure the LINSTOR Proxmox integration plugin.
Installing the LINSTOR Proxmox VE plugin
After defining and creating the necessary LINSTOR objects that you need for integrating LINSTOR with Proxmox, the next steps are to install and configure the LINSTOR Proxmox integration plugin. To install the LINSTOR Proxmox plugin, enter the following command on all your Proxmox nodes:
apt install -y linstor-proxmoxConfiguring the LINSTOR Proxmox VE plugin
After installing the LINSTOR Proxmox plugin, you need to configure it. Proxmox stores its storage configuration in the /etc/pve/storage.cfg file. Use the following command, or a text editor, to create the LINSTOR configuration:
On proxmox-0:
cat << EOF | sudo tee -a /etc/pve/storage.cfg

drbd: linstor_storage
    content images, rootdir
    controller 192.168.222.130
    resourcegroup pve-rg

EOF
❗ IMPORTANT: Storage entries within the Proxmox storage configuration file must be separated by an empty new line.
💡 TIP: You only need to edit the configuration file on one node. Proxmox will propagate the changes to the other Proxmox nodes in your cluster.
Within the configuration, you specify the Proxmox content type that you can use with LINSTOR storage, in this example VM images (images) and LXC container data (rootdir). You also specify the LINSTOR resource group and the LINSTOR controller node’s IP address. If you later configure a highly available LINSTOR controller, you would need to edit the configuration file and specify the virtual IP address for the LINSTOR controller.
After editing the Proxmox storage configuration, restart Proxmox services in your cluster by entering the following command on all nodes:
systemctl restart pve-cluster pvedaemon pvestatd pveproxy pve-ha-lrmUsing LINSTOR storage in Proxmox
That’s it. After creating a LINSTOR resource group for Proxmox storage and configuring the LINSTOR Proxmox plugin, you can use this HA storage just as you would any other compatible storage in Proxmox, for example, to store VM images or containers.
You can log in to the PVE web interface to investigate the LINSTOR integration.
Logging in to the Proxmox web interface
Log in to the PVE web interface by opening up the following URL, adjusted for your PVE host’s IP or DNS address, in a web browser: https://192.168.222.130:8006. Then enter your username and password.
Showing LINSTOR storage in the Proxmox web interface
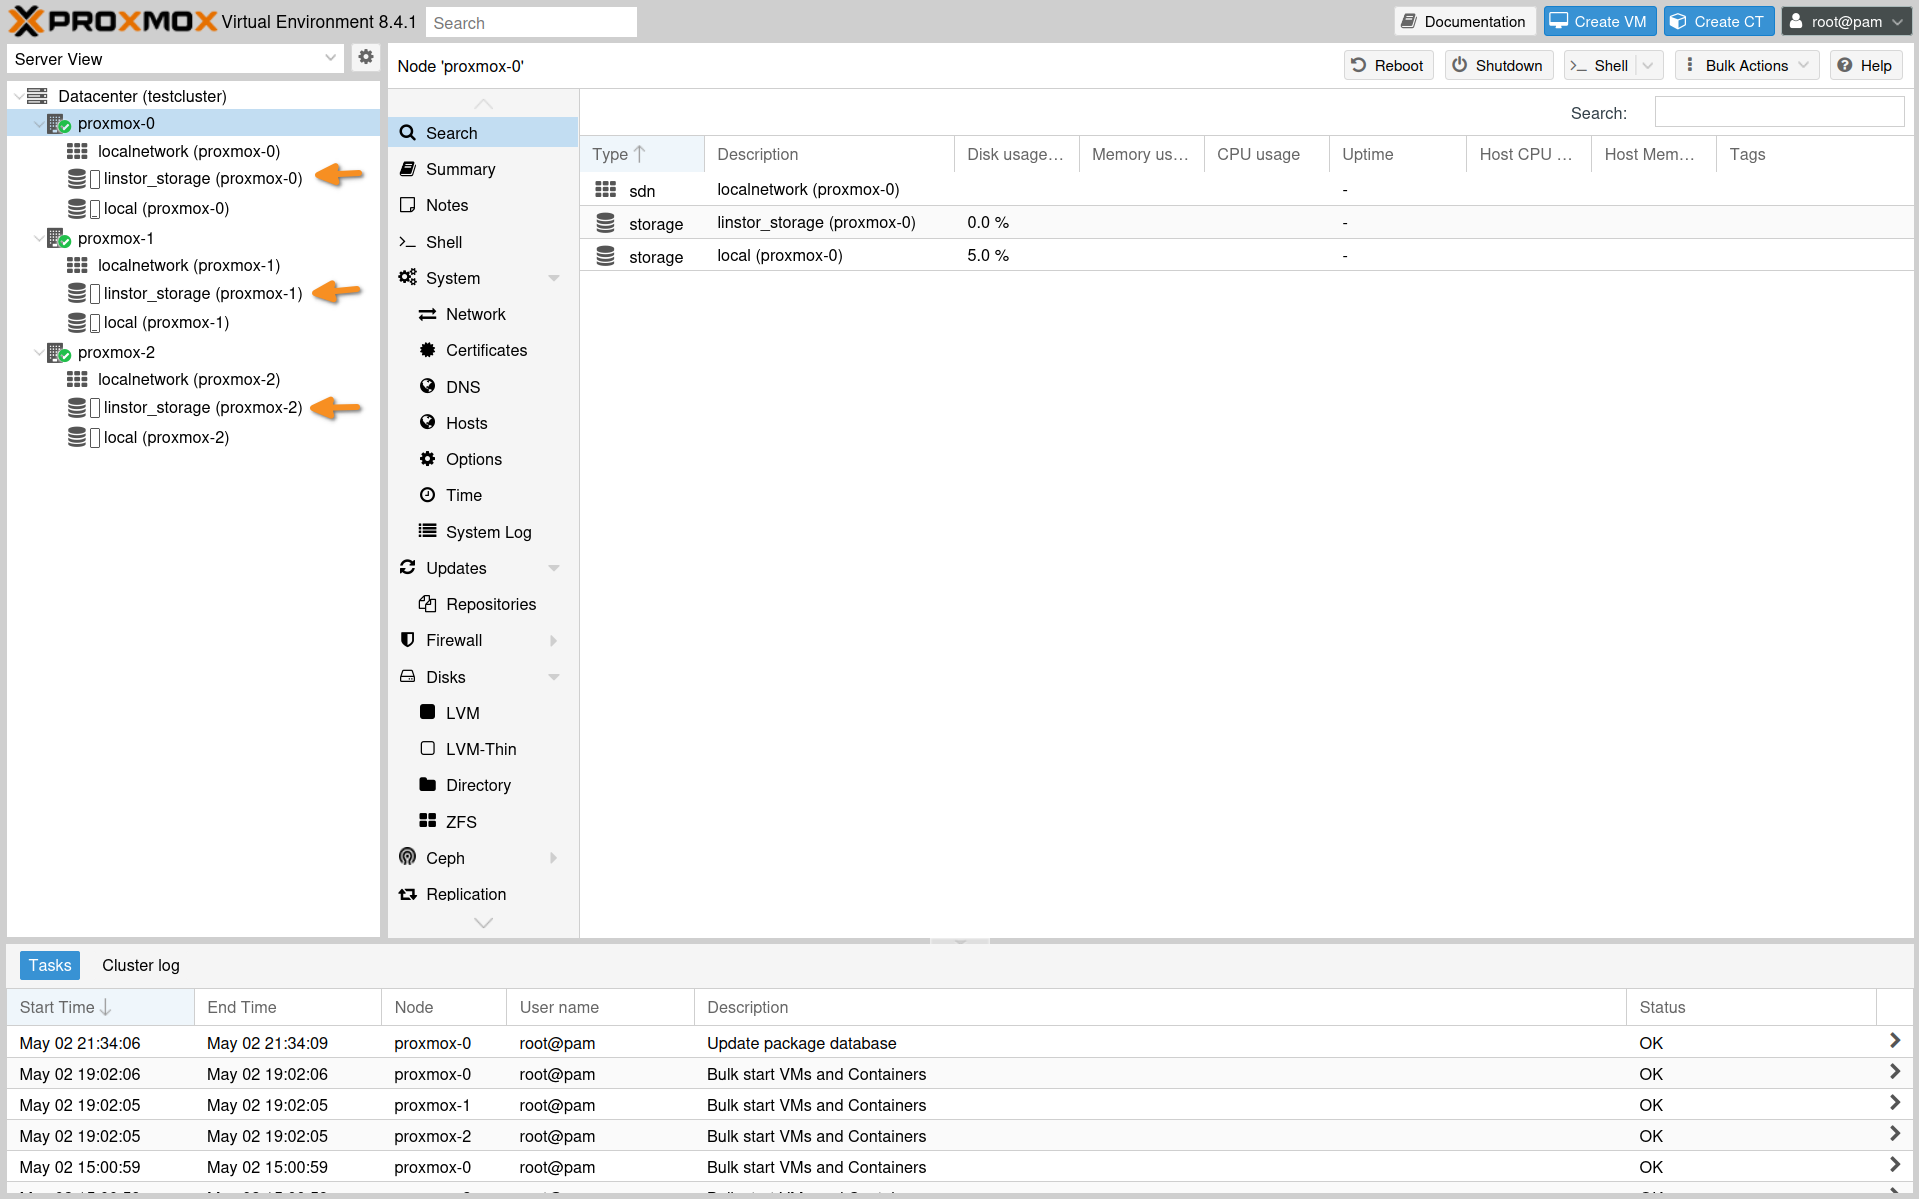
After logging in to the Proxmox web interface, if you click the expansion arrow symbols before each Proxmox node shown within the “Server View” pane, you will find linstor_storage listed as available storage for each node.
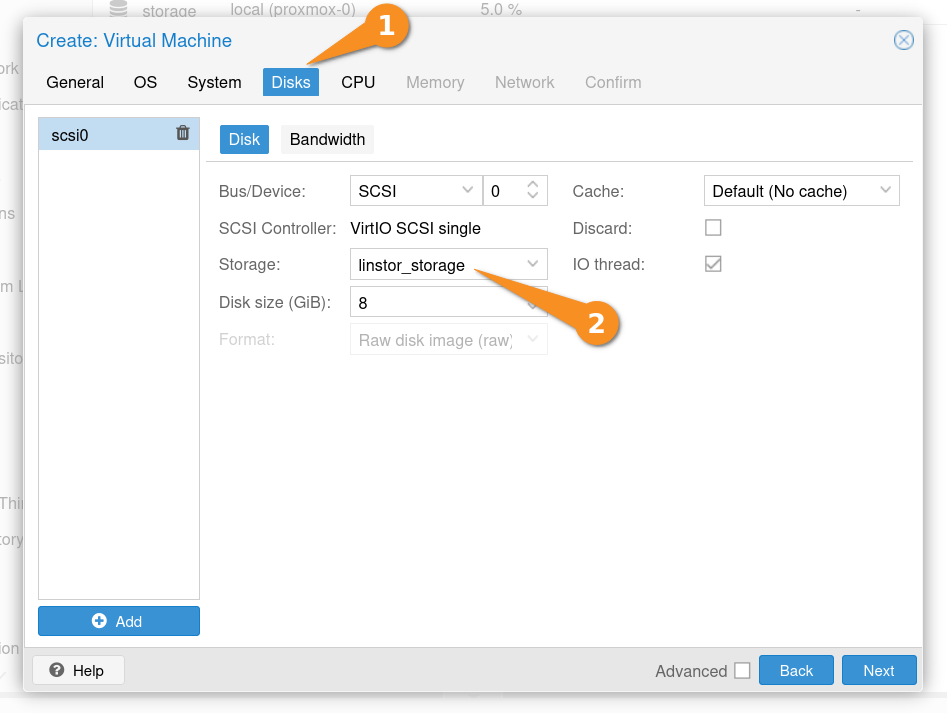
You can use your LINSTOR storage to store your virtual machine images, just as you would any other storage in Proxmox. To do this, when you create a new VM, select linstor_storage in the “Storage” field on the “Disks” tab of the “Create: Virtual Machine” pop-up.
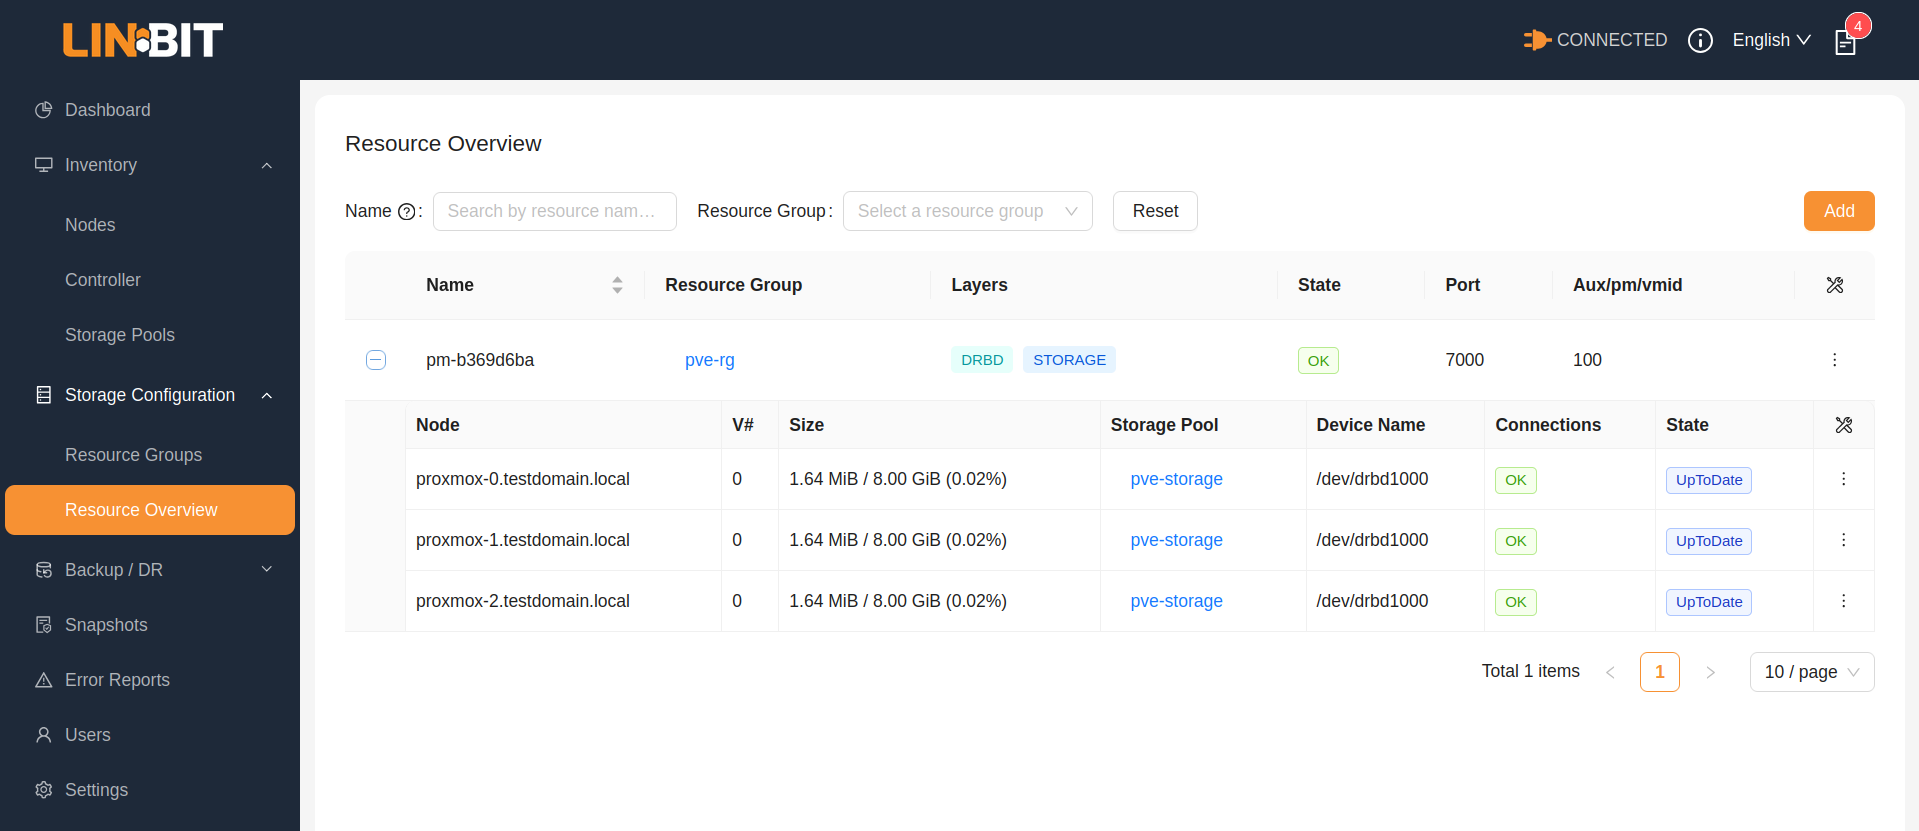
After you create a VM in Proxmox that uses LINSTOR storage, as mentioned earlier, LINSTOR will automatically create a storage resource associated with the VM and replicate the resource on all the nodes in your cluster. In this case, this is because you specified a placement count of 3 for the resource group you associated with Proxmox and because there are three storage nodes in your cluster. You can use the GUI to confirm this, by navigating to the “Resource List” screen.
Migrating virtual machines in Proxmox
If your VM does not have an attached virtual CD or DVD disc drive with an active ISO image, you can migrate your VM backed by LINSTOR storage from node to node, if you needed to. This might be something you would want to do when performing system maintenance tasks on a node. For added flexibility, and to minimize downtime for your VM users, you can also configure Proxmox high availability for your VM. To do this, with your VM selected, click the “More” button in the upper-right part of the screen and select “Manage HA” from the drop-down menu.
After adding a VM to Proxmox HA management, your VM will be automatically recovered on a healthy node in the PVE cluster if the node currently hosting the VM fails. Because LINSTOR-managed storage facilitates perfect, in real-time (synchronous) data replication through DRBD®, all nodes in this example setup will have an up-to-date copy of the VM’s virtual disk. This makes recovery and failover fast.
Next steps and other resources
Hopefully this article has demonstrated some of the convenience and utility of using the LINBIT GUI to configure LINSTOR storage. LINBIT Solutions Architect, Ryan Ronnander, created an excellent video about integrating LINSTOR with Proxmox: “How to Set Up LINSTOR on Proxmox VE”. Watching the video starting at the “Creating a VM with LINSTOR Storage” chapter, would be great companion learning piece to this article. In the video, Ryan shows how to create an example VM in Proxmox, make the VM highly available, and demonstrates VM migration and failover. For simplicity, instructions in this article only showed running the LINSTOR controller service on one node. Another next step you might investigate is how to make the LINSTOR controller service highly available in your cluster.
If you have any questions or issues integrating LINSTOR with Proxmox VE, the LINBIT Community Forums is a great place to ask for help from the community of LINBIT software users. You can also reach out to the LINBIT team if you might have questions about deploying LINSTOR with Proxmox in a production or enterprise environment, or if you want to evaluate LINBIT software for your use case using LINBIT prebuilt customer packages.
Speaking of production and enterprise environments, you can also check out the LINBIT how-to guide, Getting Started With LINSTOR in Proxmox VE. The LINBIT team created this getting started guide with production and enterprise deployments specifically in mind.
Changelog
2025-11-01:
- Showed empty lines delimiting
drbdstorage entry in Proxmox storage configuration file.
2025-08-20:
- Added mentions of Getting Started how-to guide.
2025-06-02:
- Updated to use PVE version 8.4.0 with kernel 6.8.12-10-pve.
- Updated and added screen grabs.
- Made language improvements.
2024-09-12:
- Article originally published.
