In an exciting, possibly world-first offering, the LINBIT® team has created the LINBIT® CloudStack® HCI Appliance. The appliance, built on open source software, is an easy way to deploy CloudStack. Beyond that, the appliance includes LINBIT-developed software such as DRBD®, LINSTOR®, DRBD Reactor, LINSTOR Gateway, and related utilities, plus the LINSTOR integration plugin for CloudStack, all of which facilitate software-defined storage (SDS), high availability (HA), and disaster recovery (DR) capabilities for storage within CloudStack.
Setting up and deploying CloudStack can be a complex task. A production-ready deployment can take several weeks to months before it is ready for users. A basic test deployment in a virtual environment can be set up in a few hours perhaps. By using the appliance, you can easily install CloudStack and LINBIT software in the same cluster of nodes, creating a hyperconverged infrastructure (HCI) deployment, in a fraction of the time that this nontrivial undertaking might normally take you.
This article will cover the LINBIT® CloudStack® HCI Appliance deployment requirements, and guide you through the installation and setup steps.
LINBIT® CloudStack® HCI Appliance deployment requirements
To install the LINBIT® CloudStack® HCI Appliance, you need to have a cluster with a minimum of three nodes.
The nodes in your cluster need to meet these minimum system requirements, as recommended by Apache CloudStack documentation:
- 64-bit x86 CPU (more cores results in better performance)
- 4 GB of memory
- 250 GB of local disk (more results in better capability; 500 GB recommended)
- At least one network interface controller (NIC) although in production systems, the LINBIT team recommends a second NIC to separate DRBD replication traffic for performance reasons
Also, as stated in Apache CloudStack documentation, “Nodes within the cluster must be homogeneous. The CPUs must be of the same type, count, and feature flags.”
❗ IMPORTANT: A minimum of two nodes in your cluster need to have a second disk of at least 36GB, for LINSTOR diskful storage. Two diskful nodes and one diskless (no second disk in this case) is the minimum deployment necessary to meet quorum requirements. The quorum feature helps to avoid data divergence (so called “split-brain” situations) in your cluster. You can have more diskful nodes in your cluster if you want. LINSTOR will use the second disk for CloudStack primary and secondary storage.
After verifying that your cluster meets these requirements, you can install the LINBIT® CloudStack® HCI Appliance.
❗ IMPORTANT: The LINBIT® CloudStack® HCI Appliance supports using LINSTOR storage to back CloudStack primary storage for KVM guest instances only.
Installing the LINBIT® CloudStack® HCI Appliance
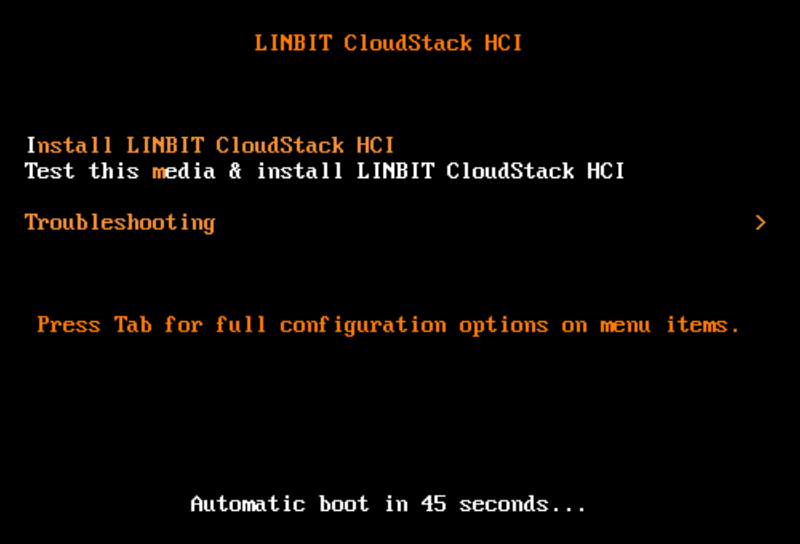
You can install theLINBIT® CloudStack® HCI Appliance from the freely available installer ISO image, available from the LINBIT website. Boot all your cluster nodes from the ISO image, or from installation medium made from the image, select Install LINBIT® CloudStack® HCI from the boot menu, and hit enter to start the installation process.
The appliance image is based on AlmaLinux and uses the familiar Anaconda installation program. At minimum, you need to set your time zone, create a root user account password, and specify a single local disk to install the appliance onto. The disk that you specify should be the one that meets the 250GB minimum size requirement.
❗ IMPORTANT: By default, the installation program will select all local disks. Deselect any additional disks so that only the 250GB or greater disk remains selected for operating system installation.
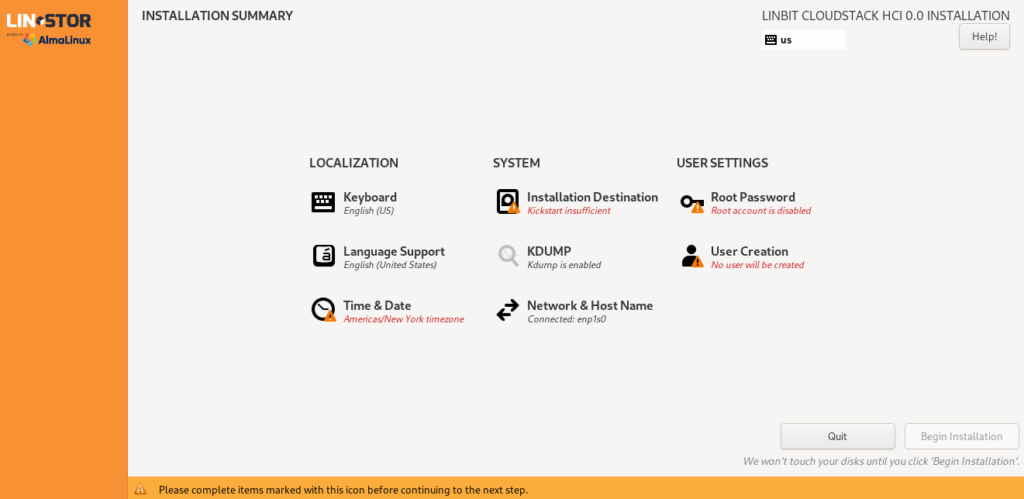
After configuring the Anaconda installer, click the Begin installation button to start installing the appliance to your node’s local disk. When the installation finishes, remove the installation medium and restart the node. Repeat the installation procedure on your remaining nodes.
Setting up the LINBIT® CloudStack® HCI Appliance
After you reboot your nodes, a terminal window will greet you with a login prompt and a message telling you a URL to open to set up the appliance.
In a web browser, open one of the URLs shown in the terminal of any of the appliance nodes to access the HTML-based appliance setup wizard.

Creating a cluster of nodes
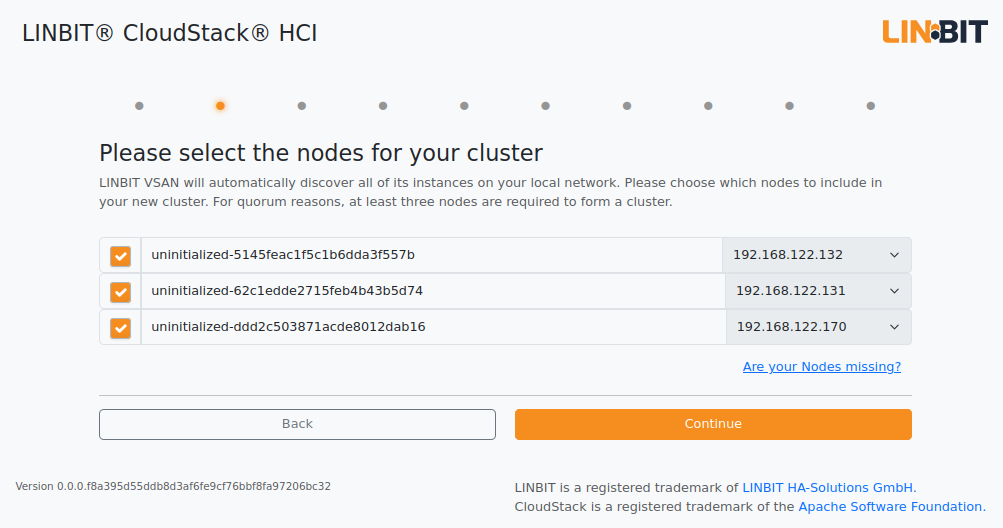
When you open the appliance setup URL, a screen will greet you and ask you to select the nodes that the setup wizard detects on your network to form a cluster. Select a minimum of three nodes and click the Continue button.
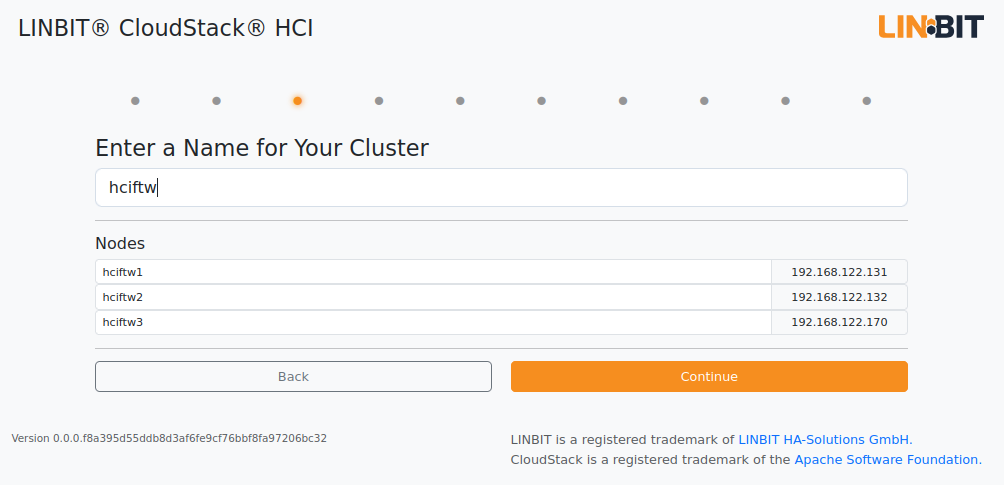
On the next screen, the setup wizard will ask you to name your cluster. Naming your cluster will automatically give your nodes hostnames based on the cluster name. If you want to, you can edit your nodes’ hostnames on this screen. When you have finished, click the Continue button.
Setting up nodes for LINSTOR
The appliance setup wizard will then set up your cluster nodes automatically. This includes:
- Making system configuration changes such as setting hostnames
- Configuring the LINSTOR controller service
- Starting the LINSTOR satellite service on your nodes
After the setup wizard finishes setting up nodes, click the Continue button.
Setting up nodes for CloudStack
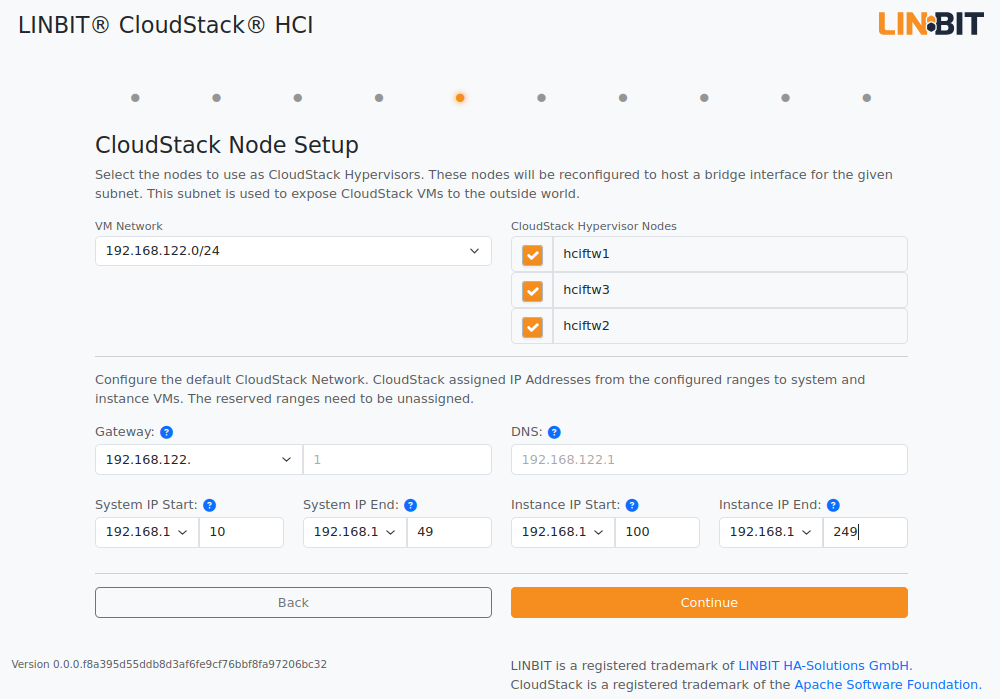
Next, the appliance setup wizard will set up CloudStack for you. On the CloudStack Node Setup screen, choose a virtual machine (VM) network and select at least two nodes in your cluster that will be CloudStack hypervisor nodes. In CloudStack, the VM network is known as the public network. It is the network through which CloudStack exposes your VMs to the Internet.
On this screen, you also specify the default CloudStack management network gateway IP address, DNS server IP address, and system and instance IP address ranges.
Click the Continue button after making your selections.
Setting up physical storage
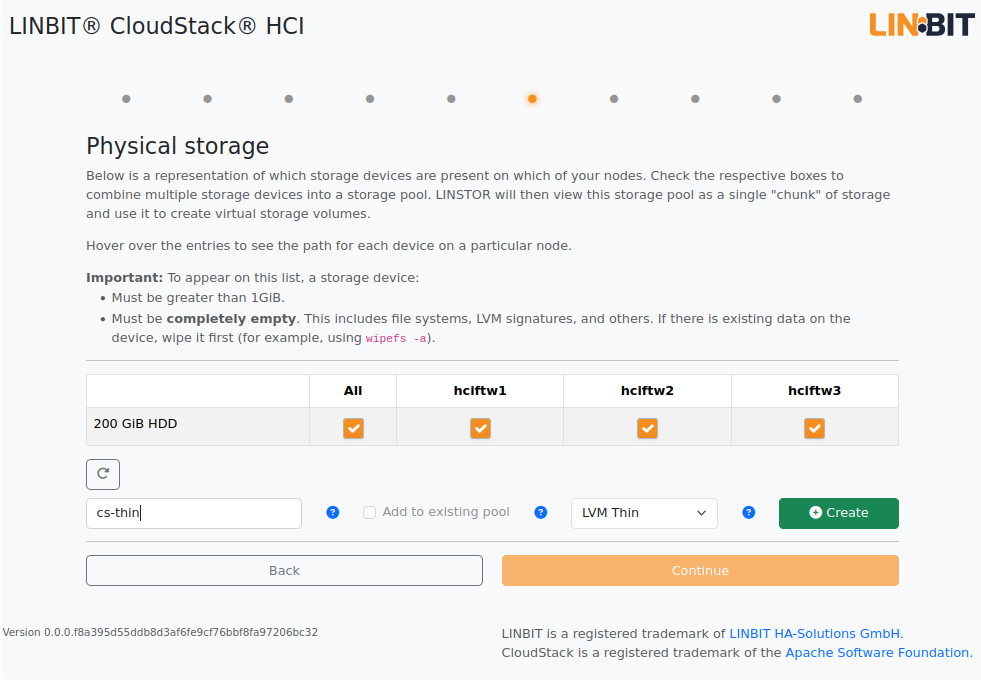
The next appliance setup wizard screen is where you can add physical storage to your HCI cluster for LINSTOR to use to back CloudStack primary and secondary storage.
Here, you select physical storage devices on your nodes and combine them into at least one LINSTOR storage pool. LINSTOR will use this storage pool to carve out CloudStack primary and secondary storage that will be backed by features from the LINBIT software stack included with the appliance. These features include high availability, software-defined storage, and disaster recovery capabilities.
After configuring your physical storage and at least one LINSTOR storage pool, click the Continue button.
Creating LINSTOR resource groups
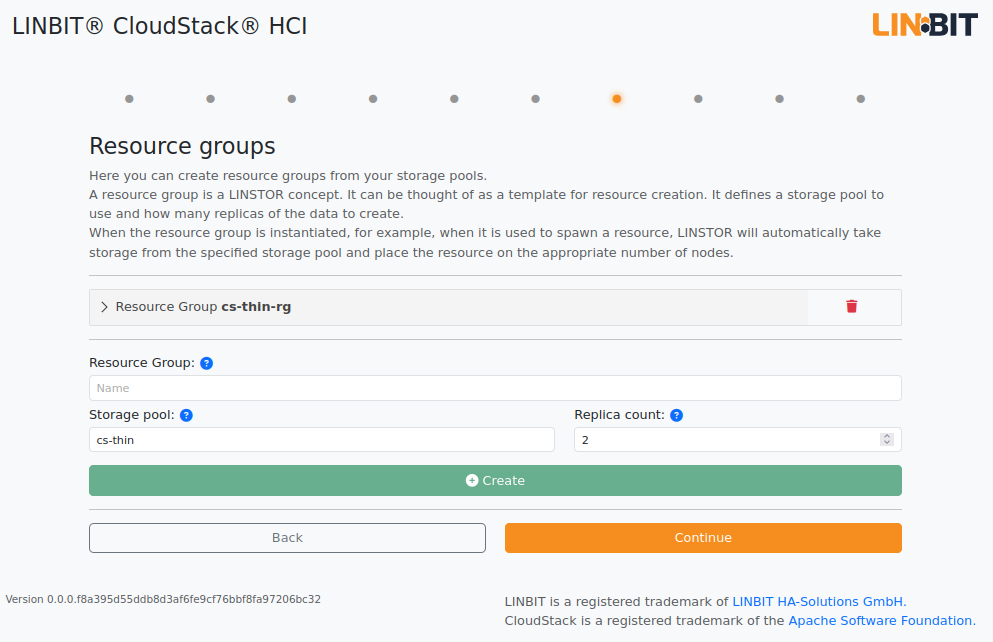
Next, the appliance setup wizard will help you to create LINSTOR resource groups. A resource group is another LINSTOR concept that you can think of as a template for defining and deploying LINSTOR storage resources. A resource group will specify what storage pool to use for backing storage and how many replicas to deploy within your cluster for high availability. You can use LINSTOR storage pools and resource groups to compliment CloudStack disk offerings, which you can use to create tiered storage.
After the appliance integrates LINSTOR with CloudStack for you through the setup process, when you create a guest VM, for example, LINSTOR will automatically create and store the VM image within a LINSTOR resource. LINSTOR will create the resource automatically in-the-moment, based on a resource group that you choose from the CloudStack management UI.
Click the Continue button after creating at least one LINSTOR resource group.
Making the LINSTOR controller service highly available
At this point in the appliance deployment, the LINSTOR controller service is only running on one node in your cluster. This could be a single point of failure and if you lost connection to the LINSTOR controller node, you would not be able to create new, or modify existing, LINSTOR resources, although existing LINSTOR resources and the CloudStack guest VM images that they back would continue to function.
For this reason, the appliance setup wizard helps you to make the LINSTOR controller service highly available. This is done by using another LINBIT open source software that is a part of the HCI appliance stack: DRBD Reactor. All you need to specify in this setup wizard screen is an unused service (or virtual) IP address that will be used to reach the LINSTOR controller, and the resource group from which to create the resource that LINSTOR will store the controller database on.
After you have specified these things, click the Continue button.
Making the CloudStack management database highly available
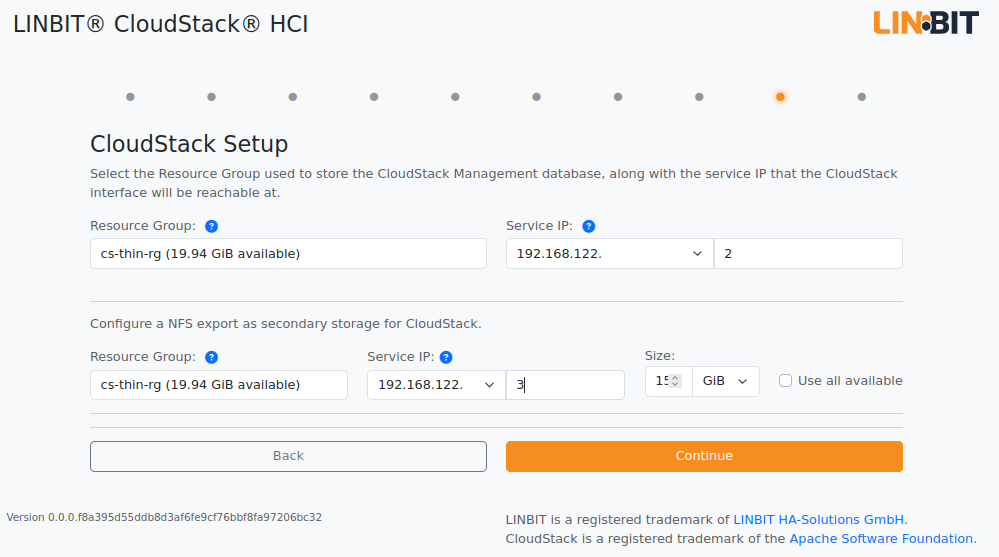
The appliance setup wizard also helps make the CloudStack management database highly available. On the wizard’s CloudStack Setup screen, specify an unused service (or virtual) IP address for reaching the CloudStack management interface, and specify the LINSTOR resource group that will back the management database. On this screen, you also need to specify the resource group from which the appliance will create an NFS export that will be used for CloudStack secondary storage. Behind the scenes, the appliance uses the open source LINSTOR Gateway software to create and make this NFS export highly available for you.
Click the Continue button after specifying these things.
Completing the LINBIT® CloudStack® HCI Appliance setup
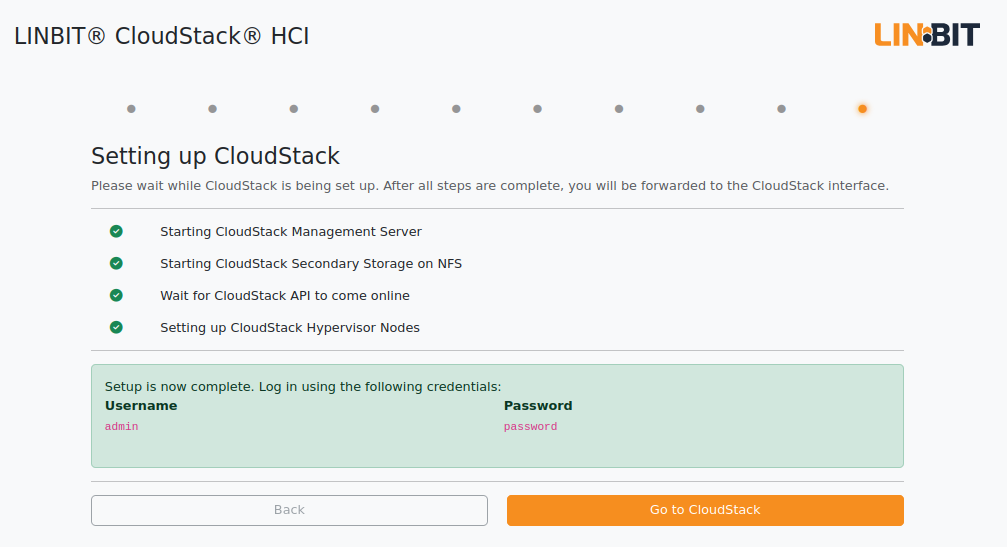
After clicking the Continue button, the appliance setup wizard will finalize the HCI deployment in your cluster and finish setting up CloudStack for use. When the setup is done, the wizard will notify you and let you know the username and password to enter to log in to the CloudStack management UI. Clicking the Go to CloudStack button will take you there.
Logging in to the CloudStack management interface
If you did not use the Go to CloudStack button from the previous wizard screen, you can log in to the CloudStack management UI by opening the following URL in a web browser:
https://<management-server-service-ip-address>/cloud/client/Log in to the CloudStack management UI by entering the user name and password previously shown by the appliance setup wizard. By default, these are admin and password. After logging in, be sure to change the admin account password.
Verifying LINSTOR storage within CloudStack
For some first steps within your appliance deployment, you can verify that your CloudStack primary and secondary storage are backed by a LINSTOR resource group, or groups, depending on your choices during the appliance setup.
Verifying primary storage in CloudStack
Click the Infrastructure icon on the left of the screen, then click Primary Storage. The “Primary Storage” screen should show your LINSTOR-backed primary storage pool in an “Up” state.

Verifying secondary storage in CloudStack
Click the Infrastructure icon on the left of the screen, then click the Secondary Storage link. The Secondary Storage screen should show your NFS-backed secondary storage in a “ReadWrite” access state. The URL for your secondary storage should have a gateway-exports directory within it. This indicates that LINSTOR Gateway created the export.

Next steps
After these simple verification steps, you might move on to other tasks, such as creating KVM guest instances backed by LINSTOR primary storage within CloudStack. After that, you will likely want to do some failover tests to verify the high availability of hypervisor hosts, services, and guest instances within your cluster.
Conclusion
Until now, the perceived complexity of installing and getting started with CloudStack might have been a barrier that prevented people from using this powerful platform for managing virtualization and creating IaaS solutions. The LINBIT team hopes that the LINBIT® CloudStack® HCI Appliance will break down this barrier for new users, whether new to CloudStack or just new to CloudStack integrated with LINSTOR storage, and make it easier to realize the benefits of a hyperconverged deployment.
If you have any feedback about, or issues with the LINBIT® CloudStack® HCI Appliance, contact the LINBIT team. You can also use the LINBIT Community Forum to engage with the worldwide community of LINBIT software users.
