
Authors: Ryan Ronnander & Roland Kammerer
—
In this technical blog post, I will show you how to integrate the open source software-defined storage (SDS) solution, LINSTOR®, with Proxmox VE by using a storage plugin developed here at LINBIT®. The advantages of using LINSTOR with Proxmox VE include:
- Extremely fast live migrations of virtual machines (VMs) and containers
- Highly available VMs and containers, ultimately mitigating virtual host failures
- Virtual disk replicas on two or more nodes
- A configurable and automatically maintained number of data replicas, for example, three replicas of a virtual disk in a 5-node cluster
The instructions in this post are intended to get you up and running with LINSTOR alongside Proxmox quickly, in a basic environment for testing and exploration. If you are interested in this solution for an enterprise or production deployment, you can check out the LINBIT how-to guide, Getting Started With LINSTOR in Proxmox VE. This guide has more information relevant to enterprises, and has instructions for setting up LINSTOR with Proxmox, with a focus on production deployments. For example, the guide shows you how to set up monitoring and health checks.
Setup overview
The rest of this post assumes that you have already configured Proxmox VE (the example setup here uses three nodes), and have created a Proxmox VE cluster consisting of all three nodes. While this post is not meant to replace the relevant content in the LINSTOR User Guide Proxmox chapter, this post is a walk-through of the necessary steps to install and configure LINSTOR alongside Proxmox VE. There is also a companion video to complement this blog post.
The setup consists of two important components:
- LINSTOR for managing and provisioning replicated storage
- The LINSTOR Proxmox plugin that provides the interface between Proxmox VE and LINSTOR
LINBIT maintains public repositories for use with Proxmox VE. These repositories contain all the packages you need to create a fully functional LINSTOR cluster.
Creating a LINSTOR cluster
First, you will need to add the LINBIT Proxmox repository, on all your Proxmox cluster nodes. To do this, follow the instructions in the LINSTOR User Guide relevant to your situation:
- Configuring LINBIT customer or evaluation account repositories for Proxmox
- Configuring LINBIT public repositories for Proxmox
Next, you need to install the low-level components for replication. These consist of the DRBD® 9 kernel module, the drbd-utils package, and the kernel headers needed to build the DRBD kernel module from source. Install the low-level components on all nodes:
apt install -y proxmox-default-headers drbd-dkms drbd-utils && \
  modprobe drbd && \
  modinfo drbd | grep ^version
📝 NOTE: If you do not plan to install the latest Proxmox kernel, you need to install kernel headers that match your current running kernel by installing the
proxmox-headers-$(uname -r)package, rather than theproxmox-default-headerspackage.
Final output from the command should show that the DRBD kernel module is a version 9 variant:
version: 9.2.14Installing and starting LINSTOR services
Next, install LINSTOR and start the LINSTOR satellite service on all nodes:
apt install -y linstor-controller linstor-satellite linstor-client
systemctl enable linstor-satellite --now
Now, decide which of your hosts will be the current controller node and enable and start the LINSTOR controller service on that node only:
systemctl enable linstor-controller --nowAdding nodes to your LINSTOR cluster
On the node that runs the controller service, enter the following commands to add your nodes:
linstor node create proxmox-0 192.168.222.130
linstor node create proxmox-1 192.168.222.131
linstor node create proxmox-2 192.168.222.132
After creating LINSTOR nodes, you can show the nodes in your LINSTOR cluster by entering a linstor node list command. Output will be similar to this:
╭───────────────────────────────────────────────────────────────╮
┊ Node      ┊ NodeType  ┊ Addresses                    ┊ State  ┊
╞═══════════════════════════════════════════════════════════════╡
┊ proxmox-0 ┊ SATELLITE ┊ 192.168.222.130:3366 (PLAIN) ┊ Online ┊
┊ proxmox-1 ┊ SATELLITE ┊ 192.168.222.131:3366 (PLAIN) ┊ Online ┊
┊ proxmox-2 ┊ SATELLITE ┊ 192.168.222.132:3366 (PLAIN) ┊ Online ┊
╰───────────────────────────────────────────────────────────────╯
Configuring storage
LINSTOR needs underlying storage to create replicated volumes. This article uses a configuration where all nodes contain an LVM thin pool called thinpool. In the demonstration environment, there is a thin pool created inside the linstor_vg volume group. In your environment, you will likely have a different storage topology.
In the demonstration environment, the following commands were run on all nodes to prepare the underlying storage for LINSTOR:
vgcreate linstor_vg /dev/vdb
lvcreate -l 80%FREE -T linstor_vg/thinpool
Creating a LINSTOR storage pool
For LINSTOR to make use of the linstor_vg/thinpool LVM thin pool, you will need to create a LINSTOR storage pool on each node:
linstor storage-pool create lvmthin proxmox-0 pve-storage linstor_vg/thinpool
linstor storage-pool create lvmthin proxmox-1 pve-storage linstor_vg/thinpool
linstor storage-pool create lvmthin proxmox-2 pve-storage linstor_vg/thinpool
Now that you have run a few LINSTOR commands, it’s worth mentioning that the LINSTOR client provides convenient shortcuts for its sub-commands. For example, to list all current LINSTOR nodes you can run linstor node list or the simplified linstor n l. Refer to the LINSTOR User Guide for more information about LINSTOR command shortcuts.
Creating a LINSTOR resource group
After creating your storage pools, you can create a LINSTOR resource group which will define how replicated volumes are provisioned in the cluster.
To do this, create a resource group called pve-rg using the pve-storage storage pool:
linstor resource-group create pve-rg --storage-pool=pve-storage --place-count=3Specifying --place-count=3 ensures each replicated volume will exist on all three nodes in the cluster.
Each resource group also needs a corresponding LINSTOR volume group. You can create a LINSTOR volume group with the same name as the resource group, by entering the following command:
linstor volume-group create pve-rgLINSTOR Proxmox VE plugin setup
After configuring DRBD and LINSTOR, the only thing left to do is install the linstor-proxmox plugin package and configure the plugin. First, install the plugin by entering the following command on all your Proxmox nodes:
apt install -y linstor-proxmoxThe plugin is configured through the Proxmox storage configuration file located at /etc/pve/storage.cfg. On one node only, edit the file and add the following linstor_storage section.
[...]

drbd: linstor_storage
    content images, rootdir
    controller 192.168.222.130
    resourcegroup pve-rg

[...]
❗ IMPORTANT: Storage entries within the Proxmox storage configuration file must be separated by an empty new line.
You do not need to copy storage.cfg to the other nodes because/etc/pve is a replicated file system in Proxmox VE.
After updating the storage.cfg configuration file, you need to restart some Proxmox related services on each node.
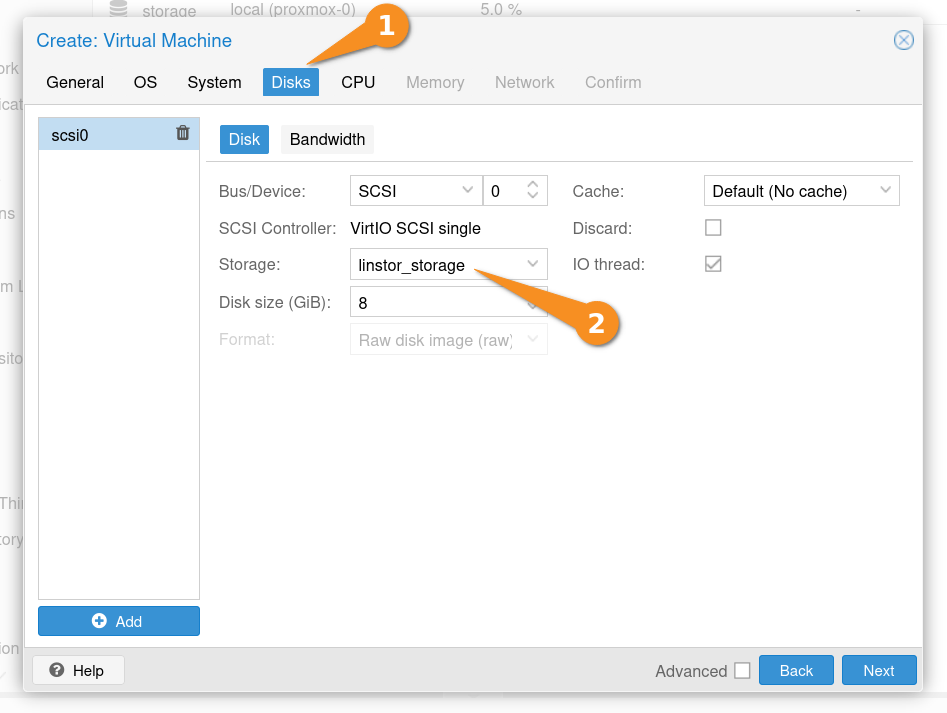
systemctl restart pve-cluster pvedaemon pvestatd pveproxy pve-ha-lrmNow you can create VMs and containers backed by LINSTOR from the Proxmox GUI. To do this, select linstor_storage for the storage in the “Disks” section of the “Create: Virtual Machine” VM configuration screen. LINSTOR then provisions the replicated storage based on the resource group settings defined earlier in this post.
You can show the status of replicated storage in the cluster by entering a linstor resource list command on your LINSTOR controller node. The following example output shows a LINSTOR resource related to VM, created in Proxmox, that uses LINSTOR storage to store the VM disk image.
╭────────────────────────────────────────────────────────────────────────────────────────────────────────────╮
┊ ResourceName ┊ Node                       ┊ Layers       ┊ Usage  ┊ Conns ┊    State ┊ CreatedOn           ┊
╞════════════════════════════════════════════════════════════════════════════════════════════════════════════╡
┊ pm-b369d6ba  ┊ proxmox-0 ┊ DRBD,STORAGE ┊ Unused ┊ Ok    ┊ UpToDate ┊ 2025-05-03 02:35:34 ┊
┊ pm-b369d6ba  ┊ proxmox-1 ┊ DRBD,STORAGE ┊ Unused ┊ Ok    ┊ UpToDate ┊ 2025-05-03 02:35:34 ┊
┊ pm-b369d6ba  ┊ proxmox-2 ┊ DRBD,STORAGE ┊ Unused ┊ Ok    ┊ UpToDate ┊ 2025-05-03 02:35:34 ┊
╰────────────────────────────────────────────────────────────────────────────────────────────────────────────╯
Diskless resources and VM migration
To highlight a benefit of using LINSTOR, assume that you initially created five Proxmox VE nodes in the cluster, but only three nodes have physical backing storage. It is important to know that the storage can be accessed by all nodes in the cluster with a feature called “diskless clients”.
Now, try to migrate a VM to a new node without any backing storage (proxmox-3). This is again done with a few clicks in the Proxmox GUI, but the interesting steps happen behind the scenes: The storage plugin realizes that it has access to the data on proxmox-0, proxmox-1, and proxmox-2 (your three replicas), but also needs access on proxmox-3 to run the VM. The plugin then creates a diskless assignment on proxmox-3. When you enter a linstor resource list, output will show four nodes are now involved:
proxmox-0with storage in Secondary (Unused) role.proxmox-1with storage in Secondary (Unused) role.proxmox-2with storage in Secondary (Unused) role.proxmox-3as a diskless client in Primary (InUse) role.
When migrating VMs, diskless assignments are created (and deleted) on demand without further user interaction. If you migrate the VM back to a node with backing storage, the diskless assignment is deleted because it is no longer needed.
This flexibility allows LINSTOR to be used across many different storage topologies and server configurations.
Next Steps
Up to this point you have created highly available replicated storage for your VMs and containers, however, the LINSTOR controller service is not highly available. For resiliency in production deployments, consider making the LINSTOR controller service highly available in your cluster.
With three or more Proxmox VE nodes and LINSTOR functioning as “shared” storage in your Proxmox cluster, you can now make your VMs and containers highly available.
Again, you can view the companion video walk-through to see just how easy it is to configure LINSTOR for use with Proxmox VE.
You can also check out the LINBIT how-to guide, Getting Started With LINSTOR in Proxmox VE. The LINBIT team created this getting started guide with production and enterprise deployments specifically in mind.
If you are interested in getting support for your LINSTOR deployments, especially in production environments, reach out to us for more information.
Changelog
2025-11-02:
- Showed empty lines delimiting
drbdstorage entry in Proxmox storage configuration file.
2025-08-20:
- Added mentions of Getting Started how-to guide.
2025-06-12:
- Improved instructions around installing necessary “low-level” components, based on feedback from a LINBIT Community Forum user.
2025-06-02:
- Added screen grab and other command output examples.
- Made language improvements.
- Tested instructions with PVE version 8.4.0 and LINSTOR version 1.31.0
2023-08-08:
- Article originally published.