LINBIT® develops and supports software used to build high availability clusters for almost any application or platform out there. It does this by creating tools and frameworks that can be used in generic ways that can be used by most applications, rather than building application-specific products that might only work for a single application. While LINBIT does create plugins and drivers to integrate LINBIT software with specific platforms, such as Kubernetes, CloudStack, and Proxmox VE (the subject of this article), LINBIT strives to keep the underlying software generic and open. This makes it highly adaptable to future platforms or changes in existing platforms that LINBIT software integrates with.
Looking at LINBIT’s how-to guides, you’ll find examples of how DRBD® and Pacemaker or DRBD Reactor can be used to cluster various applications such as GitLab, Nagios XI, KVM, and more. You will also find guides on creating highly available shared storage clusters, such as NFS, iSCSI, or NVMe-oF.
Most of LINBIT’s guides will use DRBD to replicate block storage, and Pacemaker or DRBD Reactor to start, stop, and monitor services using either systemd or more specific Open Cluster Framework (OCF) resource agents. While other guides will use LINSTOR® to integrate more directly into a specific cloud platform to provide software-defined storage to VMs or containers on-demand. In Linux environments, you’ll often have more than one path you can take to achieve your goals. Using LINBIT’s software with Proxmox VE is one of these scenarios. This blog will step you through how you can use LINBIT’s, NVMe-oF High Availability Clustering Using DRBD and Pacemaker on RHEL 9 how-to guide to create an NVMe-oF storage cluster for use with Proxmox VE.
Assumptions and Reader Bootstrapping
You will need to read the technical guide on how to set up a LINBIT HA NVMe-oF cluster linked above. For simplicity, the technical guide outlines the steps needed to create a two node cluster. However, a three-node cluster is preferable as you can then use DRBD’s quorum to ensure data cannot diverge.
You will also need to have a Proxmox VE cluster. Follow the instructions on the Proxmox VE wiki after installing Proxmox on three (or more) nodes.
You should have something resembling this simplified architecture diagram before proceeding.
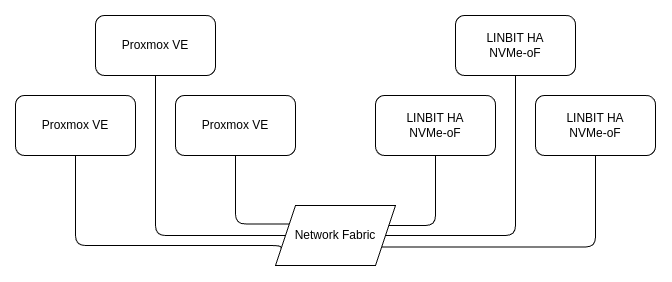
If you have followed the HA NVMe-oF how-to guide, you should have an NVMe-oF target named linbit-nqn0 being exported from the storage cluster on service port 4420 (default).
Attaching Proxmox Nodes to NVMe-oF Targets
Proxmox VE 8.x does not support attaching to NVMe-oF targets through its user interface. For that reason, you will have to enter CLI commands on each Proxmox host to attach the NVMe device. After the device is attached to each host, you can create an LVM volume group on it from a single host, which can then be configured through the Proxmox user interface as shared LVM type storage.
To discover and attach NVMe-oF devices to your Proxmox hosts, you will need to install the nvme-cli package and configure the nvme_tcp kernel module to be inserted at boot on each Proxmox host:
# apt update && apt -y install nvme-cli
# modprobe nvme_tcp && echo "nvme_tcp" > /etc/modules-load.d/nvme_tcp.conf
📝 NOTE: If you are using RDMA to export your NVMe-oF targets you will want to insert and configure the
nvme_rdmamodule instead.
With the nvme-cli package installed and nvme_tcp module loaded, you can now discover and connect to the NVMe-oF target on each Proxmox host:
# nvme discover -t tcp -a 192.168.10.200 -s 4420
# nvme connect -t tcp -n linbit-nqn0 -a 192.168.10.200 -s 4420
# nvme list

Node            Generic      SN          [...]
--------------- ------------ ----------- [...]
/dev/nvme0n1    /dev/ng0n1   ae9769ab8eac[...]
For the NVMe-oF attached device to persist a reboot, create an entry in the /etc/nvme/discovery.conf using the settings from the nvme discover command above, and enable the nvmf-autoconnect.service to start at boot on each Proxmox host:
# echo "discover -t tcp -a 192.168.10.200 -s 4420" | tee -a /etc/nvme/discovery.conf
# systemctl enable nvmf-autoconnect.service
From a single Proxmox host, create an LVM volume group on the shared NVMe device:
# vgcreate nvme_vg /dev/nvme0n1Entering a pvs from any Proxmox host should now show the nvme_vg volume group:
# pvs
  PV            VG             Fmt  Attr PSize  PFree
  /dev/nvme0n1  nvme_vg        lvm2 a--  <8.00g 4.00g
  [...]
From here on, you can use the Proxmox VE user interface to configure the LVM volume group as storage for the Proxmox cluster. Add the new storage to your cluster as LVM type storage:
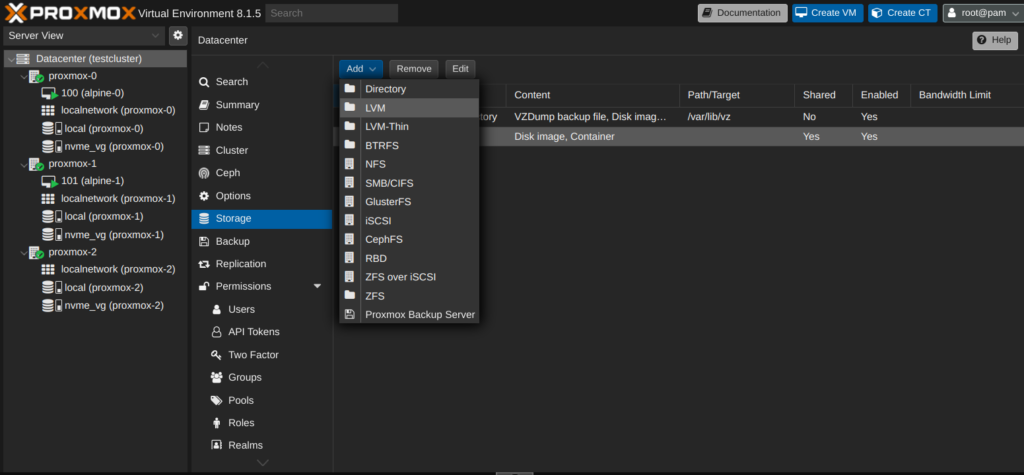
Set the ID of your new storage to whatever you’d like. The example uses the same name as the LVM volume group (nvme_vg). Then, select “Existing volume groups” as the base storage (1). Set the volume group name to nvme_vg (2). Select all of the Proxmox nodes that are attached to the NVMe-oF target using the “Nodes” drop down (3). Mark the LVM storage as “Shared” (4). Finally, add the new storage to the cluster:
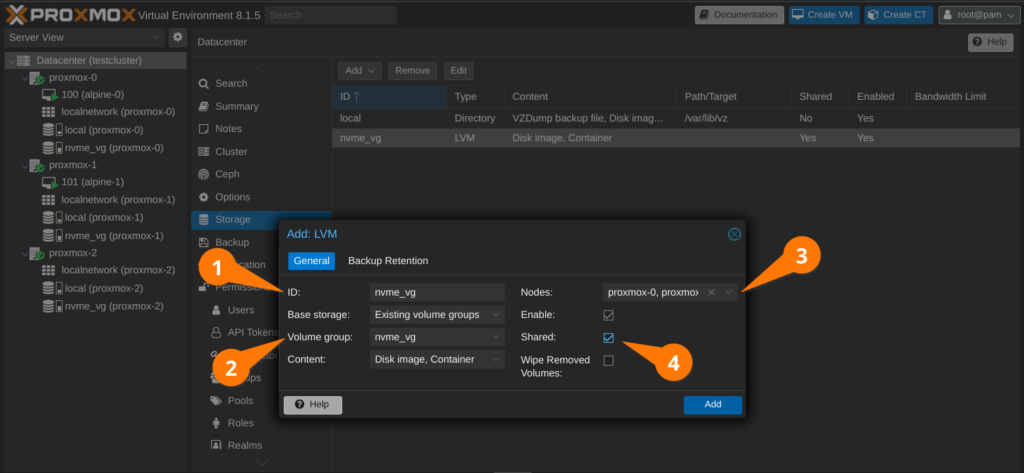
You should now see that you have the new nvme_vg storage attached to each node of your Proxmox cluster which you can use as storage for your virtual machines and containers. From this point on, the typical Proxmox VE patterns for creating and migrating virtual machines should be applicable.
Final Thoughts
This is only one way to use LINBIT’s software with Proxmox VE. LINBIT has how-to guides for creating NFS and iSCSI clusters that can be used in a similarly disaggregated approach as outlined in this blog, without having to leave the Proxmox user interface because NFS and iSCSI are storage types the user interface supports. You can also use LINBIT VSAN as a “turnkey” distribution for creating and managing NVMe-oF, NFS, and iSCSI volumes all through an easy to use web interface. No Linux-specific system administration knowledge required to operate.
For hyperconverged clusters, LINBIT also has a Proxmox VE LINSTOR driver that can create replicated DRBD devices for Proxmox VMs on-demand. A LINBIT how-to guide, Getting Started With LINSTOR in Proxmox VE, has instructions for setting up LINSTOR with Proxmox in a hyperconverged environment, with a focus on production deployments.
As mentioned earlier, there are many paths you can take when adding LINBIT powered highly available storage to your Proxmox VE cluster. We firmly believe in freedom of choice of architecture for LINBIT software users. The reasons for your architecture choice should be your own, whether they are for familiarity, resource accessibility, or other factors specific to your business and needs. For more information, or to provide feedback, on anything mentioned in this blog don’t hesitate to reach out to us at LINBIT.
Changelog
2025-08-27:
- Added mention of Getting Started how-to guide.
2024-03-26:
- Article originally published.
