During my years as a system administrator, I have worked as much with Windows servers as I have with Linux systems. Installing and managing SMB, a file-sharing protocol frequently used in small and medium-sized companies, is relatively straightforward and hassle-free on Windows servers. However, ensuring this service runs continuously can be a challenge. In this article, I will describe a simpler way to set up high availability (HA) for an SMB share, using entirely open source software.
The stars of this show are two LINBIT®-developed open source software solutions: DRBD®, and WinDRBD®. For more than 20 years, DRBD has helped make Linux applications highly available. WinDRBD, built on DRBD technology, more recently came to life. Similar to DRBD, WinDRBD is open source, LINBIT-developed software that makes disk replication possible as the first step toward making Windows services highly available.
This article is the first in what I intend to be a series of articles in which I will explore using WinDRBD to achieve HA for Windows services and the possibilities that it opens up. I will start this blog series with the simplest of the many scenarios that come to mind: Using a 2-node Linux and 1-node Windows cluster to create an HA SMB solution.
You can access all the software used in this article at this link.
Use cases for an HA SMB share
Before showing setup and configuration steps, let me give some examples of situations when I think this article is relevant and in which use cases this solution can help:
- Overcoming the often complex configurations that setting up HA for multiple services, for example, SMB, MSSQL, and others traditionally involved in Windows environments
- Meeting the need to use storage from Linux servers in Windows environments
- Reducing the high licensing costs involved with ensuring HA for Windows services
- Avoiding some of the complexities with integrating Active Directory (AD) or running SMB services on Linux
- Adding HA features to legacy Windows installations without disrupting them
More examples will likely come to mind as I expand this topic.
Deployment architecture
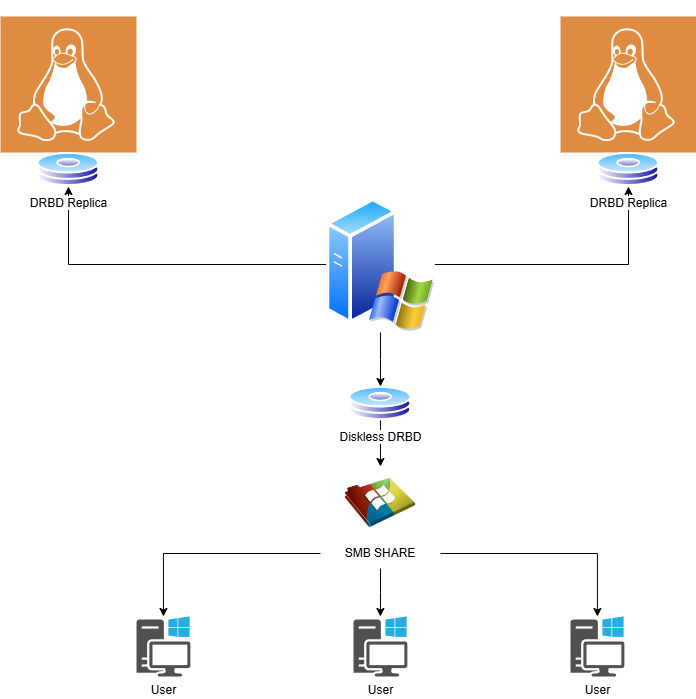
The components of the setup that I will show in this article are as follows:
- Two Linux storage servers (each with an additional 10 GiB data disk, used by DRBD)
- One Windows SMB server functioning as a diskless node (and as a tiebreaker node for quorum purposes to protect against data divergence or so-called “split-brain” scenarios)
- SMB users who will consume the SMB share

Assumptions and prerequisites
The versions of the applications mentioned here will vary over time. However, the environment in which the setup will be deployed should remain the same.
This article assumes that:
- You have two Linux and one Windows node with the following hostnames:
drbd1,drbd2, andwindrbd1. - On your Linux nodes, the DRBD version is 9.2.11 with kernel
5.14.0-427(you can choose a different version). - On your Windows node, the WinDRBD version is 1.1.19 with Windows Server 2019 (latest updates applied).
- Each Linux node has an additional unused physical disk drive with an LVM logical volume,
/dev/vgdrbd/smblv, on top of it. - All commands that you might need to run within a CLI, such as installing packages or working with a logical volume manager, should be run under the root user account or prefixed with
sudoon your Linux nodes, or from an elevated Command Prompt or PowerShell terminal window on the Windows node. - The firewall between the nodes is configured to allow traffic on DRBD resource ports. By default these are TCP port 7788 and upward, one port per DRBD resource.
- SELinux is either disabled, or the
drbd-selinuxpackage is installed. - All nodes can ping each other using their IPv4 addresses and hostnames.
Installing DRBD and WinDRBD in the cluster
DRBD and other related LINBIT-developed software used in this article are open source. You have the option of building DRBD and related components from the source code available in various repositories within the LINBIT GitHub projects page. However, it is faster and easier to upgrade if you install the software from binary packages by using a package manager (Linux) or an installation executable (Windows).
Installing DRBD on Linux nodes
You will need to install DRBD on all nodes by using public (testing and non-production use) repositories such as the LINBIT PPA, compiling from the project’s open source codebase on GitHub, or else by installing binary packages from LINBIT customer repositories. If you are not a LINBIT customer but want to evaluate LINBIT software, you can contact the LINBIT team for an evaluation account. Refer to instructions for the various installation methods within the DRBD User Guide or else reach out to the LINBIT team for help installing DRBD.
Verifying DRBD installation on Linux nodes
You can verify that you successfully installed DRBD and that the DRBD kernel modules are loaded by entering the following command:
cat /proc/drbdCommand output will show something similar to the following:
version: 9.2.11 (api:2/proto:86-122)
GIT-hash: d7212a2eaeda23f8cb71be36ba52a5163f4dc694 build by @buildsystem, 2024-08-12 10:11:06
Transports (api:21): tcp (9.2.11)
Additionally you might want to further verify the status of the DRBD kernel modules by using an lsmod command:
lsmod |grep drbdCommand output will show something similar to the following:
drbd_transport_tcp     40960  2
drbd                 1007616  2 drbd_transport_tcp
libcrc32c              16384  2 xfs,drbd
Installing WinDRBD on the Windows node
For the Windows node, you need to install a specific WinDRBD installation executable from within the “DRBD 9 Windows Driver” section here. The installation packages from this public LINBIT URL are not signed for Windows 2019. LINBIT subscribed customers have the ability to obtain packages officially signed for Windows environments.
For testing purposes, you need to enable test signing before installing WinDRBD by entering the following command in an elevated privileges Command Prompt:
bcdedit /set testsigning onNext, reboot your Windows node and install the WinDRBD package.

Configuring the DRBD resource
After installing all the necessary software packages, you can configure the DRBD resource file. The DRBD resource configuration file needs to be the same on all three nodes. Here is an example resource file, /etc/drbd.d/smb.res, that I created for this setup:
include "global_common.conf";
resource "smb" {
    protocol C;

    on windrbd1 {
        address        172.20.21.103:7600;
        node-id 1;
        volume 1 {
            disk       none;
            device     minor 1;
        }
    }

    on drbd1 {
        address        172.20.21.101:7600;
        node-id 2;
        volume 1 {
            disk       "/dev/vgdrbd/smblv";
            meta-disk  internal;
            device     minor 1;
        }
    }
    on drbd2 {
        address         172.20.21.102:7600;
        node-id 3;
        volume 1 {
            disk        "/dev/vgdrbd/smblv";
            meta-disk   internal;
            device      minor 1;
        }
    }

    connection-mesh {
        hosts windrbd1 drbd1 drbd2;
    }
}
If you use this resource file for your own deployment, you will need to change the following to match your environment:
- IP addresses for each node
- The back-end device for the
drbd1anddrbd2nodes- 📝 NOTE: I used an LVM-backed block device. You can use ZFS or a direct block device itself, such as
/dev/nvme01
- 📝 NOTE: I used an LVM-backed block device. You can use ZFS or a direct block device itself, such as
- Hostnames (if you chose different hostnames than those in my setup)
Pay close attention to the disk section for the Windows node. In the example configuration file, it is set to none which means that there is no back-end device on the Windows node. Such a node is called a diskless mode. A diskless node will access data on the DRBD device over the network from a diskful peer node.
After editing the configuration file, place it in the necessary directories.
On the Linux nodes:
/etc/drbd.d/On the Windows Server node:
C:\WinDRBD\etc\drbd.dStarting the DRBD resource in your cluster
After configuring your DRBD resource, the next step is to bring it up and start the first initial synchronization between the peer nodes.
To do this, enter the following command on both Linux nodes:
drbdadm create-md smbAt this point, you should see an “inconsistent” status on both Linux nodes when you enter a drbdadm status command. This is normal. You need to promote one of the DRBD nodes to a primary role to start the initial synchronization. To do this, enter the following commands on drbd1:
drbdadm up smb
drbdadm primary smb --force
After the synchronization finishes (you can monitor it in real time by entering a watch drbdadm status smb command), it’s time to add WinDRBD to the cluster.
First, return drbd1 to a secondary role for the resource.
drbdadm secondary smbStarting the DRBD resource on a Windows node
To start the DRBD resource on your Windows node, first log in to your Windows node and in an elevated Command Prompt, enter:
drbdadm up smbOutput from the command will show the following:

This means that you successfully connected the Windows node to the Linux nodes by using the DRBD diskless protocol.
Next, make the DRBD resource primary so you can use the block device in Windows Disk Manager.
drbdadm primary smbYou can verify the status of the DRBD resource on your Windows node by entering the same drbdadm status command that you would enter on a Linux node. Output from the command will show the following:
smb role:Primary
  volume:1 disk:Diskless
  drbd1 role:Secondary
    volume:1 peer-disk:UpToDate
  drbd2 role:Secondary
    volume:1 peer-disk:UpToDate
That will be all the DRBD configuration that you need to do to get a basic setup up and running.
Initialize a new disk on the Windows node
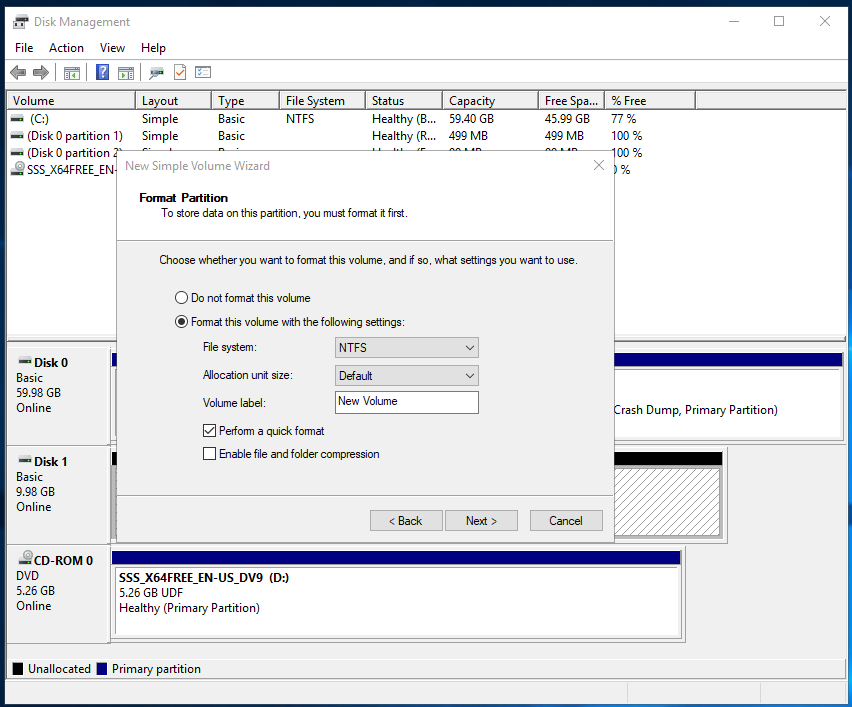
After configuring the DRBD resource and bringing it up within your cluster, on the Windows node, you need to bring this “new” disk online and format it by using Windows Disk Manager. First open Windows Disk manager by entering diskmgmt.msc in the Run dialog box (Windows meta key + R).

Next, bring the DRBD resource “online” and format it with the file system of your choice (most likely as NTFS).

Creating an SMB share on top of the DRBD device
At this point, the only remaining task is to create an SMB share on the new highly available disk within Server Manager on the Windows node.

You now have an SMB share backed by two Linux nodes using DRBD replication technology. You can now use \\windrbd1\DRBDSHARE on your clients with the peace of mind that the HA SMB share can resist single-node failure and keep your share up and running.
Answering some questions about this HA SMB solution
There might be some questions that arise while you are working on this. I will use my sixth sense to anticipate them and try to answer some of them here:
What happens if one of the DRBD Linux nodes fails
Nothing. The primary DRBD node is your Windows node. This means that both Linux servers will receive “write” and “read” requests. If one of them fails, the other node will keep functioning. In the background, you just need to recover the failed node to return your cluster to a stable state.
What kind of network do you need to set this up
It depends on your requirements. Because you are using a diskless DRBD setup, I suggest a low-latency, high-bandwidth network stack. For production deployments, I also recommend using a separate network exclusively for DRBD replication traffic. This will help maximize the performance of applications and services that depend on the replicated DRBD resource.
Can I upgrade Linux nodes while the share is up and running
Yes. DRBD allows for rolling updates, and because you are using diskless DRBD, you do not need a “maintenance window.” My LINBIT colleague, Brian Hellman, wrote a blog article about this topic if you want to learn more.
Next steps and other resources
As in all things, we at LINBIT know there is always room for improvement. The Windows Server node in this example is a single point of failure. But do not worry, we have a plan for that too. To this end, the LINBIT development team is working to implement DRBD Reactor in the Windows environment so that you can create cluster resource manager (CRM) managed HA clusters. When the team completes this work, you will be able to enable automatic failovers, in the case in mind here, when the Windows node fails.
I also made a video that overviews and demonstrates the setup I described in this blog article. You can find the video here on the LINBIT YouTube channel.
If you have any questions or issues integrating DRBD with Windows, the LINBIT Community Forum is a great place to seek help from the community of LINBIT software users. You can also reach out to the LINBIT team if you have questions about deploying DRBD in a production or enterprise environment, or if you want to evaluate LINBIT software by using prebuilt customer packages.


