This article overviews some of the features and benefits of using the CloudCasa™ data protection platform for Kubernetes with a LINSTOR® deployment in Kubernetes, and provides step-by-step instructions for getting started. Because the CloudCasa agent in Kubernetes can interface with a CSI-compliant storage driver, such as LINSTOR or Piraeus Datastore, backing up and restoring with this setup “just works.”
If you are familiar with the CloudCasa data protection platform already, and just knowing that it works with a LINSTOR deployment in Kubernetes is enough to entice you, you can skip ahead to the prerequisites section to get started with the setup and configuration. If you are new to the CloudCasa offering, keep reading to learn more about why you might consider it for data protection, migration, disaster recovery (DR), data synchronization, and other uses for your Kubernetes deployments.
Background on CloudCasa
If you are dealing with persistent data, backing up and restoring data as part of a DR plan should never be far from your thoughts. This is especially true if you are a service provider and handle data that is not your own.
CloudCasa is a data protection platform for Kubernetes, developed by Catalogic Software. Catalogic has been involved in data protection services for over 25 years, and holds over 30 global patents. If you are not familiar with CloudCasa, perhaps you have heard of Catalogic DPX, Catalogic Software’s flagship data protection solution.
CloudCasa features and benefits
CloudCasa has several features and benefits that make it a recommendable solution for data protection in Kubernetes. A common theme that runs through these is flexibility. Calling CloudCasa a data protection product might even be limiting, because you can also use it for Kubernetes migration and synchronization use cases, for example.
User-friendly web-based management console
CloudCasa has a user-friendly and comprehensive web-based GUI for its management console. You can use the management console to create, organize, manage, and monitor data backups, restores, policies, schedules, and other things related to protecting data. You can also integrate CloudCasa with public cloud platforms such as Google Cloud, Azure, and AWS, all through the GUI.
Flexible deployment
You can use the CloudCasa management console as a cloud-based software-as-a-service (SaaS), or else you can deploy a self-hosted solution, if you might be bound by organizational or regulatory requirements.
Besides integrating CloudCasa with uncustomized Kubernetes deployments, you can also use it with AKS, GKE, DigitalOcean Kubernetes, EKS, OpenShift, Rancher, and others. There are also platform vendor marketplace offerings available to make deploying CloudCasa in your chosen environment easier.
While not recommended for any kind of production work, you can even integrate CloudCasa with a LINSTOR in minikube deployment to get up-and-running quickly for testing, if you do not have a full-fledged Kubernetes deployment to use.
Flexible backup storage options
CloudCasa has flexible backup storage options. You can store backups in AWS, Azure, Backblaze, AWS, Google Cloud, and other object storage, including S3-compatible storage in the cloud or on-premise.
Beyond options for where you store your backups, CloudCasa also gives you control over what you back up. You can back up all Kubernetes namespaces, or a subset of them. You can also use CloudCasa to back up and restore Amazon Relational Database Service (RDS) cloud databases directly, through the CloudCasa management console. You can apply the same policies to these as you use for your Kubernetes clusters.
Flexible restore and recovery options
Just as CloudCasa has flexible backup storage options, you have flexibility about where you can restore backups. For example, you can recover to the same or to a different Kubernetes cluster, across cloud deployments, and more. You can also have CloudCasa create AKS, EKS, or GKE cloud clusters automatically on restore, if you have configured linked cloud accounts. This flexibility opens doors to areas beyond data recovery, for example, using CloudCasa for data or deployment migration use cases.
Using CloudCasa to manage Velero in Kubernetes
Besides setting up a “regular” CloudCasa integration with Kubernetes, you can also configure CloudCasa to control and manage Velero in your Kubernetes deployment. If you are already using Velero for data protection in Kubernetes, you do not have to give it up. Rather, you can turn over management duties to CloudCasa, even for existing Velero backups and schedules.
Integrating Velero with CloudCasa can be a way that you can centralize Velero management across many clusters, and ease your management burden. For example, through the CloudCasa management console, you can create a common backup schedule and retention policy that you can apply across multiple clusters, rather than having to create identical schedules on multiple clusters.
Synchronizing edge clusters
As mentioned earlier, the flexibility of CloudCasa storage and deployment opens doors for use cases beyond backing up and restoring. Besides migration use cases, you might consider using CloudCasa to synchronize Kubernetes edge deployments with a central deployment, which might reside on-premise or in the cloud.
Application hooks
Within the CloudCasa management console, you can define and apply application hooks to enhance or customize backup and restore operations. Application hooks are scripts that run from a shell inside a default or a defined container in a pod in your Kubernetes deployment. You can also use a pod selector key value pair to run the hook in a group of pods.
An application hook might be a script that takes steps to ensure that a stateful application is in a good state before it is backed up or replicated. For example, you might call a script that places a database in a backup or maintenance mode, and flushes data writes to disk, before a CloudCasa backup runs.
When you define a CloudCasa application hook, you can choose when it will trigger: pre-backup, post-backup, post-restore, or common (“two or more of pre-backup, post-backup, or post-restore”). There are even some application hook templates to get you started, such as an openshift-etcd-backup-system-hook, mysql-pre- and mysql-post-backup-system-hook, and other database specific hooks.
Benefits of integrating CloudCasa with LINSTOR deployments in Kubernetes
By integrating CloudCasa with LINSTOR in Kubernetes, you can add flexibility to the DR options for your LINSTOR deployments in Kubernetes. DR for LINSTOR and for LINSTOR in Kubernetes involves volume snapshot shipping and restore operations. By using LINSTOR itself, you can restore snapshots to the same or another LINSTOR cluster, or to S3-compatible storage, such as AWS S3, MinIO, Storj, and others.
Adding CloudCasa to this model simplifies backup and restore management, especially if you are managing data protection operations across multiple clusters, or storage targets, because you can now do that from a single management console. Many of the CloudCasa benefits discussed in earlier sections, apply naturally to benefit LINSTOR deployments in Kubernetes. For example, the flexibility of storage and deployment options. Some CloudCasa benefits go beyond complimenting LINSTOR DR capabilities and open up new realms, such as applying CloudCasa application hooks to backup, restore, or replication operations.
Integrating CloudCasa with LINSTOR in Kubernetes
After whetting your appetite with some background about the CloudCasa offering, it is time to get started with some how-to instructions. These instructions will show you the steps you need to take to integrate CloudCasa with LINSTOR in Kubernetes, and then take you through a simple backup and restore use case example.
Prerequisites
To follow the instructions in this how-to guide, you need to have:
- A CloudCasa account
- A LINSTOR deployment in Kubernetes
- A Kubernetes-deployed application that you want to back up
Additionally, your LINSTOR deployment in Kubernetes will need to have:
- A storage pool backed by an LVM or ZFS thin-provisioned volume on your LINSTOR satellite nodes
- A CSI snapshotter and volume snapshot custom resource definitions (CRDs) deployed
Refer to The LINSTOR User Guide for more details.
Creating a CloudCasa account
If you need to create a CloudCasa account, open signup.cloudcasa.io in a web browser. There is a free service plan option for getting started.
Deploying LINSTOR in Kubernetes
If you do not have a LINSTOR deployment in Kubernetes ready to use, you can follow the Getting started with LINSTOR in Kubernetes Quick Start Guide.
By using the LINSTOR Operator v2, you can deploy LINSTOR in Kubernetes easily by using LINBIT® customer image and container repositories and two kubectl commands. If you are not a LINBIT customer, contact the LINBIT team for evaluation access. You can optionally use the open source upstream CNCF project, Piraeus Datastore, developed by LINBIT with contributions from the community.
LINSTOR storage pool requirements
Because LINSTOR relies on logical volume snapshot features, you will need to have a LINSTOR storage pool backed by either an LVM or ZFS thin-provisioned volume. The Getting Started With LINSTOR in Kubernetes guide mentioned earlier has instructions for creating a LINSTOR storage pool in Kubernetes, or else you can refer to instructions in the LINSTOR User Guide or Piraeus Datastore documentation.
The example application in this article uses a storage class backed by a LINSTOR storage pool, named lvm-thin, that is backed by an LVM thin-provisioned volume.
Snapshot controller and CRD requirements
You also need to have a snapshot controller and CRDs related to volume snapshots deployed in your Kubernetes cluster.
Verifying and installing a snapshot controller
You can verify that you have a deployed snapshot controller by entering the following command:
kubectl get pods -A |grep snapshot-controllerThe snapshot controller is typically deployed as a replica set. If output from the command does not show deployed snapshot-controller pods, you can install a snapshot controller by entering the following command:
kubectl apply -k https://github.com/kubernetes-csi/external-snapshotter//deploy/kubernetes/snapshot-controllerVerifying and installing volume snapshot CRDs
You can verify that you have the necessary CRDs related to taking volume snapshots deployed in your cluster, by entering the following command:
kubectl api-resources --api-group=snapshot.storage.k8s.io -onameIf there are no resources shown, you can install the necessary CRDs by entering the following command:
kubectl apply -k https://github.com/kubernetes-csi/external-snapshotter//client/config/crdOutput from entering the kubectl api-resources command shown earlier should show the necessary CRDs:
volumesnapshotclasses.snapshot.storage.k8s.io
volumesnapshotcontents.snapshot.storage.k8s.io
volumesnapshots.snapshot.storage.k8s.io
An example application to back up
The backup and restore use case will not be very interesting without something to back up. You can back up an existing application namespace in your cluster or you can create a new one.
This article uses an example NGINX pod running in an application namespace, named website, in the Kubernetes deployment. You can use the following instructions to create the example application if you need to.
Creating an application namespace
Enter the following command to create a namespace for your application:
kubectl create namespace websiteNext, change your context to the website namespace:
kubectl config set-context --current --namespace websiteCreating a storage class:
Create a storage class, backed by the LINSTOR storage pool, lvm-thin, by entering the following command:
kubectl apply -f - <<EOF
apiVersion: storage.k8s.io/v1
kind: StorageClass
metadata:
  name: linstor-basic-storage-class
provisioner: linstor.csi.linbit.com
volumeBindingMode: WaitForFirstConsumer
parameters:
  autoPlace: "2"
  storagePool: lvm-thin
  resourceGroup: "linstor-basic-storage-class"
  csi.storage.k8s.io/fstype: xfs
EOF
Create a PersistentVolumeClaim (PVC) that your application can use, by entering the following command:
kubectl apply -f - <<EOF
kind: PersistentVolumeClaim
apiVersion: v1
metadata:
  name: website-data
  namespace: website
spec:
  storageClassName: linstor-basic-storage-class
  accessModes:
    - ReadWriteOnce
  resources:
    requests:
      storage: 500Mi
EOF
Create an NGINX pod to host an example webpage. This will be the application that you will use to test backing up and restoring.
kubectl apply -f - <<EOF
apiVersion: v1
kind: Pod
metadata:
  name: nginx-website
  namespace: website
  labels:
    app: nginx
spec:
  containers:
  - name: nginx
    image: nginx
    volumeMounts:
    - name: website-data
      mountPath: /usr/share/nginx/html
    ports:
    - containerPort: 80
  volumes:
  - name: website-data
    persistentVolumeClaim:
      claimName: "website-data"
EOF
Wait for the pod to be ready by entering the following command:
kubectl wait pod --for=condition=Ready --timeout=5m --all && \
  echo "NGINX pod deployed and ready!"
After the NGINX pod is ready, create an example webpage to host. To do this, enter the NGINX pod, create a basic webpage, and exit the pod.
kubectl -it exec nginx-website -- /bin/bash
cat <<EOF > /usr/share/nginx/html/index.html
<html>
<body>
<p>This is a test webpage, created on $(date).</p>
</body>
</html>
EOF
exit
Serve the webpage outside of your Kubernetes cluster by using a NodePort service:
kubectl expose pod nginx-website \
  --port=80 --target-port=80 \
  --type=NodePort
Get the mapped port for the NGINX pod by using a kubectl get svc command:
kubectl get svc nginx-websiteOutput from the command will show the port that the NodePort service maps to port 80 and through which you can connect to the hosted webpage:
NAME            TYPE       CLUSTER-IP      EXTERNAL-IP   PORT(S)        AGE
nginx-website   NodePort   10.103.107.48   <none>        80:30426/TCP   7s
Use a basic curl command to show the webpage. Replace the IP address in the command with the IP address or hostname of a node in your cluster.
curl -s 192.168.222.141:30426Output will show the contents of your webpage:
<html>
<body>
<p>This is a test webpage, created on Tue Jul 22 20:37:19 UTC 2025.</p>
</body>
</html>
Note the “created on” date and time so that you can refer to it later, to verify a successful restore from the CloudCasa backup that you will create.
Adding your cluster to CloudCasa
After taking preparatory steps in your deployment, you next need to add your cluster to your CloudCasa account.
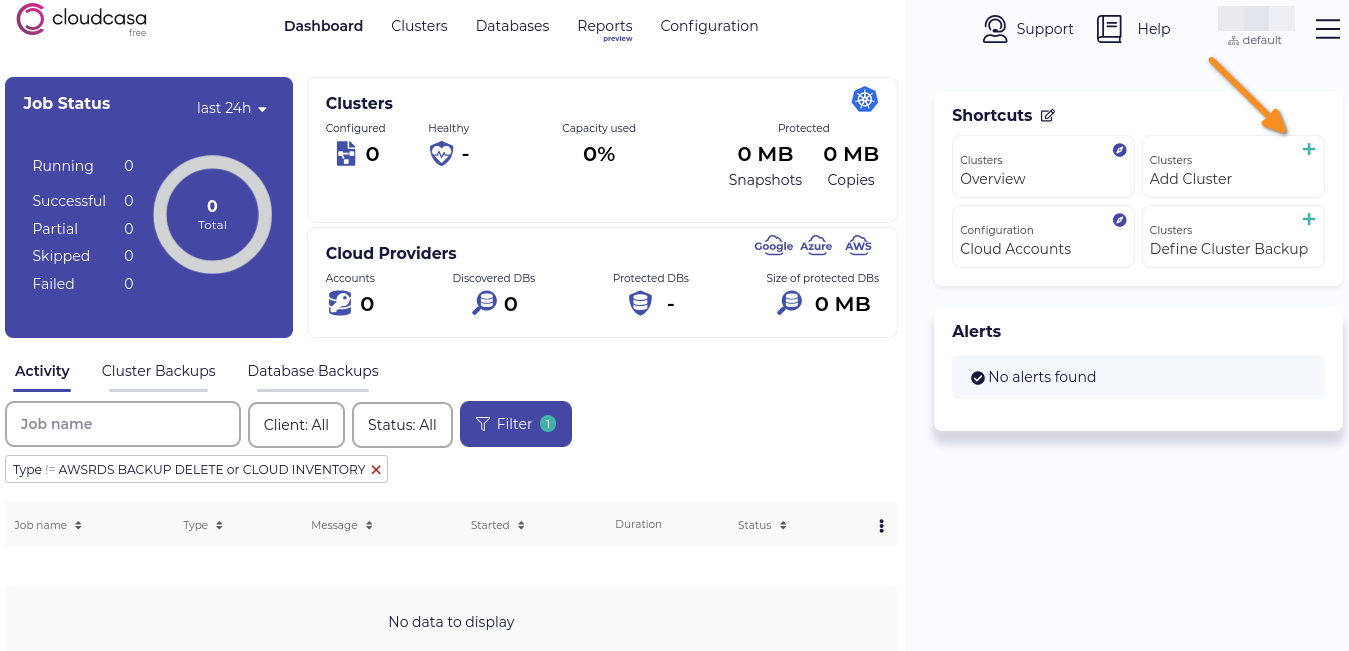
In a web browser, log in to your CloudCasa account. After logging in, you will be redirected to the CloudCasa dashboard screen.
To add your LINSTOR in Kubernetes cluster to your CloudCasa account, click the Add Cluster button.
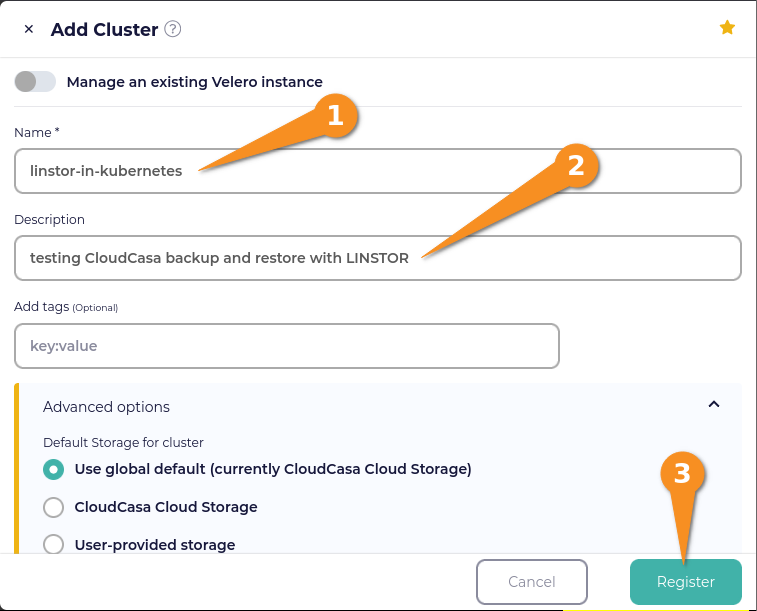
Enter a name for your cluster and an optional description. For testing, I used the default CloudCasa storage option but you can choose a different option under the Advanced Options menu. Click the Register button to register your cluster with your CloudCasa account.
Installing the CloudCasa agent
So that your CloudCasa account can communicate with and start backup and restore actions on your cluster, you need to install a CloudCasa agent in your Kubernetes deployment. After registering your cluster, the CloudCasa dashboard will show an Install Agent window.
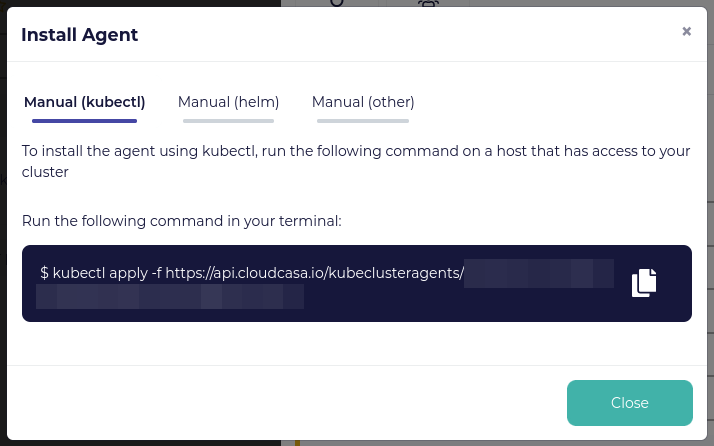
Copy the kubectl command to your clipboard and then paste it into a terminal on a system that can run kubectl commands. Output from the command will show CloudCasa-related assets were created.
namespace/cloudcasa-io created
serviceaccount/cloudcasa-io created
clusterrolebinding.rbac.authorization.k8s.io/cloudcasa-io created
deployment.apps/cloudcasa-kubeagent-manager created
You can wait for pods in the cloudcasa-io namespace to be ready by entering the following command:
kubectl wait pod --for=condition=Ready -n cloudcasa-io --timeout=5m --all && \
  echo "CloudCasa agent deployed and ready!"
In the meantime, you can click the Close button to close the Install Agent window. This will return you to the Edit Cluster window. Click the Save button to save the cluster configuration.
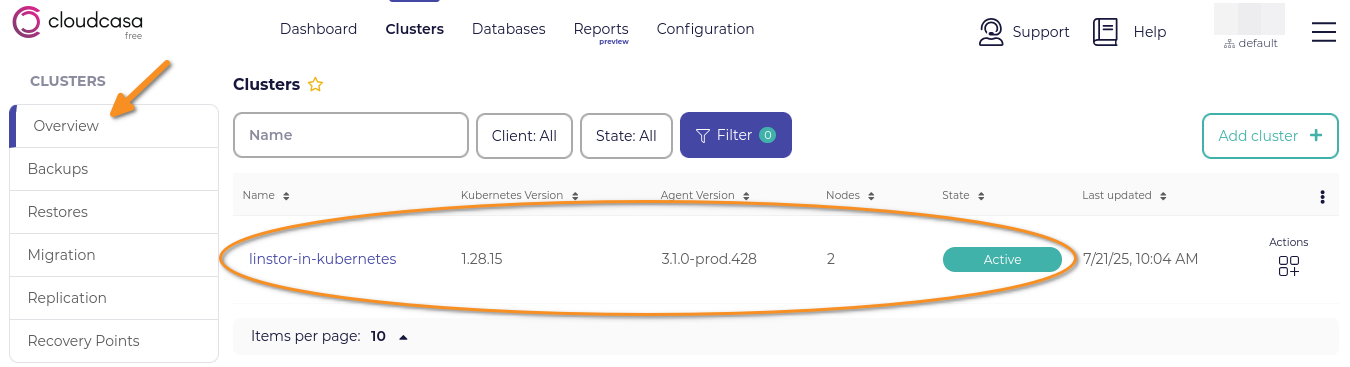
Next, click Clusters to go to the CloudCasa clusters management overview page. This overview page will show your new cluster in an active state.
Creating a CloudCasa backup policy
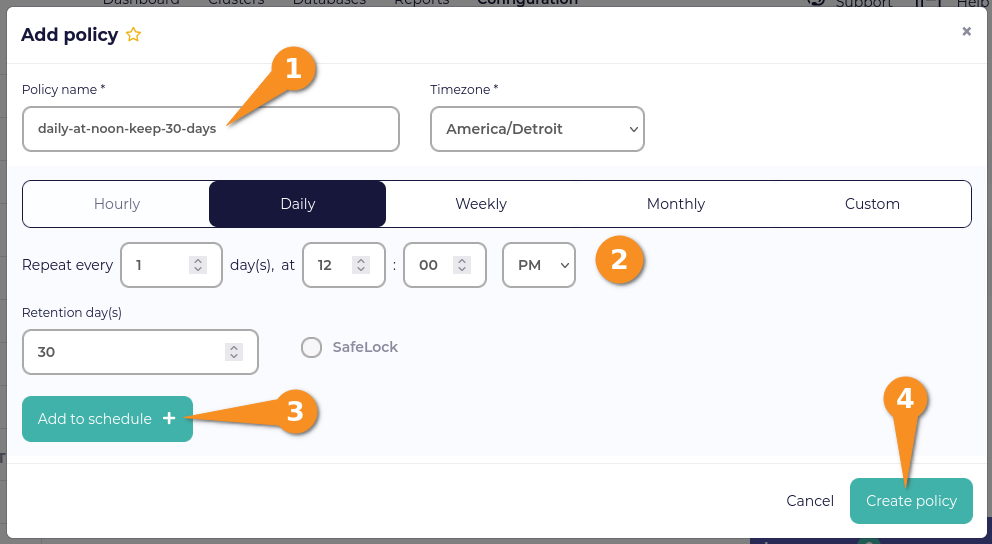
A CloudCasa backup policy defines when a backup that uses the policy will run and for how long backups will be kept. To create a backup policy, first click Configuration, from the CloudCasa dashboard. Next, click the Add policy button. Enter information about your backup policy, click the Add to schedule button, and then click the Create policy button.
Defining a CloudCasa backup
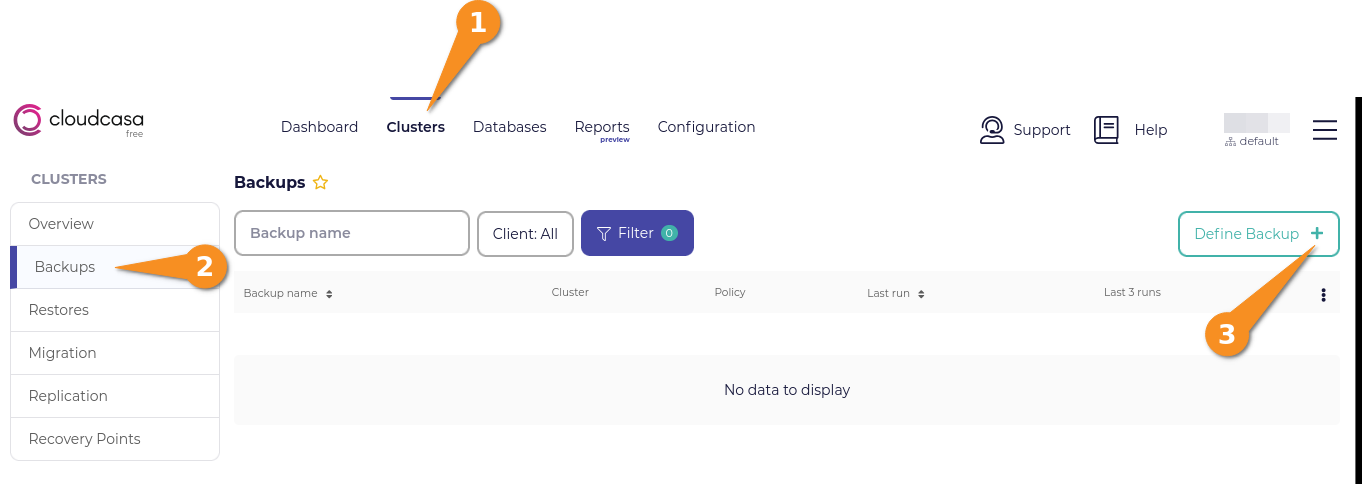
After creating a CloudCasa backup policy, you can define a backup that will use the policy. First, click Clusters from the CloudCasa dashboard, click Backups, and then click the Define Backup button.
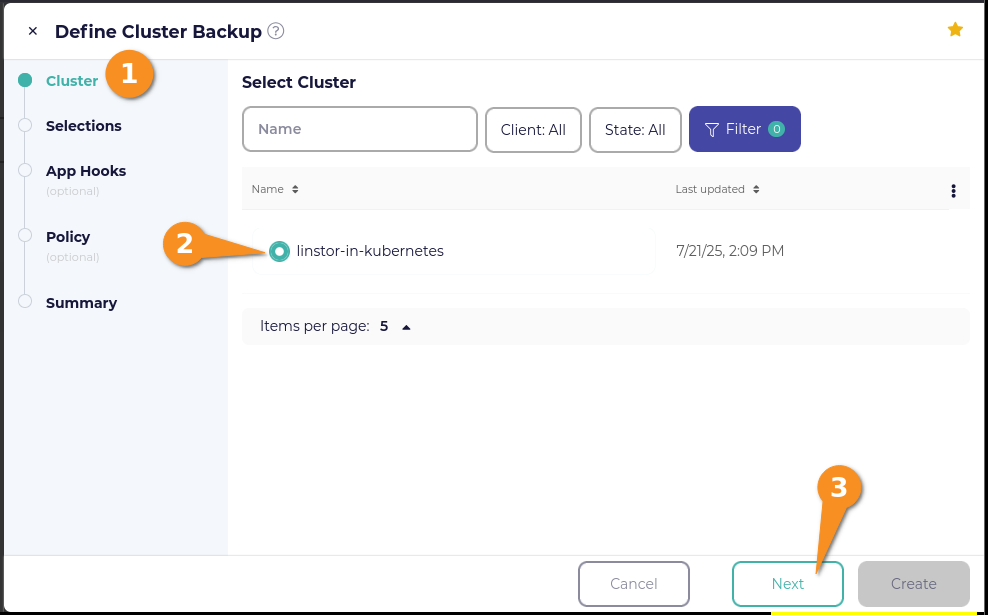
Within the Define Cluster Backup window, click the radio button next to your cluster name, then click the Next button.
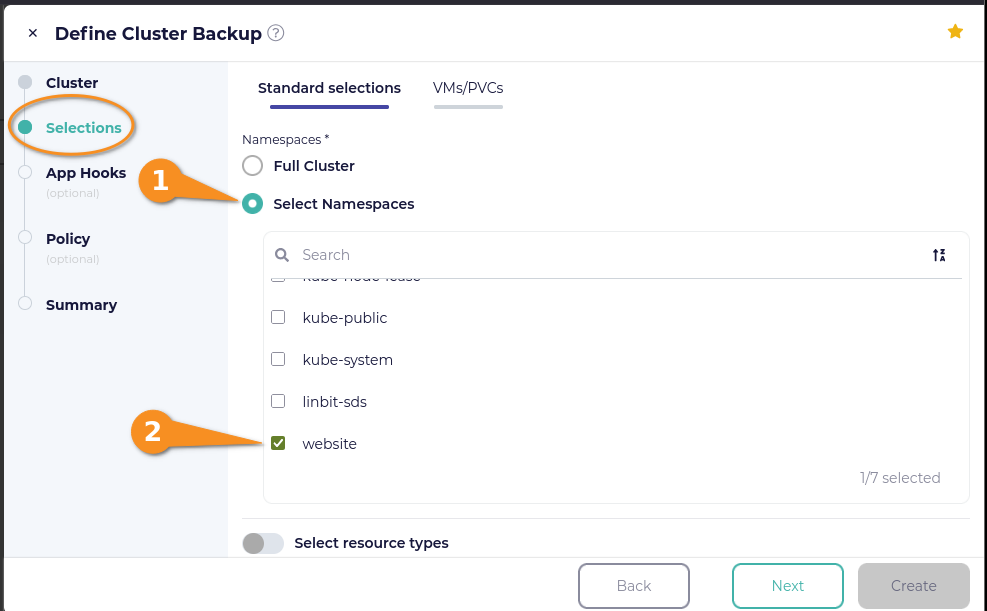
On the Selections page in the Define Cluster Backup window, click the selection box next to Select Namespaces, and then click the checkbox next to the website namespace if you used the example application shown earlier.
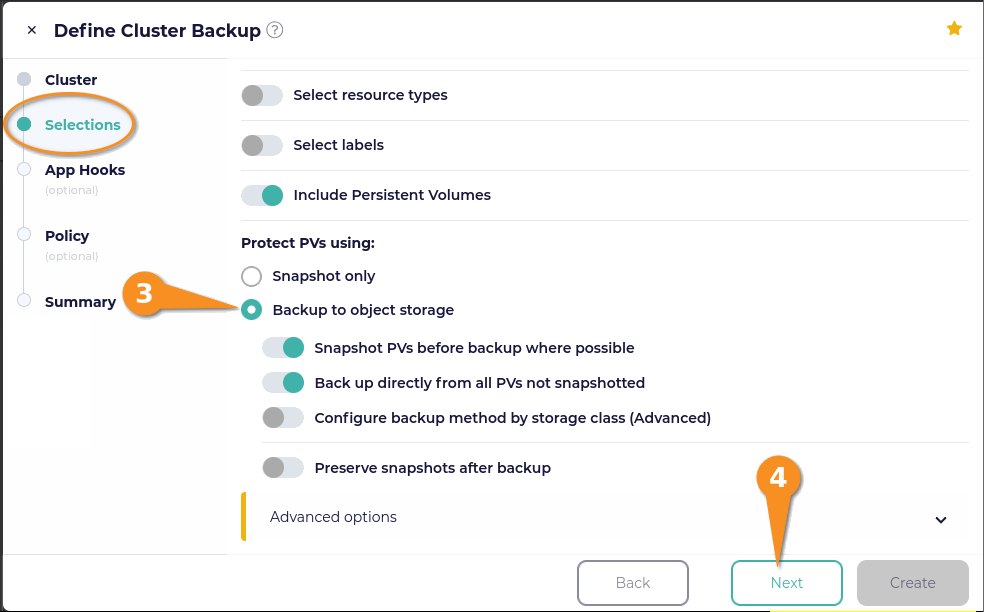
Under the “Protect PVs using” title (scroll down in the window if you need to), you can select “Snapshot only” or “Backup to object storage”. The “Snapshot only” option only creates local snapshots of your persistent volumes. The “Backup to object storage” option is selected by default and was the option that I used. Click the Next button.
To keep things simple, I did not add any application hooks. Click the Next button and then select the policy that you created earlier. Click the Next button again.

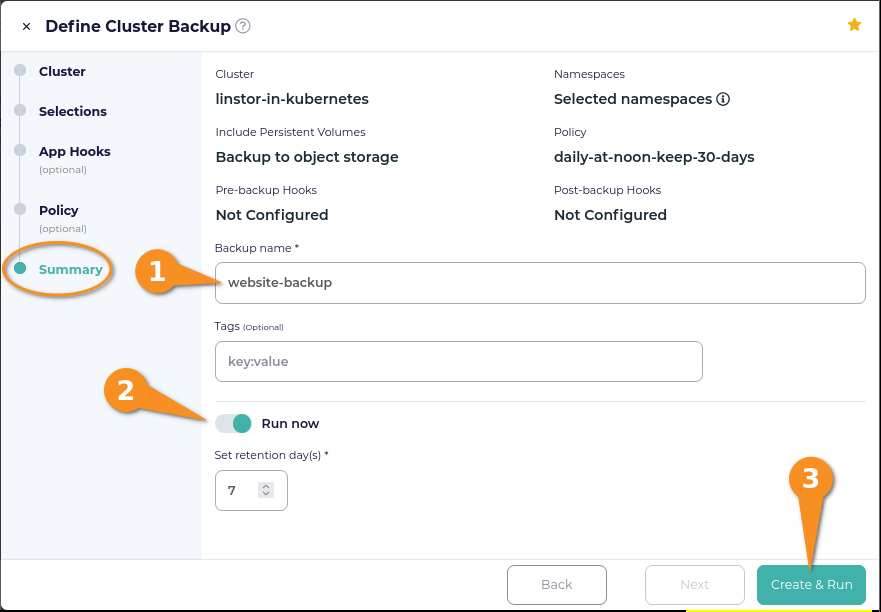
On the Summary page, enter a name for your backup, toggle “Run now” on (to create the defined backup in the moment), and then click the Create & Run button.
Eventually, you will be returned to the CloudCasa Clusters screen. A notification will show that your backup is in progress. Click the notification to get more details about the backup progress.
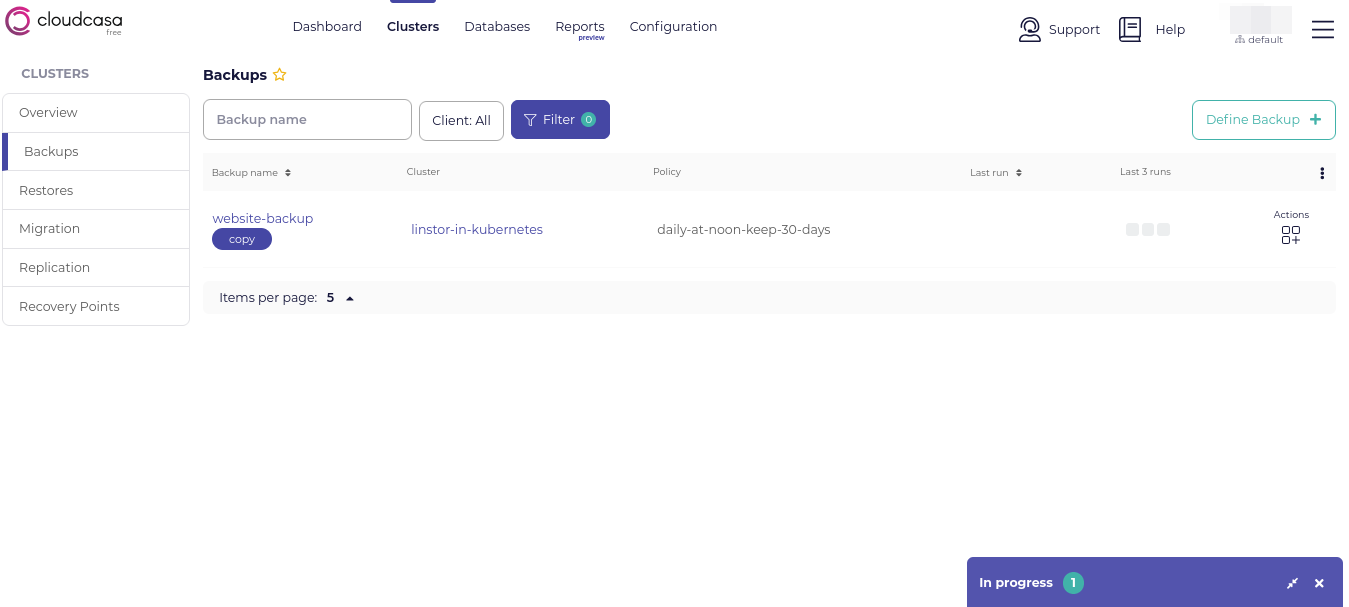
After a while, the backup progress notification in the CloudCasa dashboard will show that there are no running jobs. The backup that you created will appear in the CloudCasa backups list, and it will have a square under the “Last 3 runs” column. Hovering your mouse pointer over the square should show a “COMPLETED” status. This indicates that the backup completed successfully.
Restoring from a CloudCasa backup
Before restoring from your backup, first make some changes to the example webpage. To do this, enter the NGINX pod, create another basic webpage overwriting the webpage that you created earlier, and exit the pod.
kubectl -it exec nginx-website -- /bin/bash
cat <<EOF > /usr/share/nginx/html/index.html
<html>
<body>
<p>This is a test webpage, created on $(date).</p>
</body>
</html>
EOF
exit
Enter another curl command to show the webpage:
curl -s 192.168.222.141:30426<html>
<body>
<p>This is a test webpage, created on Tue Jul 22 21:02:43 UTC 2025.</p>
</body>
</html>Verify that the date and time are different from the webpage that you created earlier.
Using the CloudCasa web UI to restore a backup
Within the CloudCasa web UI, click Clusters from the dashboard and then click Backups. Hover your mouse pointer over Actions, in the last column of the row for the backup you want to restore from to show a menu of actions.
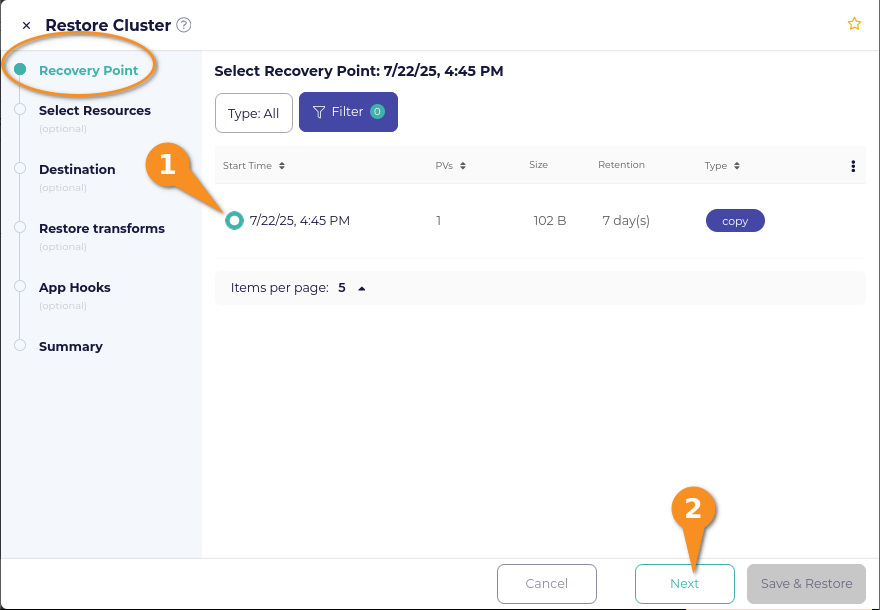
Click Restore and a Restore Cluster window will open. Select the recovery point that you want to restore from and then click the Next button.
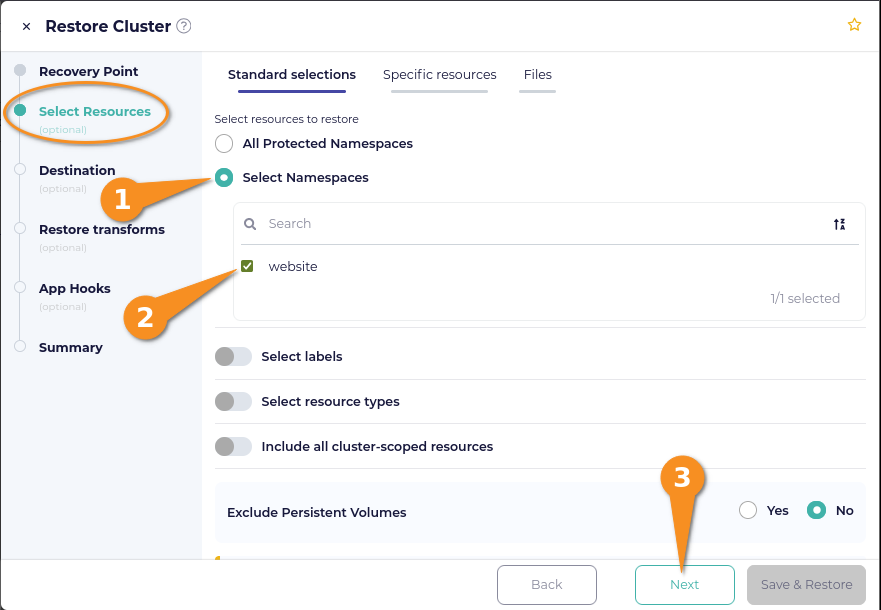
On the Select Resources page within the Restore Cluster window, click the selection circle next to Select Namespaces, then click the selection box next to the namespace you want to restore. Click Next after making your selection.
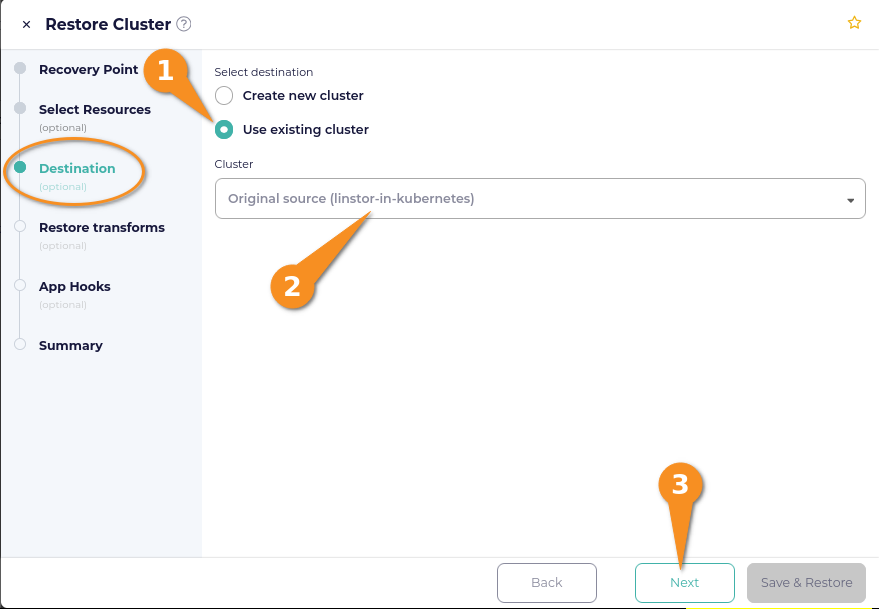
On the Destination page of the Restore Cluster window, select Use existing cluster. If your cluster is in an actively connected state through the CloudCasa agent, your cluster will appear within the selection drop-down menu under Cluster. Click the Next button after selecting your cluster.
On the Restore transforms page of the Restore Cluster window, toggle the Overwrite existing resources switch to on. I also toggled Preserve node ports to on, for convenience, with the expectation that by doing this, I could reference the port created earlier by the NodePort service through which I could reach the webpage. After doing this, rather than clicking the Next button, I clicked on Summary, because I did not have any application hooks to select.
![]()
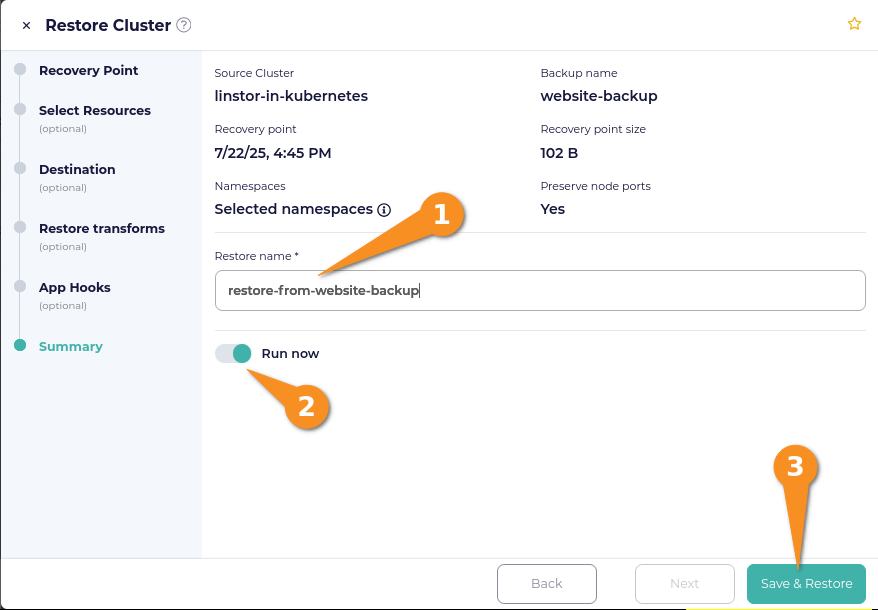
On the Summary page of the Restore Cluster window, enter a name for the restore, toggle the Run now selector to on, and then click the Save & Restore button.
A notification in the CloudCasa web console should show that the restore from backup is in progress. After the restore operation finishes, the Restores page within the Clusters screen of the CloudCasa web console will list the restore that you just created, and show a last run date and time.
Verifying the restore
To verify that the restore from backup was successful, enter another curl command to show the example webpage:
curl -s 192.168.222.141:30426If the restore from backup was successful, output from the curl command will show the webpage with the date and time from the backup:
<html>
<body>
<p>This is a test webpage, created on Tue Jul 22 20:37:19 UTC 2025.</p>
</body>
</html>
Conclusion and next steps
Instructions in this article described how you can integrate CloudCasa with a LINSTOR deployment in Kubernetes, for backing up and restoring data in Kubernetes. While the example use case was intentionally simple to get you started quickly, hopefully it established a comfort level with the software and gives you some ideas for what you might do with it in your own environments.
Using CloudCasa with LINSTOR is a newer experience for the LINBIT team but one that we are excited about. The possible use cases for combining the two solutions seem worthy of future exploration, considering this article only touched on a simple getting started use case.
Keep watching the LINBIT blog for future content related to using the CloudCasa data protection platform with LINSTOR in Kubernetes. Using CloudCasa to facilitate a Kubernetes deployment migration seems an obvious next topic to cover.
In the meantime, to learn more about CloudCasa, feel free to explore the CloudCasa documentation, or the CloudCasa blog. The CloudCasa YouTube channel also has some great informative videos. I also enjoyed this video interview with Catalogic Field CTO, Martin Phan, which has an easy to follow overview of the CloudCasa solution and explores CloudCasa in the context of AKS and Arc-enabled Kubernetes.